In today’s embedded world, it is very common to be creating bootable micro SDs. And then very often replicating them using raw dump of the micro SD (uSD) into an image file, say using dd command. And then creating another bootable uSD by flashing the image file into the uSD, again using dd command.
But what if one wants to create the image file by hand, rather than raw dumping from an existing uSD? Can it be done? Very well yes. And here follows the outline of the steps to follow:
First, create the image file for the appropriate size, say 1GiB:
$ dd if=/dev/zero of=file.img bs=32k count=32k
NB 1GiB has been achieved using 32 Kibi blocks of 32 KiB each, because nowadays 32KiB is quite an optimal block size in Linux.
Now, partition the image, with say 3 partitions (50MiB, 300MiB, remaining), using the GPT partition table type:
$ parted file.img mklabel gpt # Create a GPT partition table
$ parted file.img mkpart primary fat32 1MiB 51MiB # Create a partition for FAT32 fs
$ parted file.img mkpart primary 51MiB 351MiB
$ parted file.img mkpart primary 351MiB 2097151s
NB 2097151 is the last sector number in our image, but the third partition may not be able to extend till there, and the last command above may prompt for an alternative last sector. Accept it with “y”.
NB One may use any other partitioning utility like fdisk, as well.
Use the following commands to see partition details (in MiB & Byte units):
$ parted file.img unit MiB print
$ parted file.img unit B print
Here’s the expected output:

Partition Details using parted
Now, time to create filesystems on our partitions. But they are not visible as block device files. Then, how does one do it? That’s where loop device comes for rescue. Type the following commands to get the corresponding block device files:
$ sudo losetup -o 1MiB --sizelimit 50MiB -f file.img
$ sudo losetup -o 51MiB --sizelimit 300MiB -f file.img
$ sudo losetup -o 351MiB -f --sizelimit 705674752 file.img
NB 705674752 (refer to the print output above) is provided in bytes to be exact for the last partition
The three partitions would typically get available as /dev/loop0, /dev/loop1, /dev/loop2. You may verify using the following command:
$ sudo blockdev --report /dev/loop?
Here’s the expected output:
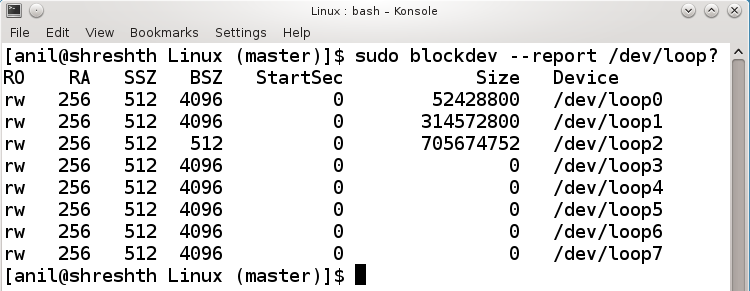
Loop (Block) Device File Details using blockdev
NB If the partition sizes are not multiple of 4096, their block size (BSZ) would reduce to 512.
Now, do all the usual partition operations. For example:
$ sudo mkfs.vfat /dev/loop0
$ sudo mkfs.ext4 /dev/loop1
$ sudo mkfs.ext4 /dev/loop2
Mount the required filesystems & copy the appropriate contents & unmount them. For example, for the first vfat filesystem:
$ sudo mount /dev/loop0 /mnt
$ sudo touch /mnt/om_arham.txt
$ sudo umount /mnt
Once done with content creation for all the filesystems, detach the loop devices:
$ sudo losetup -d /dev/loop2
$ sudo losetup -d /dev/loop1
$ sudo losetup -d /dev/loop0
All done – file.img is the desired uSD image. In fact, one may use the above learnings, to access the contents of an already existing uSD image, without raw dumping or flashing it in a uSD. Go ahead & try it out. And finally, why only an image of a uSD, you may create &/or decode any damn storage image, using just what has been learnt.