Monthly Archives: March 2015

Linux Kernel Module

<< Previous Article

In Linux kernel, drivers can be put in two ways. One is, you make it as a part of kernel and will be part of vmlinux image. Another thing is to build the drivers separately and dynamically plug it into the Kernel. So, the driver which is loaded dynamically into the kernel is known as kernel module. Modules are very handy during the development phase.

Writing a Simple Kernel Module

Before writing a module, you need to understand the kernel C. So, you might be wondering, do I need learn one more language for coding in Kernel? Don’t worry, Kernel C is normal pure C with GNU extensions. Now, what is pure C? It means C without access to any user space libraries such as glibc. Kernel includes all the code as a part of itself. This is the code which kernel developers have developed as a part of kernel and is placed at <kernel_source>/kernel/lib.

One of the beautiful thing about the kernel is that, though its written in C, but it follows the object oriented concepts. This is evident from the very first module which we will try. Below is the simple kernel module:

Simple Kernel Module

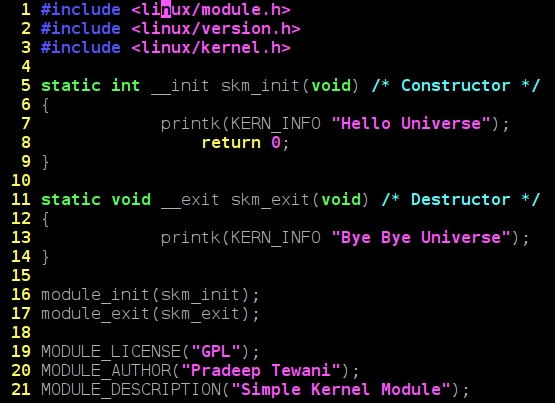
Figure 1: Simple Kernel Module

As can be seen, every module has a constructor and destruction function. skm_init is the constructor and skm_exit is the destructor. Now, as with object oriented programming, constructor is invoked when the the object is instantiated, similarly, over here, constructor is invoked when the module is dynamically loaded into the kernel. So, when will destructor be invoked? Of course, when the module is plugged out of the kernel. Macros module_init() and module_exit() are used to specify the constructor and destructor for a module.

Equivalent of printf() in kernel is printk().

Header file ‘kernel.h’ is kernel space header file which includes the prototype for printk and other commonly used functions. module.h includes the module related data structures and APIs. Macros module_init() and module_exit() are defined here. File version.h contains the kernel version. This is included for the module version to be compatible with kernel into which the module will be loaded.

Apart from this, we have a macros beginning with MODULE_. These specify the module related information and form the module’s signature.

Building a Kernel Module

In order to build a kernel module, you need to have the kernel source code which is usually found at /usr/src/linux. If not kernel source, at least you need the kernel headers. Building a kernel module is different from a building any application. Normally, applications are compiled using the gcc command and by default, gcc picks up the libraries in /usr/lib. But, as discussed earlier, kernel code is a self-contained and doesn’t uses the libraries from the user space. So, we need to give the command line options to gcc to not to take the standard libraries. Not only that, since the module is going to be the hot plugged into the kernel, it has to be compiled with the same flags as the kernel was compiled with. In order to take care of these things, we invoke the kernel makefile to compile our module.

Below is the makefile for compiling the module:

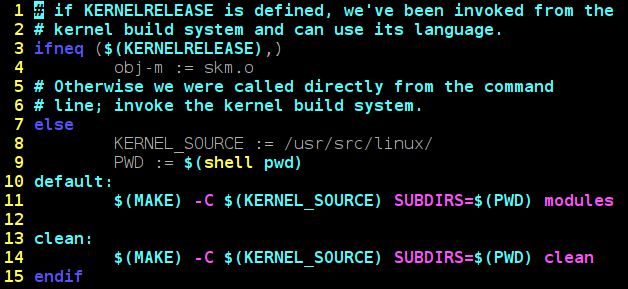
Figure 2: Makefile For Kernel Module

Here, it is assumed that the kernel source is placed at /usr/src/linux/. If it is placed at any other location, update the location in KERNEL_SOURCE variable in this Makefile.

To build the module, invoke make as below:

$ make

The output of the make would be skm.ko.

Dynamically Loading/Unloading a Kernel Module

We use insmod command to load the kernel module as below. We need to execute this command with root privileges

$ insmod skm.ko

In order to list the modules, execute lsmod as below. This will show you the skm loaded.

$ lsmod

And for removing/unloading the module, execute rmmod command as below:

$ rmmod skm

Note that while unloading, we use module name (skm), not the file name (skm.ko).

Conclusion

So, now we are comfortable with writing & building a kernel module. This is the basic building block of the Linux kernel development. In the following articles, we will dive into the Linux Kernel Programming. So, stay tuned!

Next Article >>

   Send article as PDF   

Sensing the Light Around

This 2nd article in the series of “Do It Yourself: Electronics”, starts with the journey of sensors.

<< Previous Article

After attending their regular afternoon classes, Surya & Pugs met near the Innovation Centre, headed towards their hostel rooms.

“What a waste of energy!”, exclaimed Surya pointing out to the street lights glowing on in the bright day.

“Possibly the switch man is not well and couldn’t come to switch off the lights”, said Pugs calming Surya.

“But, why do you need a switch man for switching on and off street lights?”, retorted Surya.

“What do you mean?”, asked Pugs with a puzzled look.

“These could be made automatic – what else?”

“Switch man may be more cost-effective than automating all these street lights.”

“I don’t think so – given that it can be achieved by simple & cheap electronic circuitry.”

“O Really! Then, why don’t we make and give it to the college? And, I can learn a new circuit.”

“Not a bad idea. Let us then first make a working sample.”

With that Pugs followed Surya into his room to watch the design evolve.

“By the way, what kind of circuit would it be?”, asked Pugs curiously.

“Think and you tell me. That is the first part of the design”, replied Surya.

Pugs contemplated a while and said “Something which switches off when sunlight is there.”

“Not bad. In fact, it should also switch on when light is less. And, that’s a light sensing circuit.”

“But how do we sense light electronically?”

“Why only light? A whole lot of stuff around us can be sensed using components called sensors. They come in whole variety, converting one form of energy into an another. And in electronics, we would like to use those that some how translates the energy into voltage. We have light sensors, sound sensors, humidity sensors, … – you name it.”

“Wow! So, then we can automate all kind of things.”

“Yes. That’s the power & beauty of sensors.”

With that, Surya takes out the light dependent resistor (LDR) and various other components needed for designing the light sensing circuit. And, here is how he demonstrated the complete design and working to Pugs:

As soon as Surya was done, Pugs quipped “That was simple. Even I can do it, now.”

“Exactly, that’s what I was telling you”, boosted Surya, dismantling the so built breadboard design.

“Hey, why are you breaking it?”, asked Pugs trying to stop Surya.

“That was simple. And so now you design it”, replied Surya challenging Pugs to redo the design on his own.

Pugs took up the challenge, and started building the circuit. He used the following two pointers from the notes taken by him during Surya’s demo:

LDR Circuit

LDR Circuit

741 OpAmp Pinout

741 OpAmp Pinout

He took some time but was able to build a similar circuit. However, to his surprise, it was not working. He tried tightening the ICs, shaking the wires – but no luck. Not wanting to give up his first circuit design challenge, he said “Hey Surya, I feel that circuit connections are okay, but something else is wrong. In programming, if we are not getting output, we can debug our program by putting prints. Is there something like that, I can do here as well?”

Surya gave a naughty smile understanding Pugs’ intention of not giving up, and poked “So, do you want me to debug it for you?”

“No-no. You just tell me the techniques of debugging. I’ll do it myself”, retorted Pugs.

“Okay then. Let me give you a quick debugging demo of possibilities” – and here’s what Surya showed to Pugs:

With that, Pugs was literally able to debug his circuit, and get the LED switch on when light is there and switch off when light is covered. “Aha! that’s not quite right. The logic is inverted”, exclaimed Pugs. At this, Surya couldn’t control himself, and quipped, “Yes. That’s because you have swapped the -ve and +ve connections of the Opamp.”

With that, Pugs reversed the connections and viola – everything was working right.

Super excited with the light sensing gyan from Surya, Pugs went to the local market to purchase the various components to build his own circuits. He purchased all the stuff shown to him by Surya till now, and then called up Surya asking what else shall he purchase, may be for his next circuit experiment. Surya suggested him to get an infra red transmit LED, an infra red receive diode, and four BC546 transistors.

Next Article >>

   Send article as PDF