This 15th article in the series of “Do It Yourself: Electronics”, demonstrates accessing the real time clock (RTC) chip DS1307 over the I2C protocol using the AVR micro-controller ATmega16.
Equipped with I2C implementation for AVR’s ATmega16 (in the previous article), it was time to connect an I2C device to try out the protocol. Pugs decided to use the RTC chip DS1307, and then read & write the real time from it. While going through DS1307 datasheet to put it on the breadboard to connect with ATmega16, Pugs realized that he would need a 32768Hz crystal, apart from powering the RTC chip. So while purchasing the DS1307 chip, he also got the crystal.
Once ready with all the components, here is how Pugs added the RTC circuit to his existing ATmega16 programming circuit, he has been using for all his experiments till now (aka in his previous articles):
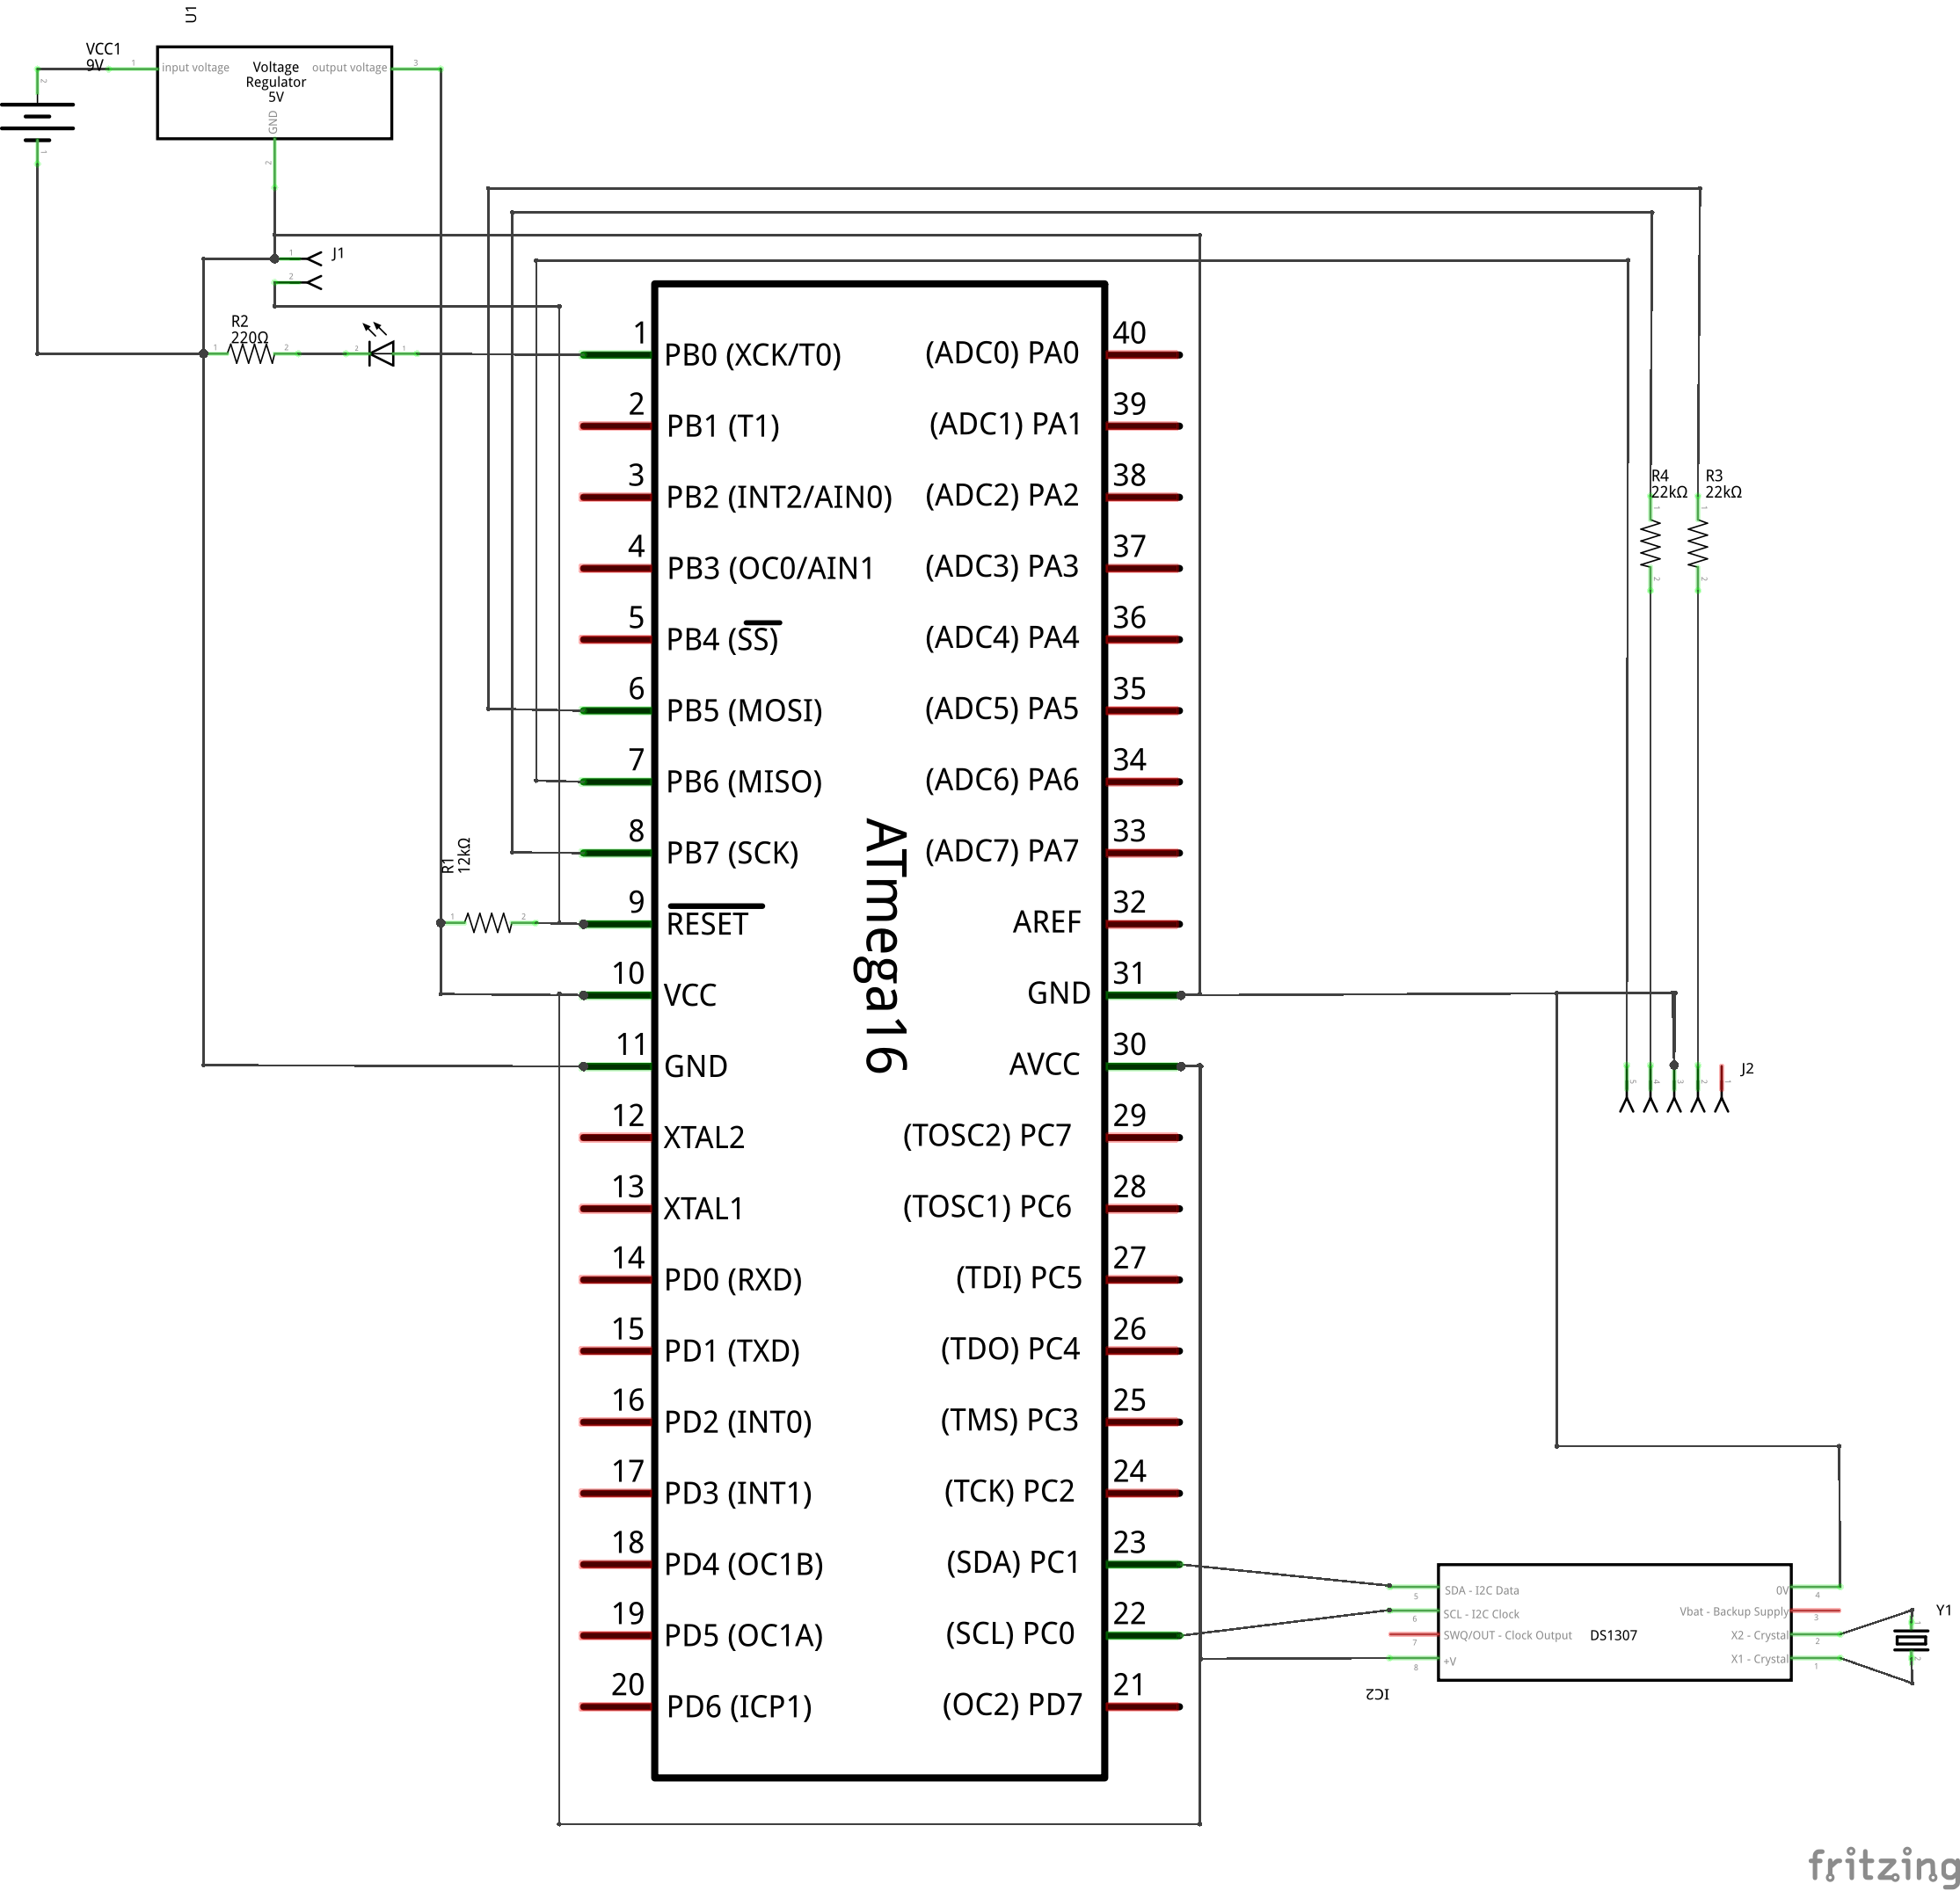
AVR RTC Interfacing Schematic
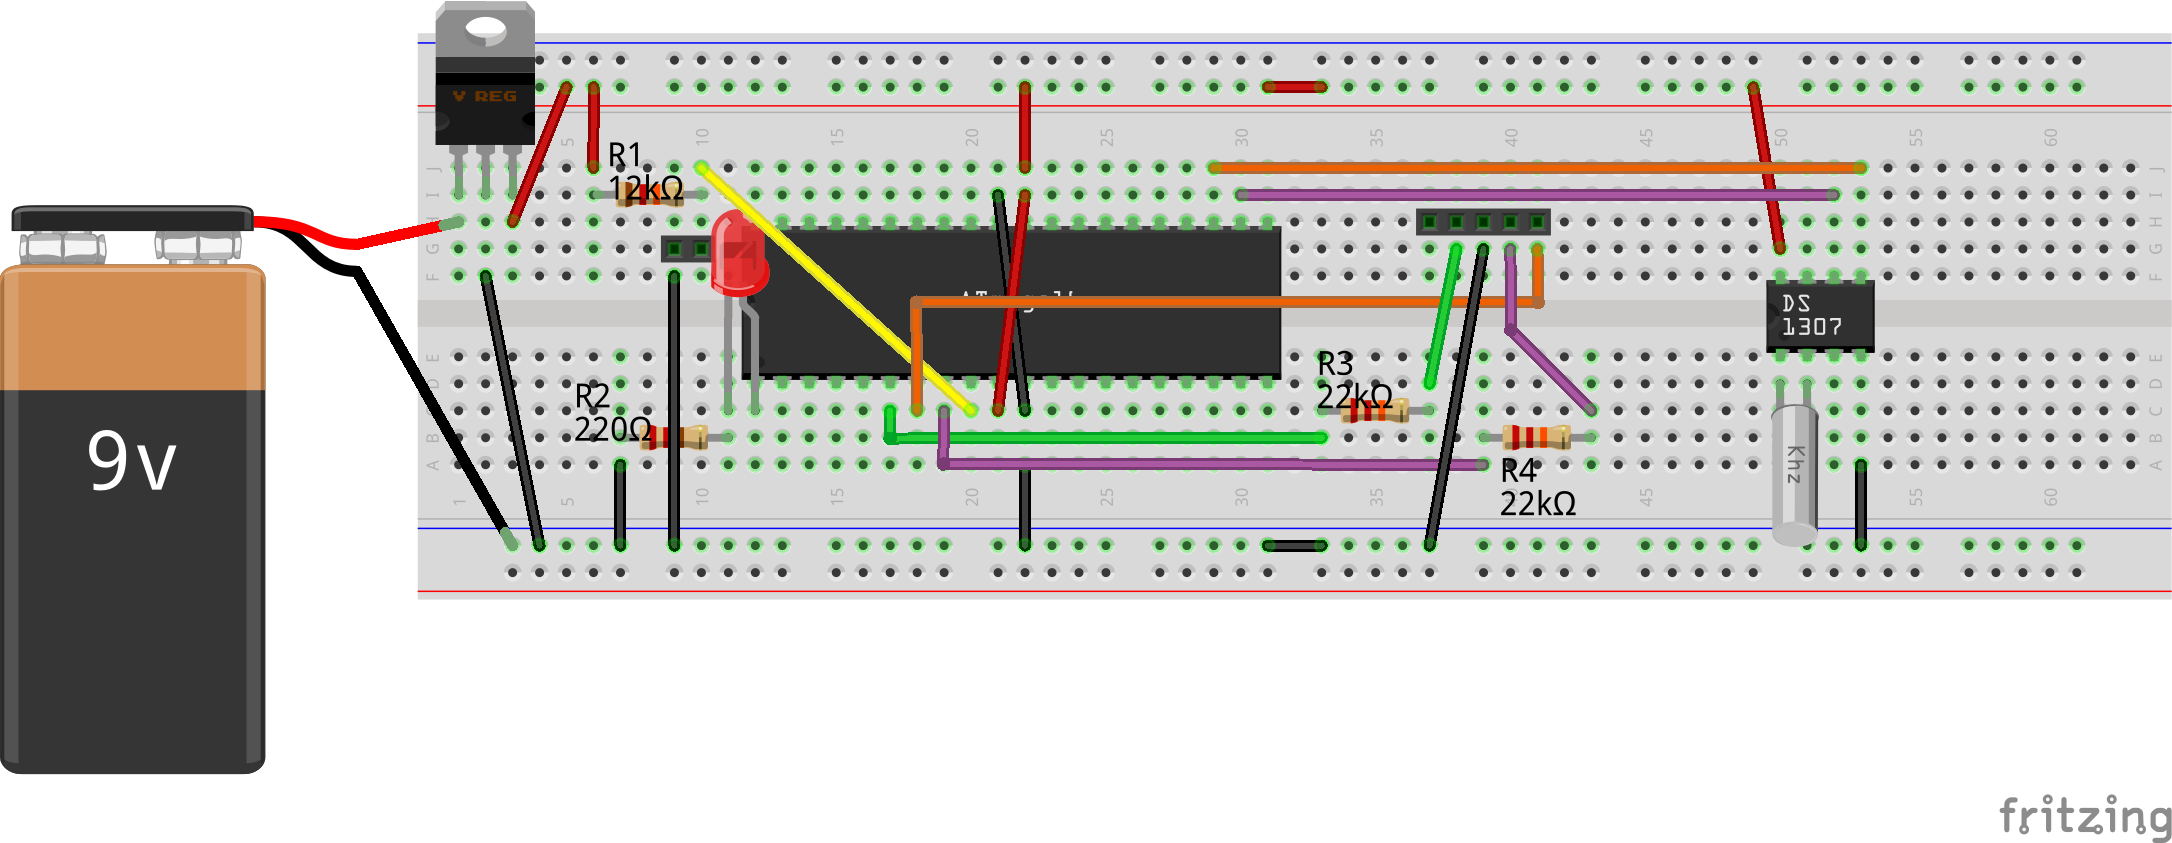
AVR RTC Interfacing Bread Board Connections
And from the DS1307 datasheet pg 7, Pugs figured out that it is the chip’s first 7 registers (for second, minute, hour, day, date, month, year in binary coded decimal (BCD) format), which need to be read or written for reading or writing the real time from the chip. Also, that the RTC operates only in standard I2C mode (pg 10) and the 7-bit slave address of the RTC is 0b1101000 (pg 12). And accordingly, he prototyped the RTC logic in rtc.h and programmed them in rtc.c.
Header rtc.h is as follows:
#ifndef RTC_H
#define RTC_H

void rtc_init(void);
int rtc_set(uint8_t y, uint8_t mo, uint8_t d, uint8_t dy, uint8_t h, uint8_t m,
		uint8_t s);
int rtc_get(uint8_t *is_halted, uint8_t *y, uint8_t *mo, uint8_t *d, uint8_t *dy,
		uint8_t *h, uint8_t *m, uint8_t *s);
int rtc_get_str(uint8_t *is_halted, char date_str[15], char time_str[9]);

#endif
And the complete implementation of rtc.c goes here (Note the usage of TWI APIs implemented in the previous article):
#include <avr/io.h>

#include "twi.h"
#include "rtc.h"

#define RTC_DEV_ADDR 0b1101000

void rtc_init(void)
{
	twi_init(standard);
}

int rtc_set(uint8_t y, uint8_t mo, uint8_t d, uint8_t dy, uint8_t h, uint8_t m,
		uint8_t s)
{
	uint8_t rtc_data[8] = { /* RTC Registers' start address */ 0x00, };
	uint8_t *rtc_reg = rtc_data + 1;

	/* RTC Registers */
	rtc_reg[0] = ((s / 10) << 4) | (s % 10); /* seconds in BCD */
	rtc_reg[1] = ((m / 10) << 4) | (m % 10); /* minutes in BCD */
	rtc_reg[2] = ((h / 10) << 4) | (h % 10); /* hours in BCD */
	rtc_reg[3] = dy; /* day in BCD : 7 for Saturday */
	rtc_reg[4] = ((d / 10) << 4) | (d % 10); /* date in BCD */
	rtc_reg[5] = ((mo / 10) << 4) | (mo % 10); /* month in BCD */
	rtc_reg[6] = ((y / 10) << 4) | (y % 10); /* year in BCD */

	return twi_master_tx(RTC_DEV_ADDR, rtc_data, sizeof(rtc_data));
}

int rtc_get(uint8_t *is_halted, uint8_t *y, uint8_t *mo, uint8_t *d, uint8_t *dy,
		uint8_t *h, uint8_t *m, uint8_t *s)
{
	int ret;
	uint8_t rtc_data = 0x00; /* RTC Registers' start address */
	uint8_t rtc_reg[7];

	if ((ret = twi_master_tx_rx(RTC_DEV_ADDR, &rtc_data, 1, rtc_reg, 7)) == 0)
	{
		*is_halted = rtc_reg[0] >> 7;
		/* seconds from BCD */
		*s = 10 * ((rtc_reg[0] >> 4) & 0x7) + (rtc_reg[0] & 0xF);
		/* minutes from BCD */
		*m = 10 * (rtc_reg[1] >> 4) + (rtc_reg[1] & 0xF);
		/* hours from BCD */
		*h = 10 * (rtc_reg[2] >> 4) + (rtc_reg[2] & 0xF);
		/* day from BCD : 7 for Saturday */
		*dy = rtc_reg[3];
		/* date from BCD */
		*d = 10 * (rtc_reg[4] >> 4) + (rtc_reg[4] & 0xF);
		/* month from BCD */
		*mo = 10 * (rtc_reg[5] >> 4) + (rtc_reg[5] & 0xF);
		/* year from BCD */
		*y = 10 * (rtc_reg[6] >> 4) + (rtc_reg[6] & 0xF);
	}
	return ret;
}

int rtc_get_str(uint8_t *is_halted, char date_str[15], char time_str[9])
/* Format Example: date_str[] = "01.06.2075 Sat"; time_str[] = "03:07:00"; */
{
	int ret;
	uint8_t rtc_data = 0x00; /* RTC Registers' start address */
	uint8_t rtc_reg[7];
	uint8_t day;
	char *day_str[] = { "", "Sun", "Mon", "Tue", "Wed", "Thu", "Fri", "Sat" };

	if ((ret = twi_master_tx_rx(RTC_DEV_ADDR, &rtc_data, 1, rtc_reg, 7)) == 0)
	{
		*is_halted = rtc_reg[0] >> 7;
		date_str[0] = '0' + (rtc_reg[4] >> 4);
		date_str[1] = '0' + (rtc_reg[4] & 0xF);
		time_str[2] = '.';
		date_str[3] = '0' + (rtc_reg[5] >> 4);
		date_str[4] = '0' + (rtc_reg[5] & 0xF);
		time_str[5] = '.';
		time_str[6] = '2';
		time_str[7] = '0';
		date_str[8] = '0' + (rtc_reg[6] >> 4);
		date_str[9] = '0' + (rtc_reg[6] & 0xF);
		time_str[10] = ' ';

		day = rtc_reg[3] & 0xF;
		date_str[11] = day_str[day][0];
		date_str[12] = day_str[day][1];
		date_str[13] = day_str[day][2];
		date_str[14] = 0;

		time_str[0] = '0' + (rtc_reg[2] >> 4);
		time_str[1] = '0' + (rtc_reg[2] & 0xF);
		time_str[2] = ':';
		time_str[3] = '0' + (rtc_reg[1] >> 4);
		time_str[4] = '0' + (rtc_reg[1] & 0xF);
		time_str[5] = ':';
		time_str[6] = '0' + ((rtc_reg[0] >> 4) & 0x7);
		time_str[7] = '0' + (rtc_reg[0] & 0xF);
		time_str[8] = 0;
	}
	return ret;
}
With all code set to read and write the RTC, Pugs needed some application code to call these. That’s where he implemented the following rtc_serial.c to operate on the RTC using serial interface. Yes, the same serial interface, he had setup in the previous articles, using the TTL to USB converter. Note the usage of serial APIs implemented in the previous USART article, and used in the previous debugging article, with modified serial.c.
#include <avr/io.h>
#include <util/delay.h>

#include "rtc.h"
#include "serial.h"

char date[] = "01.06.2075 Sat";
char time[] = "03:07:00";

int main(void)
{
	uint8_t is_halted;

	rtc_init();
	usart_init(9600);

	/* Initialize the clock to 2075.June.1st Sat 03:07:00 */
	if (rtc_set(75, 6, 1, 7, 3, 7, 0) == 0)
	{
		usart_tx(date);
		usart_byte_tx(' ');
		usart_tx(time);
	}
	else
	{
		usart_tx("RTC set failed. Halting ... ");
		while (1);
	}
	usart_byte_tx('\n');

	while (1)
	{
		if (rtc_get_str(&is_halted, date, time) == 0)
		{
			usart_tx(date);
			usart_byte_tx(' ');
			usart_tx(time);
		}
		else
			usart_tx("RTC read failed");
		usart_byte_tx('\n');
		_delay_ms(5000);
	}

	return 0;
}
Then, Pugs compiled all the programs together as follows (Note the value of F_CPU defined as 8MHz unlike earlier cases):
$ avr-gcc -mmcu=atmega16 -DF_CPU=8000000 -Os rtc_serial.c rtc.c twi.c serial.c -o
rtc_serial.elf
$ avr-objcopy -O ihex rtc_serial.elf rtc_serial.hex
And finally, downloaded the rtc_serial.hex into the ATmega16 with J1 shorted (same as in the previous articles), using the following command:
$ avrdude -c ponyser -P /dev/ttyUSB0 -p m16 -U flash:w:rtc_serial.hex:i
Pugs then connected the USB to TTL converter to his laptop on the USB side, and the RX, TX, GND pins of the USB to TTL converter to the TXD, RXD, GND pins of the micro-controller. And started the serial application minicom as root on his laptop as follows (same as in the previous articles):
# minicom -D /dev/ttyUSB1 -b 9600 -o
Note that Pugs’ TTL to USB connector shows up as /dev/ttyUSB1 on his laptop. In case, yours is different, use that instead. But what’s this, even after removing the jumper J1, no output on the minicom – seems like it is stuck. Aha! suddenly, it clicked to Pugs that he has missed something important, which was decided during the TWI implementation (in the previous article). Yes, the fuse settings of the ATmega16 to be changed for it to operate at 8MHz. So, that’s what exactly he did next.
As per the ATmega16 datasheet pg 260-261 & pg 29, the low fuse byte needs to be updated to 0xE4 from 0xE1, for it to operate at 8MHz clock. Hence, Pugs issued the following avrdude command with J1 shorted:
$ avrdude -c ponyser -P /dev/ttyUSB0 -p m16 -U lfuse:w:0xE4:m
And yes, this time after removing the short of jumper J1, he started getting the date & time displayed every 5 seconds from 2075. And, to quit from minicom, Pugs typed Ctrl-A Q.
The author is a hobbyist in open source hardware and software, with a passion for mathematics, and philosopher in thoughts. A gold medallist from the Indian Institute of Science, Linux, mathematics and knowledge sharing are few of his passions. He experiments with Linux and embedded systems to share his learnings through his weekend workshops. Learn more about him and his experiments at https://sysplay.in.


Pingback: Programming the I2C protocol | Playing with Systems
Pingback: Micro-controller based Sine Wave Generator | Playing with Systems