Bench Calculator to Program Mathematics

This third article of the mathematical journey through open source, takes you through the functional power of bench calculator.

<< Second Article

After going through the basic programming on bench calculator, here’s the time to explore its functional power. As mentioned earlier, we can do functions in bench calculator. Unlike C, it has built-in functions, though the standard math functions and the user-defined functions are similar to as in C.

Built-in Functions

Complete list of bc‘s built-in functions is:

  • length(expr) – returns the number of significant digits in expr
  • read() – reads a number from standard input in the base dictated by the ibase variable
  • scale(expr) – returns the number of digits after the decimal point in expr
  • sqrt(expr) – returns the positive square root of expr, given that expr is non-negative

Here’s a sample execution of the above functions:

$ bc -ql
length(000023.450) # Number of significant digits
5
scale(000023.450) # Number of digits after the decimal
3
sqrt(2) # Square root of 2
1.41421356237309504880
sqrt(-1) # Square root of -1 is an error
Runtime error (func=(main), adr=4): Square root of a negative number
ibase=2 # Changing the input base to 2
x=read() # Wait to read the input in binary and then display
1100 # This is the input
x # Display the read value in the default output base 10
12
quit # Get out
$

Is that the complete list of built-in functions? But no talk of the previously used print. The reason is that print is not a function – didn’t you notice the missing () with print. print is actually a statement in bc, like if, for, … and the syntax of print is: print <list>, where <list> is a comma separated list of strings and expressions

If you have not yet got the hang of this word expression, it is a statement of numbers and variables operated with the various operators and functions.

Standard Math Functions

When bc is invoked with -l option, the math library gets loaded along with. And the following 6 math functions, also get available to use:

  • s(x) – returns sine of x, x is radians
  • c(x) – returns cosine of x, x is radians
  • a(x) – returns arctangent (in radians) of x
  • l(x) – returns the natural logarithm (base e) of x
  • e(x) – returns the value of e raised to the power of x
  • j(n, x) – Bessel function of integer order n of x

All these functions operate with the scale dictated by the built-in variable scale. By default, scale is set to 20. Here’s a sample execution:

$ bc -ql
scale # Show the current scale
20
pi=4*a(1) # Calculate pi as tan-1(1) is pi / 4
pi # Show the value approx. to 20 decimals
3.14159265358979323844
s(pi/3) # Calculate sine of 60° - should sqrt(3)/2
.86602540378443864675
sqrt(3)/2 # value for comparison – note the approx. error
.86602540378443864676
c(pi/3) # Calculate sine of 60° - should be 0.5
.50000000000000000001
l(1) # log(1)
0
e(1) # Value of e1 approx. to 20 decimals
2.71828182845904523536
quit # Get out
$

This all sounds too geeky and mathematical – all going over the head. Okay, let’s forget about that and do some simple stuff. Let’s write our own simple functions – yes user-defined functions.

User-defined functions

Here is how we write a user-defined function (to add two numbers) in bc:

$ bc -ql
define add(x, y) {
	return (x + y)
}
add(3, add(4, 5)) # Lets add 3 with the sum of 4 & 5
12
quit # Get out
$

Given that, the factorial code from our previous learnings can be converted into a function as follows (say in functions.bc):

define factorial(n) {
	product = 1
	for (current_num = 1; current_num <= n; current_num += 1)
	{
		product *= current_num
	}
	return product
}

And then, we can use that function as follows:

$ bc -ql functions.bc # Load the functions while invoking bc
factorial(10) # Compute the factorial of 10
3628800
quit # Get out
$

As now, we have factorial, we can even calculate the series of e, i.e. 1 + 1/1! + 1/2! + …, say upto 1/20! for a good enough approximation. Here’s how it would go

$ bc -ql functions.bc # Load the functions while invoking bc
exp=1
for (i = 1; i <= 20; i++)
{
	exp += (1/factorial(i))
}
exp # Display the computed value of e
2.71828182845904523525
e(1) # Compare with the standard math function
2.71828182845904523536
quit # Get out
$

And as in C, if we need a function only to do actions and not return anything, void is the way.

$ bc -ql
define void designer_print(v) {
	print "---{", v, "}---"
}
designer_print(100) # Print 100 with the designs
---{100}---
quit # Get out
$

With all these fundamentals of functions in bc, next we would dive into its recursive functional power.
Fourth Article >>

   Send article as PDF   

Writing your First Linux driver in the Classroom

This second article, which is part of the series on Linux device drivers, deals with the concept of dynamically loading drivers, first writing a Linux driver, before building and then loading it.

<< First Article

As Shweta and Pugs reached their classroom, they were already late. Their professor was already in there. They looked at each other and Shweta sheepishly asked, “May we come in, sir”. “C’mon!!! you guys are late again”, called out professor Gopi. “And what is your excuse, today?”. “Sir, we were discussing your topic only. I was explaining her about device drivers in Linux”, was a hurried reply from Pugs. “Good one!! So, then explain me about dynamic loading in Linux. You get it right and you two are excused”, professor emphasized. Pugs was more than happy. And he very well knew, how to make his professor happy – criticize Windows. So, this is what he said.

As we know, a typical driver installation on Windows needs a reboot for it to get activated. That is really not acceptable, if we need to do it, say on a server. That’s where Linux wins the race. In Linux, we can load (/ install) or unload (/ uninstall) a driver on the fly. And it is active for use instantly after load. Also, it is disabled with unload, instantly. This is referred as dynamic loading & unloading of drivers in Linux.

As expected he impressed the professor. “Okay! take your seats. But make sure you are not late again”. With this, the professor continued to the class, “So, as you now already know, what is dynamic loading & unloading of drivers into & out of (Linux) kernel. I shall teach you how to do it. And then, we would get into writing our first Linux driver today”.

Dynamically loading drivers

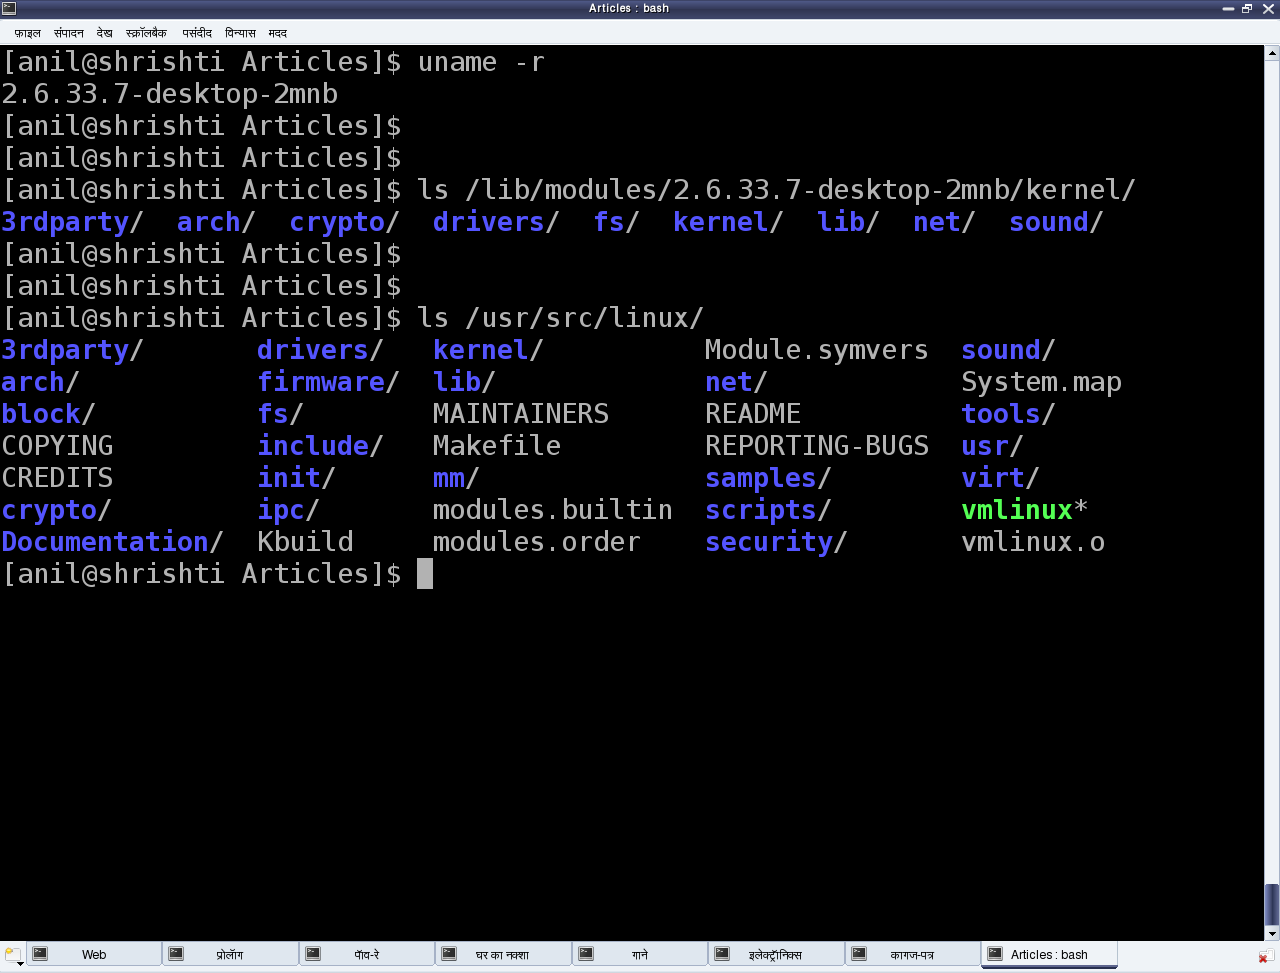
These dynamically loadable drivers are more commonly referred as modules and built into individual files with .ko (kernel object) extension. Every Linux system has a standard place under the root file system (/) for all the pre-built modules. They are organized similar to the kernel source tree structure under /lib/modules/<kernel_version>/kernel, where <kernel_version> would be the output of the command “uname -r” on the system. Professor demonstrates to the class as shown in Figure 4.

Figure 4: Linux pre-built modules

Figure 4: Linux pre-built modules

Now, let us take one of the pre-built modules and understand the various operations with it.

Here’s a list of the various (shell) commands relevant to the dynamic operations:

  • lsmod – List the currently loaded modules
  • insmod <module_file> – Insert/Load the module specified by <module_file>
  • modprobe <module> – Insert/Load the <module> along with its dependencies
  • rmmod <module> – Remove/Unload the <module>

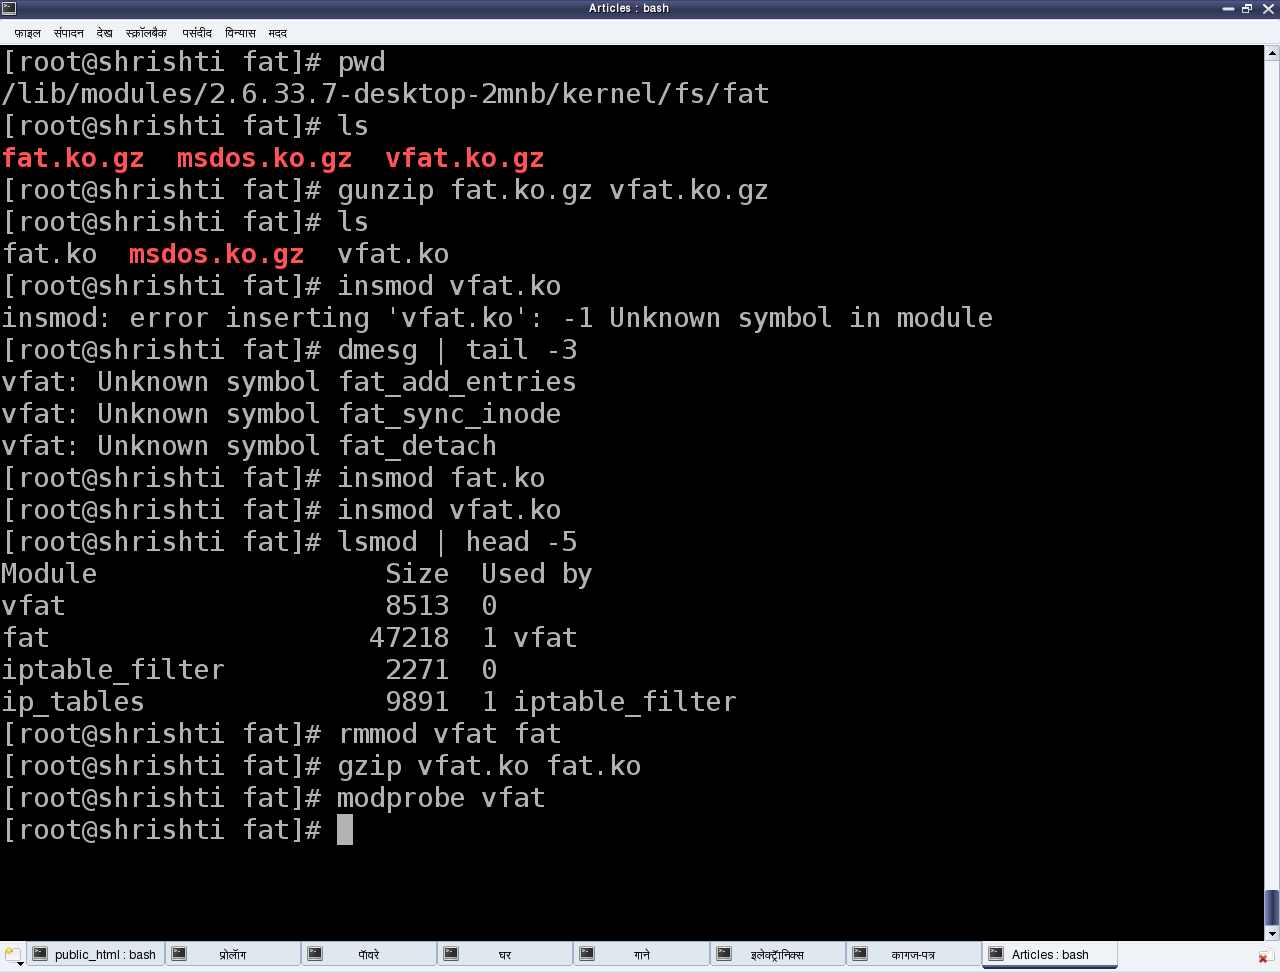
These reside under the /sbin directory and are to be executed with root privileges. Let us take the FAT file system related drivers for our experimentation. The various module files would be fat.ko, vfat.ko, etc. under directories fat (& vfat for older kernels) under /lib/modules/`uname -r`/kernel/fs. In case, they are in compressed .gz format, they need to be uncompressed using gunzip, for using with insmod. vfat module depends on fat module. So, fat.ko needs to be loaded before vfat.ko. To do all these steps (decompression & dependency loading) automatically, modprobe can be used instead. Observe that there is no .ko for the module name to modprobe. rmmod is used to unload the modules. Figure 5 demonstrates this complete experimentation.

Figure 5: Linux module operations

Figure 5: Linux module operations

Our first Linux driver

With that understood, now let’s write our first driver. Yes, just before that, some concepts to be set right. A driver never runs by itself. It is similar to a library that gets loaded for its functions to be invoked by the “running” applications. And hence, though written in C, it lacks the main() function. Moreover, it would get loaded / linked with the kernel. Hence, it needs to be compiled in similar ways as the kernel. Even the header files to be used can be picked only from the kernel sources, not from the standard /usr/include.

One interesting fact about the kernel is that it is an object oriented implementation in C. And it is so profound that we would observe the same even with our first driver. Any Linux driver consists of a constructor and a destructor. The constructor of a module gets called whenever insmod succeeds in loading the module into the kernel. And the destructor of the module gets called whenever rmmod succeeds in unloading the module out of the kernel. These two are like normal functions in the driver, except that they are specified as the init & exit functions, respectively by the macros module_init() & module_exit() included through the kernel header module.h

/* ofd.c – Our First Driver code */

#include <linux/module.h>
#include <linux/version.h>
#include <linux/kernel.h>

static int __init ofd_init(void) /* Constructor */
{
	printk(KERN_INFO "Namaskar: ofd registered");

	return 0;
}

static void __exit ofd_exit(void) /* Destructor */
{
	printk(KERN_INFO "Alvida: ofd unregistered");
}

module_init(ofd_init);
module_exit(ofd_exit);

MODULE_LICENSE("GPL");
MODULE_AUTHOR("Anil Kumar Pugalia <email@sarika-pugs.com>");
MODULE_DESCRIPTION("Our First Driver");

Above is the complete code for our first driver, say ofd.c. Note that there is no stdio.h (a user space header), instead an analogous kernel.h (a kernel space header). printk() being the printf() analogous. Additionally, version.h is included for version compatibility of the module with the kernel into which it is going to get loaded. Also, the MODULE_* macros populate the module related information, which acts like the module’s signature.

Building our first Linux driver

Once we have the C code, it is time to compile it and create the module file ofd.ko. And for that we need to build it in the similar way, as the kernel. So, we shall use the kernel build system to do the same. Here follows our first driver’s Makefile, which would invoke the kernel’s build system from the kernel source. The kernel’s Makefile would in turn invoke our first driver’s Makefile to build our first driver. The kernel source is assumed to be installed at /usr/src/linux. In case of it to be at any other location, the KERNEL_SOURCE variable has to be appropriately updated.

# Makefile – makefile of our first driver

# if KERNELRELEASE is not defined, we've been called directly from the command line.
# Invoke the kernel build system.
ifeq (${KERNELRELEASE},)
	KERNEL_SOURCE := /usr/src/linux
	PWD := $(shell pwd)
default:
	${MAKE} -C ${KERNEL_SOURCE} SUBDIRS=${PWD} modules

clean:
	${MAKE} -C ${KERNEL_SOURCE} SUBDIRS=${PWD} clean

# Otherwise KERNELRELEASE is defined; we've been invoked from the
# kernel build system and can use its language.
else
	obj-m := ofd.o
endif

Note 1: Makefiles are very space-sensitive. The lines not starting at the first column have a tab and not spaces.

Note 2: For building a Linux driver, you need to have the kernel source (or at the least the kernel headers) installed on your system.

With the C code (ofd.c) and Makefile ready, all we need to do is put them in a (new) directory of its own, and then invoke make in that directory to build our first driver (ofd.ko).

$ make
make -C /usr/src/linux SUBDIRS=... modules
make[1]: Entering directory `/usr/src/linux'
CC [M] .../ofd.o
Building modules, stage 2.
MODPOST 1 modules
CC .../ofd.mod.o
LD [M] .../ofd.ko
make[1]: Leaving directory `/usr/src/linux'

Summing up

Once we have the ofd.ko file, do the usual steps as root, or with sudo.

# su
# insmod ofd.ko
# lsmod | head -10

lsmod should show you the ofd driver loaded.

While the students were trying their first module, the bell rang, marking the end for this session of the class. And professor Gopi concluded, saying “Currently, you may not be able to observe anything, other than “lsmod” listing showing our first driver loaded. Where’s the printk output gone? Find that out for yourself in the lab session and update me with your findings. Moreover, today’s first driver would be the template to any driver you write in Linux. Writing any specialized advanced driver is just a matter of what gets filled into its constructor & destructor. So, here onwards, our learnings shall be in enhancing this driver to achieve our specific driver functionalities.”

Notes

  1. In most of today’s distros, one may safely have KERNEL_SOURCE set to /lib/modules/$(shell uname -r)/build, instead of /usr/src/linux i.e. KERNEL_SOURCE := /lib/modules/$(shell uname -r)/build in the Makefile.

Third Article >>

   Send article as PDF   

Explore the Power of the Bench Calculator

This second article of the mathematical journey through open source, takes you through the basics of bench calculator.

<< First Article

Faced with the limitations of the shell command expr and other shell constructs, here we are all set to explore the powerful command bc. bc stands for bench calculator. It is not just a command or tool but a complete language in itself. And its power lies in its arbitrary precision-ness with not only integers but with real number. Wondering what that means? It just means that its computation is mostly not limited by size of the integer or real number types, unlike in most programming languages. Thus, this is more closer to our day to day dealing of mathematics, keeping away the internal details of computer’s precision blah blah. So, let’s get started with the first usual maths. And then we will move onto more involved one with variables, conditionals, and later on with functions and recursion.

Basic operations

For integer-only math, you may invoke the bench calculator as bc. For a full-fledged real number math, you may invoke it as bc -l. Once invoked, it will print a welcome message and then wait for you to just type your math statements and press Enter to get your answer. For quitting the bench calculator, you need to press Ctrl-D (^D), on an empty line. All the basic arithmetic operations: addition (+), subtraction (-), multiplication (*), quotient (/), remainder (%), power (^), brackets (()) are just there – with the C-like precedence & associativity rules. An example with all of them in use:

$ bc
bc 1.06.95
Copyright 1991-1994, 1997, 1998, 2000, 2004, 2006 Free Software Foundation, Inc.
This is free software with ABSOLUTELY NO WARRANTY.
For details type `warranty'.
2 + 2 * 3 - 5 + 21 / 4 * 6 # A basic maths statement
33
(2 ^ 2) ^ 3 # Another one with power & bracket
64
^D

Yes, you guessed it right. # starts a one-line comment as in shell, or like // in C++. For a multi-line comment, you may use /* */ as in C/C++. You may want that in case you are writing a complete program in bc. Yes, you can even do that. How? You may put your math statements (each one on a line by itself) in a file, say in prog.bc, as follows:

2 + 2 * 3 - 5 + 21 / 4 * 6 # A basic maths statement
(2 ^ 2) ^ 3 # Another one with power & bracket
quit # This will complete the program and not wait for more input

And then execute – yes I mean execute, you do not need to compile it – as follows:

$ bc prog.bc
bc 1.06.95
Copyright 1991-1994, 1997, 1998, 2000, 2004, 2006 Free Software Foundation, Inc.
This is free software with ABSOLUTELY NO WARRANTY.
For details type `warranty'.
33
64
$

Aha! You actually got the welcome message from bc and then your results. To avoid the welcome message, you may add -q option to bc, as follows:

$ bc -q prog.bc
33
64
$

You may also try out the difference in the output of the same program with a -l option, i.e. with real numbers. Then, / would be treated as a complete division, not just a quotient provider. Here’s what you would get:

$ bc -ql prog.bc 
34.50000000000000000000
64
$

Programming with bc

As soon as we say programming, the first thing flashing to your mind might be variables. Yes, so they are there. All the variables must start with a small letter alphabet and then may contain numbers or small letter alphabets. Yes, you read it right – only small letter alphabets (a,b,c,…,z). This is because, capital letters (A,B,C,…) are used to represent numbers in other bases greater than 10. Yes, bc have support for various bases from 2 to 16, and two variables associated with them: 1) ibase: defines the base for input; 2) obase: defines the base for output. By default, both are set to 10, as in our day-to-day usual maths. But can be modified, for more fancier base conversions. Here’s a snippet:

$ bc -ql
ibase # Show the current input base
10
obase # Show the current output base
10
obase=16 # Set the output base to 16
108 # Input in base 10; Output should be in base 16
6C
obase=10 # Set the output base back to 10
ibase=16 # Set the input base to 16
11 # Input now in base 16; Output should be in base 10
17
ibase=10 # Set the input base to 16. 10 is 16 in input base 16.
ibase=A # Set the input base to 10.
obase=2 # Set the output base to 2, i.e. binary
x = 2 * 5 - 1 # Set the variable x to 9 (input base 10)
x # Display the value of x (in output base 2)
1001
x * 2 # This should display 18 in base 2, but x is still 9
10010
obase=10
x++ # Post increment: Display the current value of x and then increment it
9
x # Display the incremented value
10
--x # Pre decrement: Decrement x and then display its value
9
^D

From the demo above, you might have already observed that there is nothing like declaring variable type or so – just assign them using = and then use them. Moreover, bc also have basic conditional and loop constructs: if, for, while, break, continue. And along with are the usual C-like relational (<, <=, >, >=, ==, !=), logical (!, ||, &&), and the operation-assignment (-=, +=, *=, /=, %=, ^=) operators. Note of caution: Their precedence and associativity rules may not be as in C. If you do not understand that, forget about it – just make sure to use brackets for whatever you want to operate first. Here goes two simple programs to demonstrate: 1) Computing the sum of the first n numbers (sum.bc); 2) Computing the product of the first n numbers, i.e. factorial of n (factorial.bc)

-------------------------------- file: sum.bc -----------------------------

print "Enter a positive number: "
num = read()
sum = 0
current_num = 1
while (current_num <= num)
{
	sum += current_num
	current_num += 1
}
print "Sum of first ", num, " numbers is: ", sum, "\n"
quit
-------------------------------- file: factorial.bc -----------------------------

print "Enter a positive number: "
num = read()
product = 1
for (current_num = 1; current_num <= num; current_num += 1)
{
	product *= current_num
}
print "Product of first ", num, " numbers is: ", product, "\n"
quit

The above programs can be tried out by issuing shell commands bc -ql sum.bc and bc -ql factorial.bc, respectively. But, what are those two words: print & read, doing there in the code. What else; they are just two built-in functions, displaying the message to the user and taking a number from the user, respectively. Functions? Yes, bc can do functions as well. That’s what would be our next camping. So, right now, just go ahead and try the above programs.

Third Article >>

   Send article as PDF   

Linux Device Drivers for your Girl Friend

This is the first article of the series on Linux device drivers, which aims to present the usually technical topic in a way that is more interesting to a wider cross-section of readers.

“After a week of hard work, we finally got our driver working”, was the first line as Pugs met his girl friend Shweta.

“Why? What was your driver upto? Was he sick? And what hard work did you do?”, came a series of question from Shweta with a naughty smile.

Pugs was confused as what was Shweta talking about. “Which driver are you talking about?”, he exclaimed.

“Why are you asking me? You should tell me, which of your drivers, you are talking about?”, replied Shweta.

Pugs clicked, “Ah C’mon! Not my car drivers. I am talking about my device driver written on my computer.”

“I know a car driver, a bus driver, a pilot, a screw driver. But what is this device driver?”, queried Shweta.

And that was all needed to trigger Pugs’ passion to explain the concept of device drivers for a newbie. In particular, the Linux device drivers, which he had been working on since many years.

Of drivers and buses

A driver is one who drives – manages, controls, directs, monitors – the entity under his command. So a bus driver does that with a bus. Similarly, a device driver does that with a device. A device could be any peripheral connected to a computer, for example mouse, keyboard, screen / monitor, hard disk, camera, clock, … – you name it.

A pilot could be a person or automatic systems, possibly monitored by a person. Similarly, device driver could be a piece of software or another peripheral / device, possibly driven by a software. However, if it is an another peripheral / device, it is referred as device controller in the common parlance. And by driver, we only mean the software driver. A device controller is a device itself and hence many a times it also needs a driver, commonly referred as a bus driver.

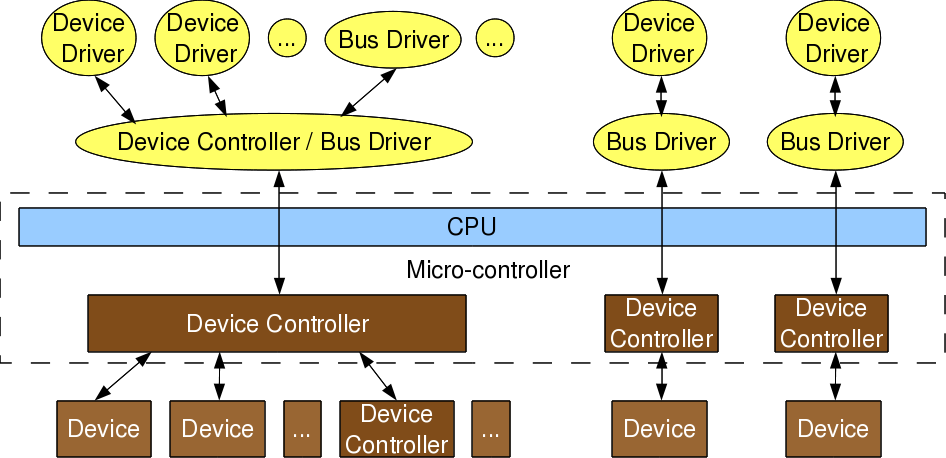
General examples of device controllers include hard disk controllers, display controllers, audio controller for the corresponding devices. More technical examples would be the controllers for the hardware protocols, such as an IDE controller, PCI controller, USB controller, SPI controller, I2C controller, etc. Pictorially, this whole concept can be depicted as in figure 1.

Figure 1: Device & driver interaction

Figure 1: Device & driver interaction

Device controllers are typically connected to the CPU through their respectively named buses (collection of physical lines), for example pci bus, ide bus, etc. In today’s embedded world, we more often come across microcontrollers than CPUs, which are nothing but CPU + various device controllers built onto a single chip. This effective embedding of device controllers primarily reduces cost & space, making it suitable for embedded systems. In such cases, the buses are integrated into the chip itself. Does this change anything on the drivers or more generically software front?

Not much except that the bus drivers corresponding to the embedded device controllers, are now developed under the architecture-specific umbrella.

Drivers have two parts

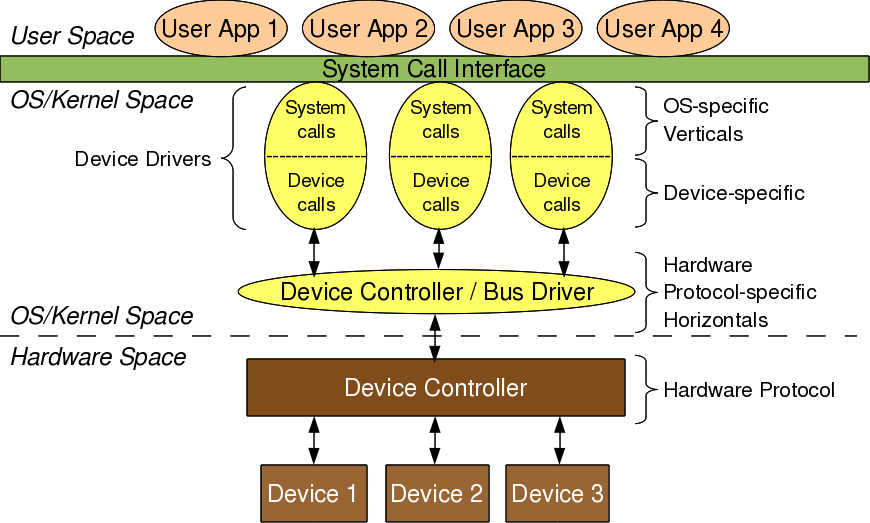
Bus drivers provides hardware-specific interface for the corresponding hardware protocols, and are the bottom-most horizontal software layers of an operating system (OS). Over these sit the actual device’ drivers. These operate on the underlying devices using the horizontal layer interfaces, and hence are device-specific. However, the whole idea of writing these drivers is to provide an abstraction to the user. And so on the other end, these do provide interface to the user. This interface varies from OS to OS. In short, a device driver has two parts: i) Device-specific, and ii) OS-specific. Refer to figure 2.

Figure 2: Linux device driver partition

Figure 2: Linux device driver partition

The device-specific portion of a device driver remains same across all operating systems, and is more of understanding and decoding of the device data sheets, than of software programming. A data sheet for a device is a document with technical details of the device, including its operation, performance, programming, etc. Later, I shall show some examples of decoding data sheets as well. However, the OS-specific portion is the one which is tightly coupled with the OS mechanisms of user interfaces. This is the one which differentiates a Linux device driver from a Windows device driver from a MAC device driver.

Verticals

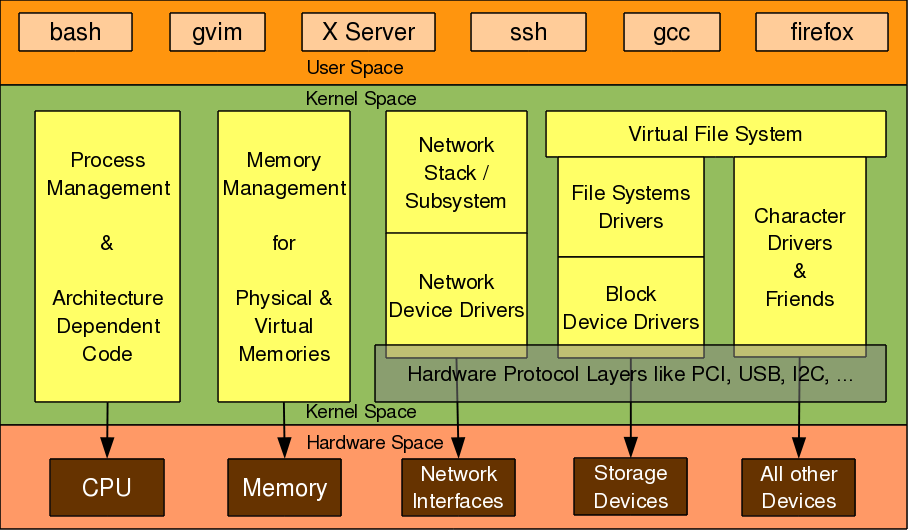
In Linux, a device driver provides a system call interface to the user. And, this is the boundary line between the so-called kernel space and user space of Linux, as shown in figure 2. Figure 3 elaborates on further classification.

Based on the OS-specific interface of a driver, in Linux a driver is broadly classified into 3 verticals:

  • Packet-oriented or Network vertical
  • Block-oriented or Storage vertical
  • Byte-oriented or Character vertical
Figure 3: Linux kernel overview

Figure 3: Linux kernel overview

The other two verticals, loosely the CPU vertical and memory vertical put together with the other three verticals give the complete overview of the Linux kernel, like any text book definition of an OS: “An OS does 5 managements namely: CPU/process, memory, network, storage, device/io”. Though these 2 could be classified as device drivers, where CPU & memory are the respective devices, these two are treated differently for many reasons.

These are the core functionalities of any OS, be it micro or monolithic kernel. More often than not, adding code in these areas is mainly a Linux porting effort, typically for a new CPU or architecture. Moreover, the code in these two verticals cannot be loaded or unloaded on the fly, unlike the other three verticals. And henceforth to talk about Linux device drivers, we would mean to talk only on the later three verticals in figure 3.

Let’s get a little deeper into these three verticals. Network consists of 2 parts: i) Network protocol stack, and ii) Network interface card (NIC) or simply network device drivers, which could be for ethernet, wifi, or any other network horizontals. Storage again consists of 2 parts: i) File system drivers for decoding the various formats on various partitions, and ii) Block device drivers for various storage (hardware) protocols, that is the horizontals like IDE, SCSI, MTD, etc.

With this you may wonder, is that the only set of devices for which you need drivers, or Linux has drivers for. Just hold on. You definitely need drivers for the whole lot of devices interfacing with a system, and Linux do have drivers for them. However, their byte-oriented accessibility puts all of them under the character vertical – yes I mean it – it is the majority bucket. In fact, because of this vastness, character drivers have got further sub-classified. So, you have tty drivers, input drivers, console drivers, framebuffer drivers, sound drivers, etc. And the typical horizontals here would be RS232, PS/2, VGA, I2C, I2S, SPI, etc.

Multiple-vertical interfacing drivers

On a final note on the complete picture of placement of all the drivers in the Linux driver ecosystem, the horizontals like USB, PCI, etc span below multiple verticals. Why? As we have a USB wifi dongle, a USB pen drive, as well as a USB to serial converter – all USB but three different verticals.

In Linux, bus drivers or the horizontals, are often split into two parts, or even two drivers: i) Device controller specific, and ii) An abstraction layer over that for the verticals to interface, commonly called cores. A classical example would be the usb controller drivers ohci, ehci, etc and the USB abstraction usbcore.

Summing up

So, to conclude a device driver is a piece of software which drives a device, though there are so many classifications. And in case it drives only another piece of software, we call it just a driver. Examples are file system drivers, usbcore, etc. Hence, all device drivers are drivers but all drivers are not device drivers.

“Hey Pugs! Just hold on. We are getting late for our class. And you know what kind of trouble, we can get into. Let’s continue from here, tomorrow.”, exclaimed Shweta.

With that Pugs wrapped up saying, “Okay. This is majorly what the device driver theory is. If you are interested, later I shall show you the code & what all have we been doing for all the various kinds of drivers”. And they hurried towards their classroom.

Second Article >>

   Send article as PDF   

Mathematics through the Shell

This article, which is the first part of the mathematical journey through open source, takes you through the basic mathematics through a shell.

Mathematics is something which is knowingly or unknowingly part of every moment of our life, starting from the interpretation of the moment – the time to shopping to advanced engineering calculations and computations. We have learnt mathematics from our childhood by counting. With the age of computers, we have been taught how to do mathematics with them. In this journey of mathematics, we are going to tour through the various open source softwares with their mathematical capabilities. Today, we start with the most preliminary one the shell.

Shell command ‘expr’

expr supports the basic arithmetic operations: Addition (+), Subtraction (-), Multiplication (\*), Quotient (/), Remainder (%) – with the C-like precedence & associativity rules. So, if that’s what you want, you may use it as follows:

$ expr 2 + 3
5
$ expr 34 – 67
-33
$ expr 23 \* 27
621
$ expr 43 / 6
7
$ expr 43 % 6
1
$ expr 2 + 2 \* 3 – 5 + 21 / 4 \* 6
33

Note the spaces between every one of the expr, numbers, and the operator – expr is very space-sensitive. The power of this simple command is its precision-less-ness. What I mean is, try out the following:

$ expr 1024 \* 1024 \* 1024 \* 1024 \* 1024 \* 1024 \* 1024 \* 1024 \* 1024 \* 1024

And you still don’t get an overflow, but 1267650600228229401496703205376, i.e. 2100.

Also, you may use variables. Here’s an example:

$ x=5; y=6; z=`expr $x + $y`
$ echo $z
11

However, it has its own limitation. Basic one being, you do not have the exponentiation operator. Moreover, you can’t change precedences by using brackets. And that’s where you start looking at the other options.

Shell’s arithmetic expansion

With this, we get the all the mathematical C operators, plus the exponentiation using **. We have the bracketing, and variable usage even without the cryptic $. It is achieved by putting the complete expression to be evaluated, between $((…)) – the arithmetic expander. Here’s a set of examples:

$ echo $(((2+3)*4-2**4/5%6))
17
$ x=y=8; echo $((3 << 4 | x | 2 << y))
568

There are some additional interesting ways to assign variables, as well, using let or declare -i.

$ let x=y=8 z='3 << 4 | x | 2 << y' w=z/3
$ echo $w
189
$ declare -i x=y=8 z='3 << 4 | x | 2 << y' w=z/3
$ echo $w
189

Note that the $((…)) has been replaced by single quoting in assigning the value to z. In fact, in most cases – see the assignment of w – it can be actually assigned directly as in C. Though the single quote for z is required to prevent the shell specially interpreting constructs like <<, >>, |, *, etc, and for it not to be space-sensitive. Otherwise, checkout, this example:

$ declare -i x=y=8 z=++x+y
$ echo $z
17

In fact, the variables can be declared as integer once, and then be operated any number of times, as follows:

$ declare -i x y z
$ x=y=8
$ z=++x+y
$ echo $z
17

And, finally here’s two simple ones:

$ echo $((2 ** 100))
0
$ echo $((2.6 + 3))
bash: 2.6 + 3: syntax error: invalid arithmetic operator (error token is ".6 + 3")

Oops!!! how come 2100 is zero, and we are not able to do real number operations. It has its own limitation. It is limited by the C’s long integer math, typically upto 64-bit computations on today’s computers; and by not having support for non-integer math. That’s where we would look out for something more powerful: the bench calculator.

Second Article >>

   Send article as PDF