This twelfth article, which is part of the series on Linux device drivers, gets you further with writing your first USB driver in Linux – a continuation from the previous article.
Pugs continued, “Let’s build upon the USB device driver coded in our previous session, using the same handy JetFlash pen drive from Transcend with vendor id 0x058f and product id 0x6387. For that, we would dig further into the USB protocol and then convert the learning into code.”
USB endpoints and their types
Depending on the type and attributes of information to be transferred, a USB device may have one or more endpoints, each belonging to one of the following four categories:
- Control – For transferring control information. Examples include resetting the device, querying information about the device, etc. All USB devices always have the default control endpoint point zero.
- Interrupt – For small and fast data transfer, typically of up to 8 bytes. Examples include data transfer for serial ports, human interface devices (HIDs) like keyboard, mouse, etc.
- Bulk – For big but comparatively slow data transfer. A typical example is data transfers for mass storage devices.
- Isochronous – For big data transfer with bandwidth guarantee, though data integrity may not be guaranteed. Typical practical usage examples include transfers of time-sensitive data like of audio, video, etc.
Additionally, all but control endpoints could be “in” or “out”, indicating its direction of data transfer. “in” indicates data flow from USB device to the host machine and “out” indicates data flow from the host machine to USB device. Technically, an endpoint is identified using a 8-bit number, most significant bit (MSB) of which indicates the direction – 0 meaning out, and 1 meaning in. Control endpoints are bi-directional and the MSB is ignored.
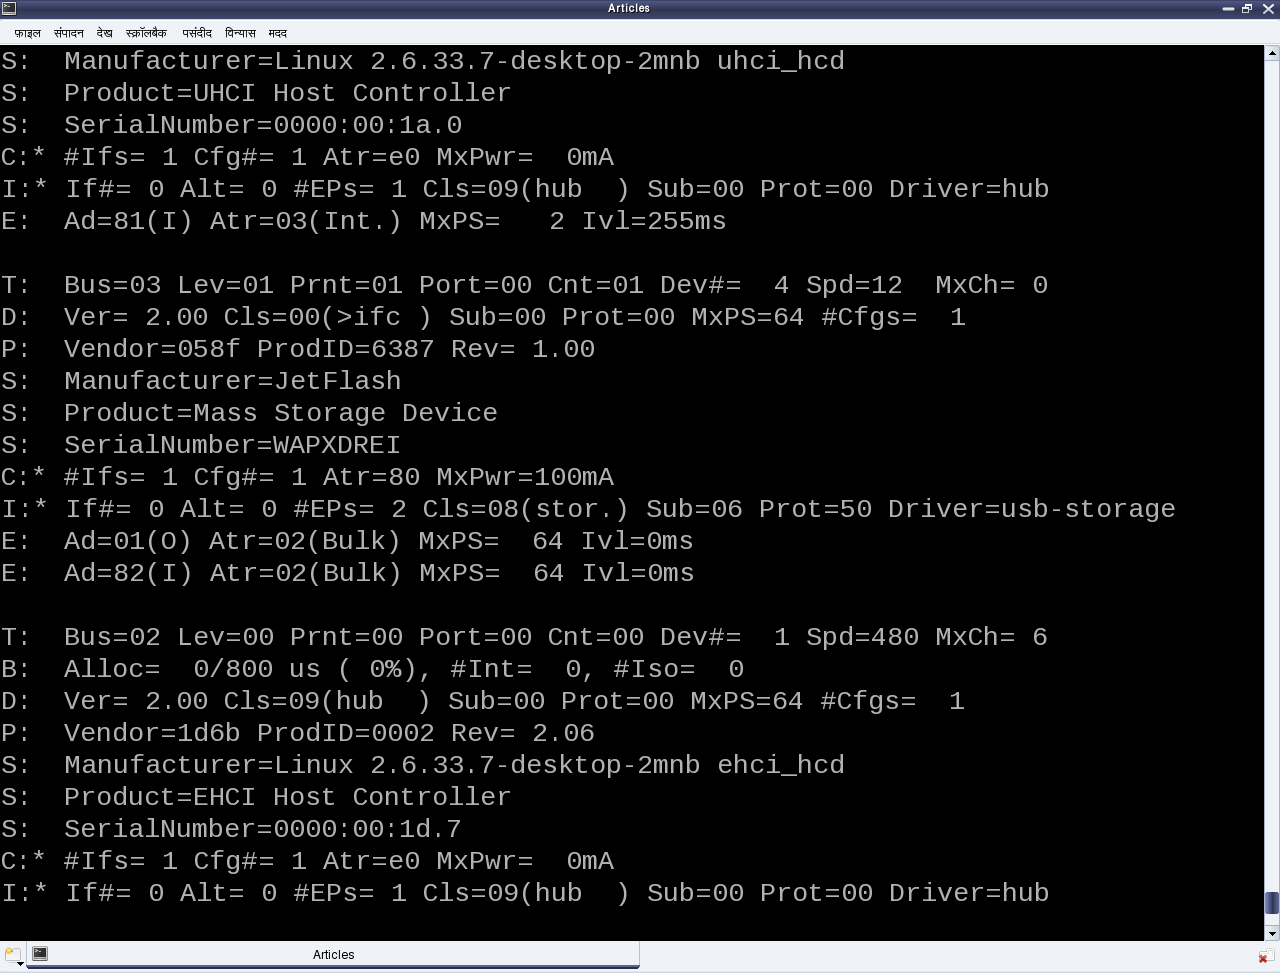
Figure 19 shows a typical snippet of USB device specifications for devices connected on a system. To be specific, the “E: ” lines in the figure shows example of an interrupt endpoint of a UHCI Host Controller and two bulk endpoints of the pen drive under consideration. Also, the endpoint numbers (in hex) are respectively 0x81, 0x01, 0x82. The MSB of the first and third being 1 indicating “in” endpoints, represented by “(I)” in the figure. Second one is an “(O)” for the “out” endpoint. “MaxPS” specifies the maximum packet size, i.e. the data size that can be transferred in a single go. Again as expected, for the interrupt endpoint it is 2 (<= 8), and 64 for the bulk endpoints. “Ivl” specifies the interval in milliseconds to be given between two consecutive data packet transfers for proper transfer and is more significant for the interrupt endpoints.
Decoding a USB device section
As we have just discussed the “E: ” line, it is right time to decode the relevant fields of others as well. In short, these lines in a USB device section gives the complete overview of the USB device as per the USB specifications, as discussed in our previous article. Refer back to Figure 19. The first letter of the first line of every device section is a “T” indicating the position of the device in the USB tree, uniquely identified by the triplet <usb bus number, usb tree level, usb port>. “D” represents the device descriptor containing at least the device version, device class/category, and the number of configurations available for this device. There would be as many “C” lines as the number of configurations, typically one. “C” represents the configuration descriptor containing its index, device attributes in this configuration, maximum power (actually current) the device would draw in this configuration, and the number of interfaces under this configuration. Depending on that there would be at least that many “I” lines. There could be more in case of an interface having alternates, i.e. same interface number but with different properties – a typical scenario for web-cams.
“I” represents the interface descriptor with its index, alternate number, functionality class/category of this interface, driver associated with this interface, and the number of endpoints under this interface. The interface class may or may not be same as that of the device class. And depending on the number of endpoints, there would be as many “E” lines, details of which have already been discussed above. The “*” after the “C” & “I” represents the currently active configuration and interface, respectively. “P” line provides the vendor id, product id, and the product revision. “S” lines are string descriptors showing up some vendor specific descriptive information about the device.
“Peeping into /proc/bus/usb/devices is good to figure out whether a device has been detected or not and possibly to get the first cut overview of the device. But most probably this information would be required in writing the driver for the device as well. So, is there a way to access it using ‘C’ code?”, asked Shweta. “Yes definitely, that’s what I am going to tell you next. Do you remember that as soon as a USB device is plugged into the system, the USB host controller driver populates its information into the generic USB core layer? To be precise, it puts that into a set of structures embedded into one another, exactly as per the USB specifications”, replied Pugs. The following are the exact data structures defined in <linux/usb.h> – ordered here in reverse for flow clarity:
struct usb_device
{
	...
	struct usb_device_descriptor descriptor;
	struct usb_host_config *config, *actconfig;
	...
};
struct usb_host_config
{
	struct usb_config_descriptor desc;
	...
	struct usb_interface *interface[USB_MAXINTERFACES];
	...
};
struct usb_interface
{
	struct usb_host_interface *altsetting /* array */, *cur_altsetting;
	...
};
struct usb_host_interface
{
	struct usb_interface_descriptor desc;
	struct usb_host_endpoint *endpoint /* array */;
	...
};
struct usb_host_endpoint
{
	struct usb_endpoint_descriptor  desc;
	...
};
So, with access to the struct usb_device handle for a specific device, all the USB specific information about the device can be decoded, as shown through the /proc window. But how to get the device handle? In fact, the device handle is not available directly in a driver, rather the per interface handles (pointers to struct usb_interface) are available, as USB drivers are written for device interfaces rather than the device as a whole. Recall that the probe & disconnect callbacks, which are invoked by USB core for every interface of the registered device, have the corresponding interface handle as their first parameter. Refer the prototypes below:
int (*probe)(struct usb_interface *interface, const struct usb_device_id *id);
void (*disconnect)(struct usb_interface *interface);
So with the interface pointer, all information about the corresponding interface can be accessed. And to get the container device handle, the following macro comes to rescue:
struct usb_device device = interface_to_usbdev(interface);
Adding these new learning into the last month’s registration only driver, gets the following code listing (pen_info.c):
#include <linux/module.h>
#include <linux/kernel.h>
#include <linux/usb.h>

static struct usb_device *device;

static int pen_probe(struct usb_interface *interface, const struct usb_device_id *id)
{
	struct usb_host_interface *iface_desc;
	struct usb_endpoint_descriptor *endpoint;
	int i;

	iface_desc = interface->cur_altsetting;
	printk(KERN_INFO "Pen i/f %d now probed: (%04X:%04X)\n",
			iface_desc->desc.bInterfaceNumber,
			id->idVendor, id->idProduct);
	printk(KERN_INFO "ID->bNumEndpoints: %02X\n",
			iface_desc->desc.bNumEndpoints);
	printk(KERN_INFO "ID->bInterfaceClass: %02X\n",
			iface_desc->desc.bInterfaceClass);

	for (i = 0; i < iface_desc->desc.bNumEndpoints; i++)
	{
		endpoint = &iface_desc->endpoint[i].desc;

		printk(KERN_INFO "ED[%d]->bEndpointAddress: 0x%02X\n",
				i, endpoint->bEndpointAddress);
		printk(KERN_INFO "ED[%d]->bmAttributes: 0x%02X\n",
				i, endpoint->bmAttributes);
		printk(KERN_INFO "ED[%d]->wMaxPacketSize: 0x%04X (%d)\n",
				i, endpoint->wMaxPacketSize,
				endpoint->wMaxPacketSize);
	}

	device = interface_to_usbdev(interface);
	return 0;
}

static void pen_disconnect(struct usb_interface *interface)
{
	printk(KERN_INFO "Pen i/f %d now disconnected\n",
			interface->cur_altsetting->desc.bInterfaceNumber);
}

static struct usb_device_id pen_table[] =
{
	{ USB_DEVICE(0x058F, 0x6387) },
	{} /* Terminating entry */
};
MODULE_DEVICE_TABLE (usb, pen_table);

static struct usb_driver pen_driver =
{
	.name = "pen_info",
	.probe = pen_probe,
	.disconnect = pen_disconnect,
	.id_table = pen_table,
};

static int __init pen_init(void)
{
	return usb_register(&pen_driver);
}

static void __exit pen_exit(void)
{
	usb_deregister(&pen_driver);
}

module_init(pen_init);
module_exit(pen_exit);

MODULE_LICENSE("GPL");
MODULE_AUTHOR("Anil Kumar Pugalia <email@sarika-pugs.com>");
MODULE_DESCRIPTION("USB Pen Info Driver");
Then, the usual steps for any Linux device driver may be repeated, along with the pen drive steps:
- Build the driver (pen_info.ko file) by running make.
- Load the driver using insmod pen_info.ko.
- Plug-in the pen drive (after making sure that usb-storage driver is not already loaded).
- Unplug-out the pen drive.
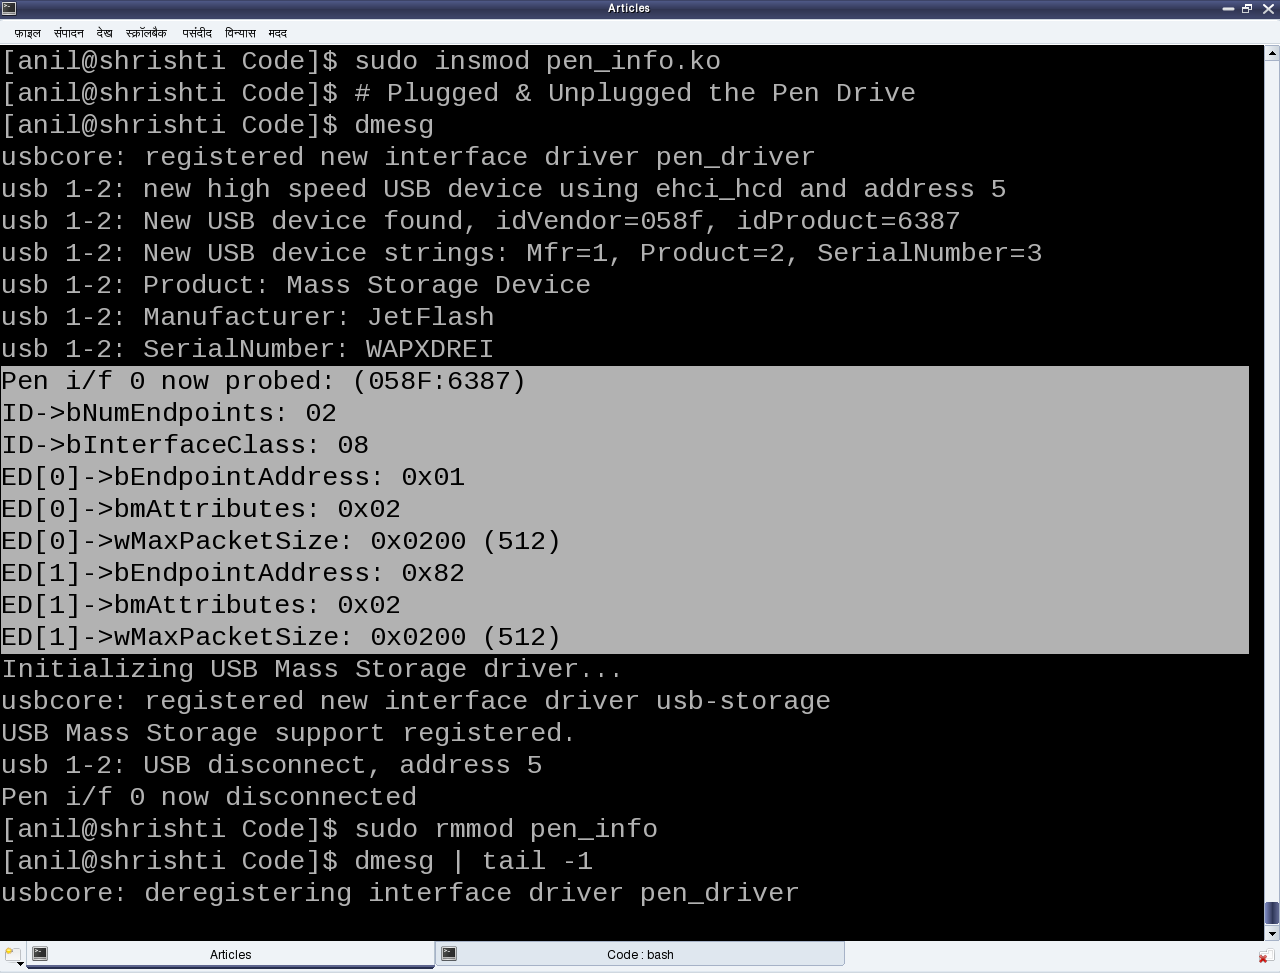
- Check the output of dmesg for the logs.
- Unload the driver using rmmod pen_info.
Figure 22 shows a snippet of the above steps on Pugs’ system. Remember to ensure (in the output of cat /proc/bus/usb/devices) that the usual usb-storage driver is not the one associated with the pen drive interface, rather it should be the pen_info driver.
Summing up
Before taking another break, Pugs shared two of the many mechanisms for a driver to specify its device to the USB core, using the struct usb_device_id table. First one is by specifying the <vendor id, product id> pair using the USB_DEVICE() macro (as done above), and the second one is by specifying the device class/category using the USB_DEVICE_INFO() macro. In fact, many more macros are available in <linux/usb.h> for various combinations. Moreover, multiple of these macros could be specified in the usb_device_id table (terminated by a null entry), for matching with any one of the criteria, enabling to write a single driver for possibly many devices.
“Earlier you mentioned writing multiple drivers for a single device, as well. Basically, how do we selectively register or not register a particular interface of a USB device?”, queried Shweta. “Sure. That’s next in line of our discussion, along with the ultimate task in any device driver – the data transfer mechanisms” replied Pugs.
Notes
- Make sure that you replace the vendor id & device id in the above code examples by the ones of your pen drive.
- One may wonder, as how does the usb-storage get autoloaded. The answer lies in the module autoload rules written down in the file /lib/modules/<kernel_version>/modules.usbmap. If you are an expert, you may comment out the corresponding line, for it to not get autoloaded. And uncomment it back, once you are done with your experiments.
- In latest distros, you may not find the detailed description of the USB devices using cat /proc/bus/usb/devices, as the /proc/bus/usb/ itself has been deprecated. You can find the same detailed info using cat /sys/kernel/debug/usb/devices – though you may need root permissions for the same. Also, if you do not see any file under /sys/kernel/debug (even as root), then you may have to first mount the debug filesystem, as follows: mount -t debugfs none /sys/kernel/debug
