Category Archives: Linux

Linux related posts

Task on a particular CPU

In today’s world of multi-CPUs, a fundamental question arises as on which of the multiple CPUs does the various tasks (processes and threads) in Linux run / execute? Is it all on one, or distributed over all? If distributed over all, how is the distribution decided? Can the tasks dynamically change the CPU? and so on.

The default behaviour is that the various tasks are distributed over all the enabled* CPUs. And, the Linux scheduler decides which task gets to run on which CPU in a way which yields an optimal performance. This association of a task with a CPU is called CPU affinity of the task. In general, a task (once started) is not switched dynamically from one CPU to another unless and otherwise demanded by some overall performance specific situations. This tendency to keep a task associated with a particular CPU is termed as natural CPU affinity. Though Linux scheduler supports natural CPU affinity, it is not a 100% guarantee that a particular task will always be associated, only with one particular CPU. In fact, Linux scheduler intentionally by default keeps a weak affinity of a task to a particular CPU. In general, that is good only. But what if it is required to have a 100% guaranteed fixed affinity due to some constraints? Is it possible to run a specific task always on a specific CPU, or among some specific CPUs, or at least exclude some CPUs? And the answer is yes – using the command taskset, which is part of the Linux utilities.

As understood above, by default, all tasks are free to run on all enabled CPUs, and that is specified by a CPU bitmask corresponding to all CPUs. Say, there are 4 CPUs on a system. Then, the all CPU bitmask would be hexadecimal “f”.

Number of CPUs on a system can be checked as follows:

$ grep "^processor" /proc/cpuinfo | wc -l

Current CPU affinity bitmask of a specific process, say the init / systemd (pid 1) can be obtained as follows:

$ taskset -p 1

Current CPU affinity bitmask for the current shell can be checked as follows:

$ taskset -p $$

But out of the list of CPUs, specified by the bitmask, how do one know, on which CPU is the specific task currently running on? For that, one may run “top” with the corresponding pid and add the “Last used CPU” column to “top” after pressing “f” key. For the current shell, it may be run as:

$ top -p $$

And then, press “f”. Go to “Last used CPU” by pressing down arrow. Select it by pressing “Space” bar. Come back by pressing “Esc”. Now, the last column in “top” labelled by “P”, tells the processor number, the corresponding task is running on. Without the “-p” option to “top”, it would show for all the top actively running processes. And one may observe the switching of the various tasks between various CPUs.

Now let’s fix one of the tasks to a particular CPU, say for the web browser task. Note down its pid using “ps ax”. Say it is <pid>. And then, run the “top” for this <pid> and with its CPU details as mentioned above. Observe its current CPU change frequently, or even if it is fixed on say 0th CPU. To fix / change its CPU to say 1st, give the following command on an another shell:

$ taskset -p 0x2 <pid>

Observe the CPU in the “top” getting fixed to 1. That’s all.

In fact, if fixing of the CPU is desired for a command to be run from a shell, it can be done while starting the command itself. As an example:

$ taskset 0x3 ls -l

would run the “ls” command between CPUs 0 & 1. For more details, checkout:

$ man taskset

*NB that CPU 0 is always enabled. And for others, they are enabled if /sys/bus/cpu/devices/cpu<cpu_no>/online is set to 1.

   Send article as PDF   

Self-extracting Shell Script

Self-extracting executables are a commonplace in Windows. Can it be or something like it be created in Linux, as well? If the question is CAN it be done for Linux, the answer to most “can” questions in open source world is a “yes”. But one does not need to be a copycat of Windows, when better things can be done in Linux – a self-extracting Shell Script.

For that, we just need to write a shell script, say generate_self_extracting_shell_script.sh. This script will take the directory to be self-extracted and output the self-extracting shell script. But how does this self-extracting shell script work? Basically, there are two parts in this script: 1) the bottom one containing the compressed tar of the directory to be self-extracted, and 2) the top one containing the shell script to extract the bottom part. So, when one runs this shell script, it would run the top part extracting the bottom part. These two parts are demarcated by a unique marker for the top part to identify its bottom. Here is how a typical self-extracting shell script will look like with TGZ_CONTENT as the unique marker:

#!/bin/bash

echo -n "Extracting script contents ... "
start_line_of_tar=$((`grep -an "^TGZ_CONTENT$" $0 | cut -d: -f1` + 1))
tail -n+${start_line_of_tar} $0 | tar zxf -
echo "done"
exit 0
TGZ_CONTENT
<compressed_tar_of_the_directory_goes_here>

The grep-cut pair extracts the line number of this script having TGZ_CONTENT, and then 1 is added to it to get the start_line_of_tar. Then, tail-tar pair extracts the tar, starting from start_line_of_tar till the end of the shell script file. The “exit 0” is important to stop the script execution after its top part is executed, as the bottom part is not really a script.

Now, here’s the script generate_self_extracting_shell_script.sh to generate the above self-extracting shell script:

#!/bin/bash

if [ $# -ne 2 ]
then
	echo "Usage: $0 <directory_to_package> <self_extracting_script_file>"
	exit 1
fi

directory=$1
script=$2

cat > ${script} <<SCRIPT_TOP
#!/bin/bash

echo -n "Extracting script contents ... "
start_line_of_tar=\$((\`grep -an "^TGZ_CONTENT$" \$0 | cut -d: -f1\` + 1))
tail -n+\${start_line_of_tar} \$0 | tar zxf -
echo "done"
exit 0
TGZ_CONTENT
SCRIPT_TOP
tar zcf - ${directory} >> ${script}

chmod +x ${script}

The two SCRIPT_TOP above are the delimiters for here-document (content from here) to be put into the generated shell script file. The tar line after that is to add the bottom content of the script. Notice the \ before the $ in the here-document, so as to not evaluate those in this script, but output verbatim into the self-extracting shell script.

Assuming an existing directory XYZ to be packaged into the self-extracting shell script xyz.sh, this script could be run as follows:

$ ./generate_self_extracting_shell_script.sh XYZ xyz.sh

And running the xyz.sh shell script would extract back the XYZ directory, thus xyz.sh becoming a self-extracting shell script.

   Send article as PDF   

Controlling Shell Commands through C

With the ever growing presence of embedded systems, it has become a very common requirement to do some tasks through shell commands while doing others through C in an embedded system. Very often people achieve this by using system() C library function, which is known for its inefficiencies and limitations. So, is there a better way to achieve it? Yes. The main C (commander) program may spawn a master shell script process, which would then keep on accepting & executing shell commands from the commander program. Here are the two components (a main C program and a master script) of the framework, put out:

/* File: commander.c */

#include <stdio.h>
#include <unistd.h>
#include <string.h>
#include <stdlib.h>

int main(char argc, char *argv[])
{
	int pfds[2]; // 0 is read end, 1 is write end
	int wfd;
	pid_t pid;
	char cmd[100];
	int cmdlen;
	int stop, status;

	if (pipe(pfds) == -1)
	{
		perror(argv[0]);
		return 1;
	}

	pid = fork();
	if (pid == -1)
	{
		perror(argv[0]);
		return 2;
	}
	else if (pid != 0) // Parent
	{
		close(pfds[0]); // Close the read end of the pipe
		wfd = pfds[1];
		// Continue doing other stuff, e.g.
		// take commands from user and pass onto the master script
		stop = 0;
		do
		{
			printf("Cmd (type \"done\" to exit): ");
			if ((status = scanf("%[^\n]", cmd)) <= 0)
			{
				getchar(); // Remove the \n
				continue;
			}
			getchar(); // Remove the \n
			if (strcmp(cmd, "done") == 0)
			{
				stop = 1;
			}
			else
			{
				cmdlen = strlen(cmd);
				cmd[cmdlen++] = '\n';
				//cmd[cmdlen] = '\0';
				// Pass on the command to master script
				write(wfd, cmd, cmdlen);
			}
		}
		while (!stop);
		close(wfd);
	}
	else
	{
		close(pfds[1]); // Close the write end of the pipe
		dup2(pfds[0], 0); // Make stdin the read end of the pipe
		if (execl("./master_script.sh", "master_script.sh", (char *)(NULL))
				== -1)
		{
			perror("Master script process spawn failed");
		}
	}

	return 0;
}

# File: master_script.sh

#!/bin/bash

while read cmd
do
	#echo "Running ${cmd} ..."
	${cmd}
done

One may compile the commander.c and try it as follows:

$ gcc commander.c -o commander
$ ./commander

This approach becomes even more powerful, when the shell command execution is pretty often. Also note that the main thread need not block for the command execution to complete. Though, it can be customized to block as well, if required. And many more customizations can be achieved as desired, e.g. getting the command output back into the C program instead of stdout, redirecting the command error into some log file instead of stderr, getting the command status – to list a few. Post your comments below to discuss any customizations of your interest.

   Send article as PDF   

Types of Shell Commands

Everyone, who has been a Linux user, must have typed various commands on shell, or the so-called shell commands, knowingly or unknowingly – at least the ubiquitous command “ls”. However, have one wondered, how one gets these commands?

A command which one types on shell is broadly available from one of the following three places:

  • An executable from some standard path in the file system
  • A built-in of the shell, available from the shell’s binary itself
  • An alias or function created by the shell

“ls” – every Linux users’ typical first command, basically comes from the “ls” executable located under /bin. And so are many more commands. All such commands come from one of the directories like /bin, /usr/bin, /sbin, etc. The complete list of such directories can be obtained from the PATH environment variable by typing:

$ echo ${PATH}

Typing this as a normal user would show the list of directories for commands available to a normal user. And typing it as a root user would show the list of directories for commands available to root user. Moreover, one could add directories to the corresponding PATH variable as well, using “export” command.

Given a command available from executable, e.g. “ls”, one may find its directory using the “which” command as follows:

$ which ls

What about the “which” command itself? Try:

$ which which

What about the “cd” command? Try:

$ which cd

And you’ll get a message saying no cd in the path. But then, cd still works, right? Just type:

$ type cd

And it would show that it is a shell built-in – the second type of the command types. And, it makes sense to be a built-in as well, as meaning of current working directory (the concept around “cd”) is relevant only with respect to a shell. What about the “type” command, itself? Any guess? Try:

$ type type

Yes, as expected, this is also a shell built-in. What about the “which” command? Try:

$ type which

And it shows, as expected, that it is an executable being picked up from a corresponding hashed directory. What about the “ls” command? Try:

$ type ls

Ouch! This is not as expected. It doesn’t show “ls” as an executable from a corresponding directory, but rather that “ls” is aliased to some string like “ls -F –color=auto” or so. Why is it so? Because the “ls” command we type, is actually an alias to the “ls” executable (with the specific colour options) – the third type of command types. And, that’s why we see coloured listing by default when we type “ls”. One can create aliases using the “alias” command, which itself is a shell built-in, as expected. And aliases override commands from the actual executables.

What if one wants to bypass the alias and directly call the executable? The command with the complete executable path, e.g. “/bin/ls”, may be invoked, or it may be backslashed, as follows:

$ \ls

Observe the non-coloured output of the original “ls” executable.

So to conclude, “type” command gives the actual type (out of the three types) for any command we type on shell. “which” command is to figure out the directory of its corresponding executable, if any. And “alias” command would list out all the aliases currently defined under the corresponding shell.

On a side note, “man” command typically provides help on the shell’s executable commands only. For a built-in command, it may just open up the man page of the shell itself. So, for specific help on built-in commands, you may use the “help” command, e.g.:

$ help cd

Parting question: Which type of command is “help”? Try out the various commands on it and have fun exploring the types of shell commands.

   Send article as PDF   

Running DOS programs on Linux

Lot of people from DOS days must have played & enjoyed those DOS games. And today those don’t always play or not play straight away on Windows. And so, the newer generation might have heard about them, but never got a first hand experience. Moreover, today there are more Linux users than ever. Ya ya, on Linux, people have been using wine for Windows emulation of the executables, but not always straight forward for the graphics part. So, for the DOS game lovers, or for that matter for executing any DOS program to get that antique feeling, there is a simpler elegant way. It is using dosbox, which is available in various Linux distros. Just install it as a package. And run with the command dosbox.

And DOS would so-called boot and give the DOS prompt with Z:\ drive as system drive. Then, it is all DOS in that dosbox window. Now, how to run external DOS executables? Assuming they are available in some folder under Linux, say ~/DOS. That could be mounted in the dosbox, by the following command:

Z:\>mount c ~/DOS

With this, the ~/DOS folder from Linux is mounted as C:\ drive in dosbox. And now the various DOS things are applicable to it. One may switch to it by typing the drive, as follows:

Z:\>C:

If it has game executables, compiler executables, … from DOS days, those can be run by just typing them as the executable with complete path, as was to be done in those DOS days. Just remember that the directory separator slash used in DOS is backslash (\) like in Windows and unlike in Linux. And front slash (/) is used for command options.

To get a list and help on the default available (DOS) commands, type:

C:\>help /all

And finally to exit from the dosbox:

C:\>exit


   Send article as PDF   

Detection of I2C Devices

While exploring new I2C devices or bringing up I2C devices on Linux, and especially when things are not working, one of the common doubts which linger around is, is there a problem in hardware or software. In fact, this is a common doubt for any type of device, why only I2C. And the easiest way ahead for all such standard protocols is to have a user space tool / application, which can scan the devices without depending on any device specific driver. Assumption here is that the corresponding bus driver is in place. Depending on the protocol, the tools may be different. So, here our focus is on I2C.

i2cdetect is a powerful and simple tool for figuring out I2C devices. If an I2C device is detectable with i2cdetect, it means hardware is fine and if not detectable means some issue with the hardware. And the debugging could proceed accordingly. Executing i2cdetect may need root privileges and can be used as follows:

List the I2C buses available:

# i2cdetect -l

Say, 0 & 1 are available. Then, each bus could be scanned to see what all device addresses exist on each bus. It is assumed that we know the device addresses of our devices. Here’s how to scan say bus 0:

# i2cdetect -y 0

If this doesn’t work, issuing an error, you may add a “-r” option to use the SMBus commands, which should work.

# i2cdetect -y -r 0

Output of the working command will be an array of all device address locations on that bus, with “- -” or “UU” or a device address, as its value.

“- -” indicates address was probed but no device responded. So, if you are expecting a device at some address and got “- -“, it means either it is not on this bus, or the device is not getting detected because of some hardware issue, which could be hardware lines not connected properly, or voltage supply issue, or something else.

“UU” indicates that probing of this address was skipped because the address is currently in use by a driver. This is strong indication that the device is present, and highly likely that the driver is also in place.

Device Address in hexadecimal indicates that the device has been detected.

In both the above cases, hardware side of the device & its connections are all fine. And if it is still not working as expected in case it is showing “UU”, it is high chances that the driver may need tuning / modification. Just to be doubly sure about that, you may verify it by changing the device with an another one, if possible.

And for the case showing the device address in hexadecimal, either a software driver is needed for it or it may be accessed using some user space accessing mechanism.

Note: i2cdetect is part of the i2c-tools package. So, if it is not available on the corresponding Linux system, the i2c-tools package may need to be installed.

   Send article as PDF   

Running Commands on VirtualBox from Outside

In today’s world of multi operating systems (OSes), some things get done better / easier in one OS, whereas some in other. Now, if all types of tasks are to be done on the corresponding OSes, there are various possibilities. Two from those are:

  • Have multiple systems with the various OSes
  • Have a system with one of the OSes (referred to as host OS) and VirtualBoxes on it for the other OSes (referred to as guest OSes)

From ease of use perspective, the second one is preferable. In either case, if automation of all the tasks is required the following are the most common steps:

  • Write a script on one of the OSes, preferably bash script on Linux to automate its local tasks
  • Invoke / Do the tasks on the other OSes in the same script, using ssh with the command to the corresponding OS

For the above steps to work, a minimal network connection is expected between the different OSes. In case of multiple systems, physical network connection is required. However, with VirtualBoxes, even the network could be virtual between the VirtualBoxes.

In case of VirtualBoxes, a networkless solution is also possible. One can actually run the commands on a VirtualBox based guest OS using commands on the host OS. The key to that is the command VBoxManage which gets installed alongwith the VirtualBox on the host OS. To be specific, it is the option guestcontrol of the VBoxManage. Invoke it as follows for further list of options:

$ VBoxManage help guestcontrol

Assuming a VirtualBox running with the name “Ubuntu”, username “test”, password “testpwd”, the following are a few examples of what can be done:

$ VBoxManage guestcontrol Ubuntu --username test --password testpwd mkdir /home/test/xyz
$ VBoxManage guestcontrol Ubuntu --username test --password testpwd mv /home/test/xyz /home/test/abc
$ VBoxManage guestcontrol Ubuntu --username test --password testpwd rmdir /home/test/abc

There are few more commands, apart from the above, which can be directly used. But what about the whole plethora of commands on the guest OS? For an access to all the commands on the guest OS, they may be invoked using their complete path as follows:

$ VBoxManage guestcontrol Ubuntu --username test --password testpwd run --exe /bin/ls

The above is an example of invoking “ls”, but this shows the content of the root (/) directory on the guest OS. What if parameters are to be passed to the command? Then, do as follows:

$ VBoxManage guestcontrol Ubuntu --username test --password testpwd run --exe /bin/ls -- ls /home/test

This would list the contents of /home/test on the guest OS. Note that after – – , argv[0], argv[1], … has to be passed. Hence, the first one is “ls” itself.

Want to shorten giving the long command again and again, on a Linux host. Then, define a variable, say

$ export UBUNTU="VBoxManage guestcontrol Ubuntu --username test --password testpwd run --exe"
$ ${UBUNTU} /bin/ls -- ls /home/test

In case of doing it through a script, the variable may be defined without the export.

Now, if the output from the command is not desired, one may use “start” instead of “run”, e.g.

$ VBoxManage guestcontrol Ubuntu --username test --password testpwd start --exe /bin/ls -- ls /home/test

In all the above examples, it has been assumed that the VirtualBox Ubuntu was already running. In fact, if it was not, it also may be started / booted, paused, resumed, stopped / shutdown from the command line as well. This, giving a full control on automation. Here are the corresponding commands:

$ VBoxManage startvm Ubuntu --type gui # The usual graphical Start
$ VBoxManage startvm Ubuntu --type headless # The hidden background Start
$ VBoxManage controlvm Ubuntu pause # Pause the VM
$ VBoxManage controlvm Ubuntu resume # Resume the VM
$ VBoxManage controlvm Ubuntu poweroff # Poweroff the VM
$ VBoxManage controlvm Ubuntu reset # Reset / Hard Restart the VM in case of hang or so
   Send article as PDF   

Playing with ALSA loopback devices

Looping back is always an interesting thing to play with. It comes with its own set of applications, ranging from testing & debugging to replicating & integration. It has been used in various fields including hardware and software. At hardware level, we often short the Rx (receive) & Tx (transmit) lines to do the loopback in devices like serial, network, etc. In software, we do it using pipes, files, etc. However, an even more interesting crop is the concept of virtual devices doing loopback. We had talked about virtual video loopback devices in the previous article “Simultaneous Access to Single Camera“. Similarly, we can have virtual audio loopback devices.

snd-aloop is the kernel module for setting up virtual audio loopback devices.

$ sudo modprobe snd-aloop

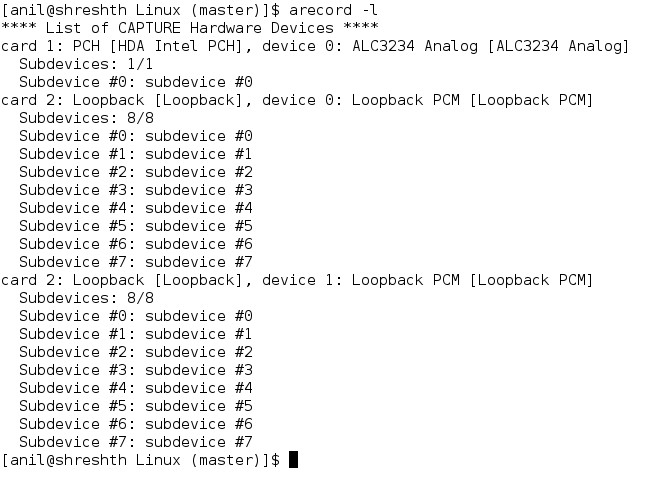
creates two devices 0 & 1 under a new “Loopback” card for both playback & capturing, as shown below, respectively:

Playback Devices

Capture Devices

In the above images, the card 2 is the loopback card. It may vary depending on which is the next free available card number. Moreover, each of the two devices under it, has 8 subdevices, which would be accessed using the format hw:c,d,s, where c stands for card number, d for device number, and s for subdevice number, e.g. hw:2,0,0

Now in this, whatever audio is played back into hw:2,0,s could be captured from hw:2,1,s and viceversa, s ranging from 0 to 7. For example, audio played back into hw:2,0,4 could be captured from hw:2,1,4; audio played back into hw:2,1,7 could be captured from hw:2,0,7 – these are what are the loopbacks. A simple experiment could demonstrate the same.

Start recording audio from hw:2,1,4:

$ arecord -D hw:2,1,4 -f S16_LE -c 2 -r 48000 recorded.wav

Note that providing the sample format, channel count, frame rate in recording ensures that playback picks up the same settings – this is because there is no real hardware underneath it is just a virtual loopback connection.

And in parallel (from another shell) play an audio from audio.wav into hw:2,0,4:

$ aplay -D hw:2,0,4 audio.wav

And you’d find that recorded audio contains the played one – a loopback in action. You may play the recorded audio as follows:

$ aplay recorded.wav

This would play on your system’s default speaker.

Also, note that there may be problem in just playing any audio.wav file because of the mismatched audio format etc support. For that, just record a new wave file with your speech using the following command:

$ arecord -f S16_LE -c 2 -r 48000 audio.wav

This would record from your system’s default mic.

Interestingly, audio loopback could also be achieved in user space using alsaloop from alsa-utils package. Here is a demo of the same. From the output of aplay -l, hw:1,0 is the analog out (speaker). Note that hw:1,0 is same as hw:1,0,0. Find the equivalent on your system. And, now let’s loopback the virtual audio capture device hw:2,1,4 to this:

alsaloop -C hw:2,1,4 -P hw:1,0

On another shell, do the earlier playing:

$ aplay -D hw:2,0,4 audio.wav

This time you should be able to hear the audio.wav directly through system’s default speaker – again a loopback in action – rather two loopbacks in action: audio.wav -> hw:2,0,4 -> (loopback through snd-aloop driver) -> hw:2,1,4 -> (loopback through alsaloop app) -> hw:1,0 -> heard on speaker.

   Send article as PDF   

Simultaneous Access to Single Camera

There are many devices, accessing which is meaningful, only when accessed by one user at a time. Examples include a serial port, a camera, … To illustrate it further, think through as what would happen if two applications (aka users) read from the same serial port simultaneously. Some data would go to one user and some to the other, making both data meaningless. That is why, in such cases it is recommended to use only one application at a time for that particular device. A similar scenario would happen even with camera capturing. To avoid such undesired results, many a times the corresponding device framework marks the device busy if it is being used – thus ensuring that only one application is using it at a time.

In general, this mutually exclusive device usage is fine. But, what if two applications want to access the same data simultaneously. That is a problem. But even if the device is allowed to be accessed simultaneously, it does not solve the problem, as the data would get split, unlike in the storage devices like EEPROM, hard disk. One way to solve such a problem is by mirroring the data, and the mutually exclusiveness also would not be hampered. For that, we would need an intermediate application which would actually read from the device and then mirror the read data into as many virtual devices as needed. With such an arrangement, many applications can actually get the same camera feed, say for different processings.

Here is the outline of how to achieve this for a v4l2 (video for linux 2) compatible camera:

+ Download the v4l2loopback driver from https://github.com/umlaeute/v4l2loopback
+ Compile it using the corresponding kernel version, where the camera is attached. On an x86 system, typically typing make should do.
+ Load the v4l2loopback driver (v4l2loopback.ko file) w/ appropriate options. A typical way:

$ sudo insmod v4l2loopback.ko devices=2

Assuming an existing /dev/video0 for the camera, this would create two loopback video device file entries video1 & vide2. Refer to https://github.com/umlaeute/v4l2loopback/README.md for more options. Whatever is fed into these device files, comes out as their output.

+ Feeding a video test source (Ancient Doordarshan Screen) into the loopback video device files, using gst-launch application (just for testing):

$ gst-launch-1.0 videotestsrc ! tee name=t ! queue ! v4l2sink device=/dev/video1 t. ! queue ! v4l2sink device=/dev/video2

+ Open cheese or any such application to view video test screen from the video1 & video2 device files

+ Time to mirror the video0 stream to video1 & video2. Use the gst-launch application, as follows:

$ gst-launch-1.0 v4l2src device=/dev/video0 ! tee name=t ! queue ! v4l2sink device=/dev/video1 t. ! queue ! v4l2sink device=/dev/video2

+ Now, video1 & video2 are mirrors of video0. Go ahead and enjoy using video1 & video2. An example:

$ gst-launch-1.0 v4l2src device=/dev/video1 ! xvimagesink
   Send article as PDF   

Working with multiple Python environments

With the ample use of Python in applications all over, it is a common requirement that different applications need different combinations & conflicting versions of Python modules. Rather than having separate (real or virtual) machines with different installations for the different applications, it can be simply achieved using the Python’s virtualenv module. Here’s a quick summary of how to do it in Linux.

Install the python-virtualenv package, either using the package installer, or using pip of the desired python version:

$ sudo pip3 install virtualenv

Create a directory with the desired virtual environment, with or without the system wide installed packages, and the desired python version, as follows:

$ virtualenv --system-site-packages -p python3 ./venv

Or,

$ virtualenv --no-site-packages -p python3 ./venv

Here, venv (in the current directory) is the directory created with the desired virtual environment. Now, time to activate the virtual environment:

$ . ./venv/bin/activate

Now onwards, this shell’s prompt would be prefixed by (venv) indicating the virtual environment it is using. Whatever local done on this shell is specific only to this virtual environment, it being stored in this virtual environment’s directory. So, whatever pip installs (w/o sudo) are required for an application to run, can be done here independent of any external environment – even independent of the system wide installed packages, in case the virtual environment was created without them. All such installs would be local only to this environment without affecting the external environment.

Now the desired application, needing this environment, may be run in this environment.

Once done with the virtual environment, it can be deactivated as follows:

(venv) $ deactivate

It can be activated & deactivated as & when desired. Why just one? One may have any number of different virtual environments created and activated in parallel, just using separate directories and on separate shells – no need of separate machines.

   Send article as PDF