Looping back is always an interesting thing to play with. It comes with its own set of applications, ranging from testing & debugging to replicating & integration. It has been used in various fields including hardware and software. At hardware level, we often short the Rx (receive) & Tx (transmit) lines to do the loopback in devices like serial, network, etc. In software, we do it using pipes, files, etc. However, an even more interesting crop is the concept of virtual devices doing loopback. We had talked about virtual video loopback devices in the previous article “Simultaneous Access to Single Camera“. Similarly, we can have virtual audio loopback devices.
snd-aloop is the kernel module for setting up virtual audio loopback devices.
$ sudo modprobe snd-aloop
creates two devices 0 & 1 under a new “Loopback” card for both playback & capturing, as shown below, respectively:

Playback Devices
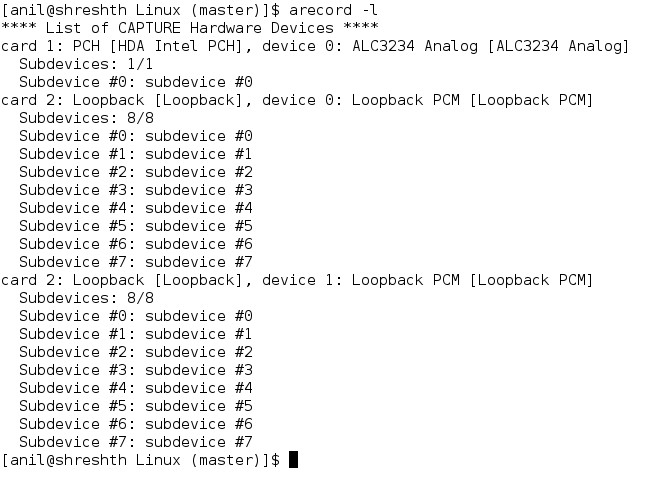
Capture Devices
In the above images, the card 2 is the loopback card. It may vary depending on which is the next free available card number. Moreover, each of the two devices under it, has 8 subdevices, which would be accessed using the format hw:c,d,s, where c stands for card number, d for device number, and s for subdevice number, e.g. hw:2,0,0
Now in this, whatever audio is played back into hw:2,0,s could be captured from hw:2,1,s and viceversa, s ranging from 0 to 7. For example, audio played back into hw:2,0,4 could be captured from hw:2,1,4; audio played back into hw:2,1,7 could be captured from hw:2,0,7 – these are what are the loopbacks. A simple experiment could demonstrate the same.
Start recording audio from hw:2,1,4:
$ arecord -D hw:2,1,4 -f S16_LE -c 2 -r 48000 recorded.wav
Note that providing the sample format, channel count, frame rate in recording ensures that playback picks up the same settings – this is because there is no real hardware underneath it is just a virtual loopback connection.
And in parallel (from another shell) play an audio from audio.wav into hw:2,0,4:
$ aplay -D hw:2,0,4 audio.wav
And you’d find that recorded audio contains the played one – a loopback in action. You may play the recorded audio as follows:
$ aplay recorded.wav
This would play on your system’s default speaker.
Also, note that there may be problem in just playing any audio.wav file because of the mismatched audio format etc support. For that, just record a new wave file with your speech using the following command:
$ arecord -f S16_LE -c 2 -r 48000 audio.wav
This would record from your system’s default mic.
Interestingly, audio loopback could also be achieved in user space using alsaloop from alsa-utils package. Here is a demo of the same. From the output of aplay -l, hw:1,0 is the analog out (speaker). Note that hw:1,0 is same as hw:1,0,0. Find the equivalent on your system. And, now let’s loopback the virtual audio capture device hw:2,1,4 to this:
alsaloop -C hw:2,1,4 -P hw:1,0
On another shell, do the earlier playing:
$ aplay -D hw:2,0,4 audio.wav
This time you should be able to hear the audio.wav directly through system’s default speaker – again a loopback in action – rather two loopbacks in action: audio.wav -> hw:2,0,4 -> (loopback through snd-aloop driver) -> hw:2,1,4 -> (loopback through alsaloop app) -> hw:1,0 -> heard on speaker.
The author is a hobbyist in open source hardware and software, with a passion for mathematics, and philosopher in thoughts. A gold medallist from the Indian Institute of Science, Linux, mathematics and knowledge sharing are few of his passions. He experiments with Linux and embedded systems to share his learnings through his weekend workshops. Learn more about him and his experiments at https://sysplay.in.


hi,
nice tutorial.
Here is my situation in raspberry pi
pi@retropie:~ $ arecord -l
**** List of CAPTURE Hardware Devices ****
pi@retropie:~ $
pi@retropie:~ $
pi@retropie:~ $ aplay -l
**** List of PLAYBACK Hardware Devices ****
card 0: ALSA [bcm2835 ALSA], device 0: bcm2835 ALSA [bcm2835 ALSA]
Subdevices: 7/7
Subdevice #0: subdevice #0
Subdevice #1: subdevice #1
Subdevice #2: subdevice #2
Subdevice #3: subdevice #3
Subdevice #4: subdevice #4
Subdevice #5: subdevice #5
Subdevice #6: subdevice #6
card 0: ALSA [bcm2835 ALSA], device 1: bcm2835 IEC958/HDMI [bcm2835 IEC958/HDMI]
Subdevices: 1/1
Subdevice #0: subdevice #0
card 0: ALSA [bcm2835 ALSA], device 2: bcm2835 IEC958/HDMI1 [bcm2835 IEC958/HDMI1]
Subdevices: 1/1
Subdevice #0: subdevice #0
pi@retropie:~ $ arecord -l
**** List of CAPTURE Hardware Devices ****
pi@retropie:~ $
I am thinking of creating loopback device then forward or clone hdmi sound to this loopback device and capture from counter part of loopback device .
Is it possible ?
Thanks.
Give it a try. I think it should be possible.
In a world on systemd, pulseaudio and dbus u are the one XD
Now I can record my desktop sound and share my PrimeVideo con my friends for a nigth party :3
Now I want to get how to combine my mic and my desktop XD
Please do research and add your learning here as a comment. That way we could all learn together.
Awesome work!
Would it be possible to loopback the output of a USB dac and then use that file for some LED visualization?
Is the USB dac exposed as an audio hw? If yes, loopback should be possible. Then, it depends on how you want to use that as an input for LED visualization.
does ALSA loopback also works with android audio? Like if i want to write audio using mediarecorder or aaudio and capture it at the lower layer via ALSA loopback, it is possible?
Fundamentally Android uses Linux. So, should be possible, unless Android has put in some hacks for it to not work.
An important note the device numbers matter. I spent a long time scratching my head because I was recording and playing back from the same device. The loopback is actually a pair of devices. The input is device 1 and the output is device 0.
AUDIODEV=hw:1,1 play -V -V foo.wav
AUDIODEV=hw:1,0 rec -V -c 1 -r 8000 bar.wav
I also found sox’s players to be more helpful than alsa’s as you get a convenient ascii-art volume indicator:
In:54.9% 00:05:29.22 [00:04:30.78] Out:15.8M [ -=|=- ] Clip:0
I tried to make an automataic phone answering with pjsua.
Therfore I wrote a script which use aplay for producing the anncoument. This works …
Now I have to loop the output to the “microphone” input, because this is what pjsua send’s via SIP.
It works with a physical soundcard and a loopback cable, but I’d like to set up without physical soundcard. Unfortunately I can’t manage it.
My setup on my Pi is:
aplay – l
**** List of PLAYBACK Hardware Devices ****
card 0: Headphones [bcm2835 Headphones], device 0: bcm2835 Headphones [bcm2835 Headphones]
Subdevices: 8/8
Subdevice #0: subdevice #0
Subdevice #1: subdevice #1
Subdevice #2: subdevice #2
Subdevice #3: subdevice #3
Subdevice #4: subdevice #4
Subdevice #5: subdevice #5
Subdevice #6: subdevice #6
Subdevice #7: subdevice #7
card 1: Loopback [Loopback], device 0: Loopback PCM [Loopback PCM]
Subdevices: 7/8
Subdevice #0: subdevice #0
Subdevice #1: subdevice #1
Subdevice #2: subdevice #2
Subdevice #3: subdevice #3
Subdevice #4: subdevice #4
Subdevice #5: subdevice #5
Subdevice #6: subdevice #6
Subdevice #7: subdevice #7
card 1: Loopback [Loopback], device 1: Loopback PCM [Loopback PCM]
Subdevices: 8/8
Subdevice #0: subdevice #0
Subdevice #1: subdevice #1
Subdevice #2: subdevice #2
Subdevice #3: subdevice #3
Subdevice #4: subdevice #4
Subdevice #5: subdevice #5
Subdevice #6: subdevice #6
Subdevice #7: subdevice #7
I tried with aplay -D hw:2,0,x myaudio.wav and hw:2,1,x (all possible variants)
any ideas?
Thanks
Did you try recording using arecord? What are you getting?
Did you try loopback using alsaloop command?
Thanks, this is really cool!