Accessing the Real Time Clock

This 15th article in the series of “Do It Yourself: Electronics”, demonstrates accessing the real time clock (RTC) chip DS1307 over the I2C protocol using the AVR micro-controller ATmega16.

<< Previous Article

Equipped with I2C implementation for AVR’s ATmega16 (in the previous article), it was time to connect an I2C device to try out the protocol. Pugs decided to use the RTC chip DS1307, and then read & write the real time from it. While going through DS1307 datasheet to put it on the breadboard to connect with ATmega16, Pugs realized that he would need a 32768Hz crystal, apart from powering the RTC chip. So while purchasing the DS1307 chip, he also got the crystal.

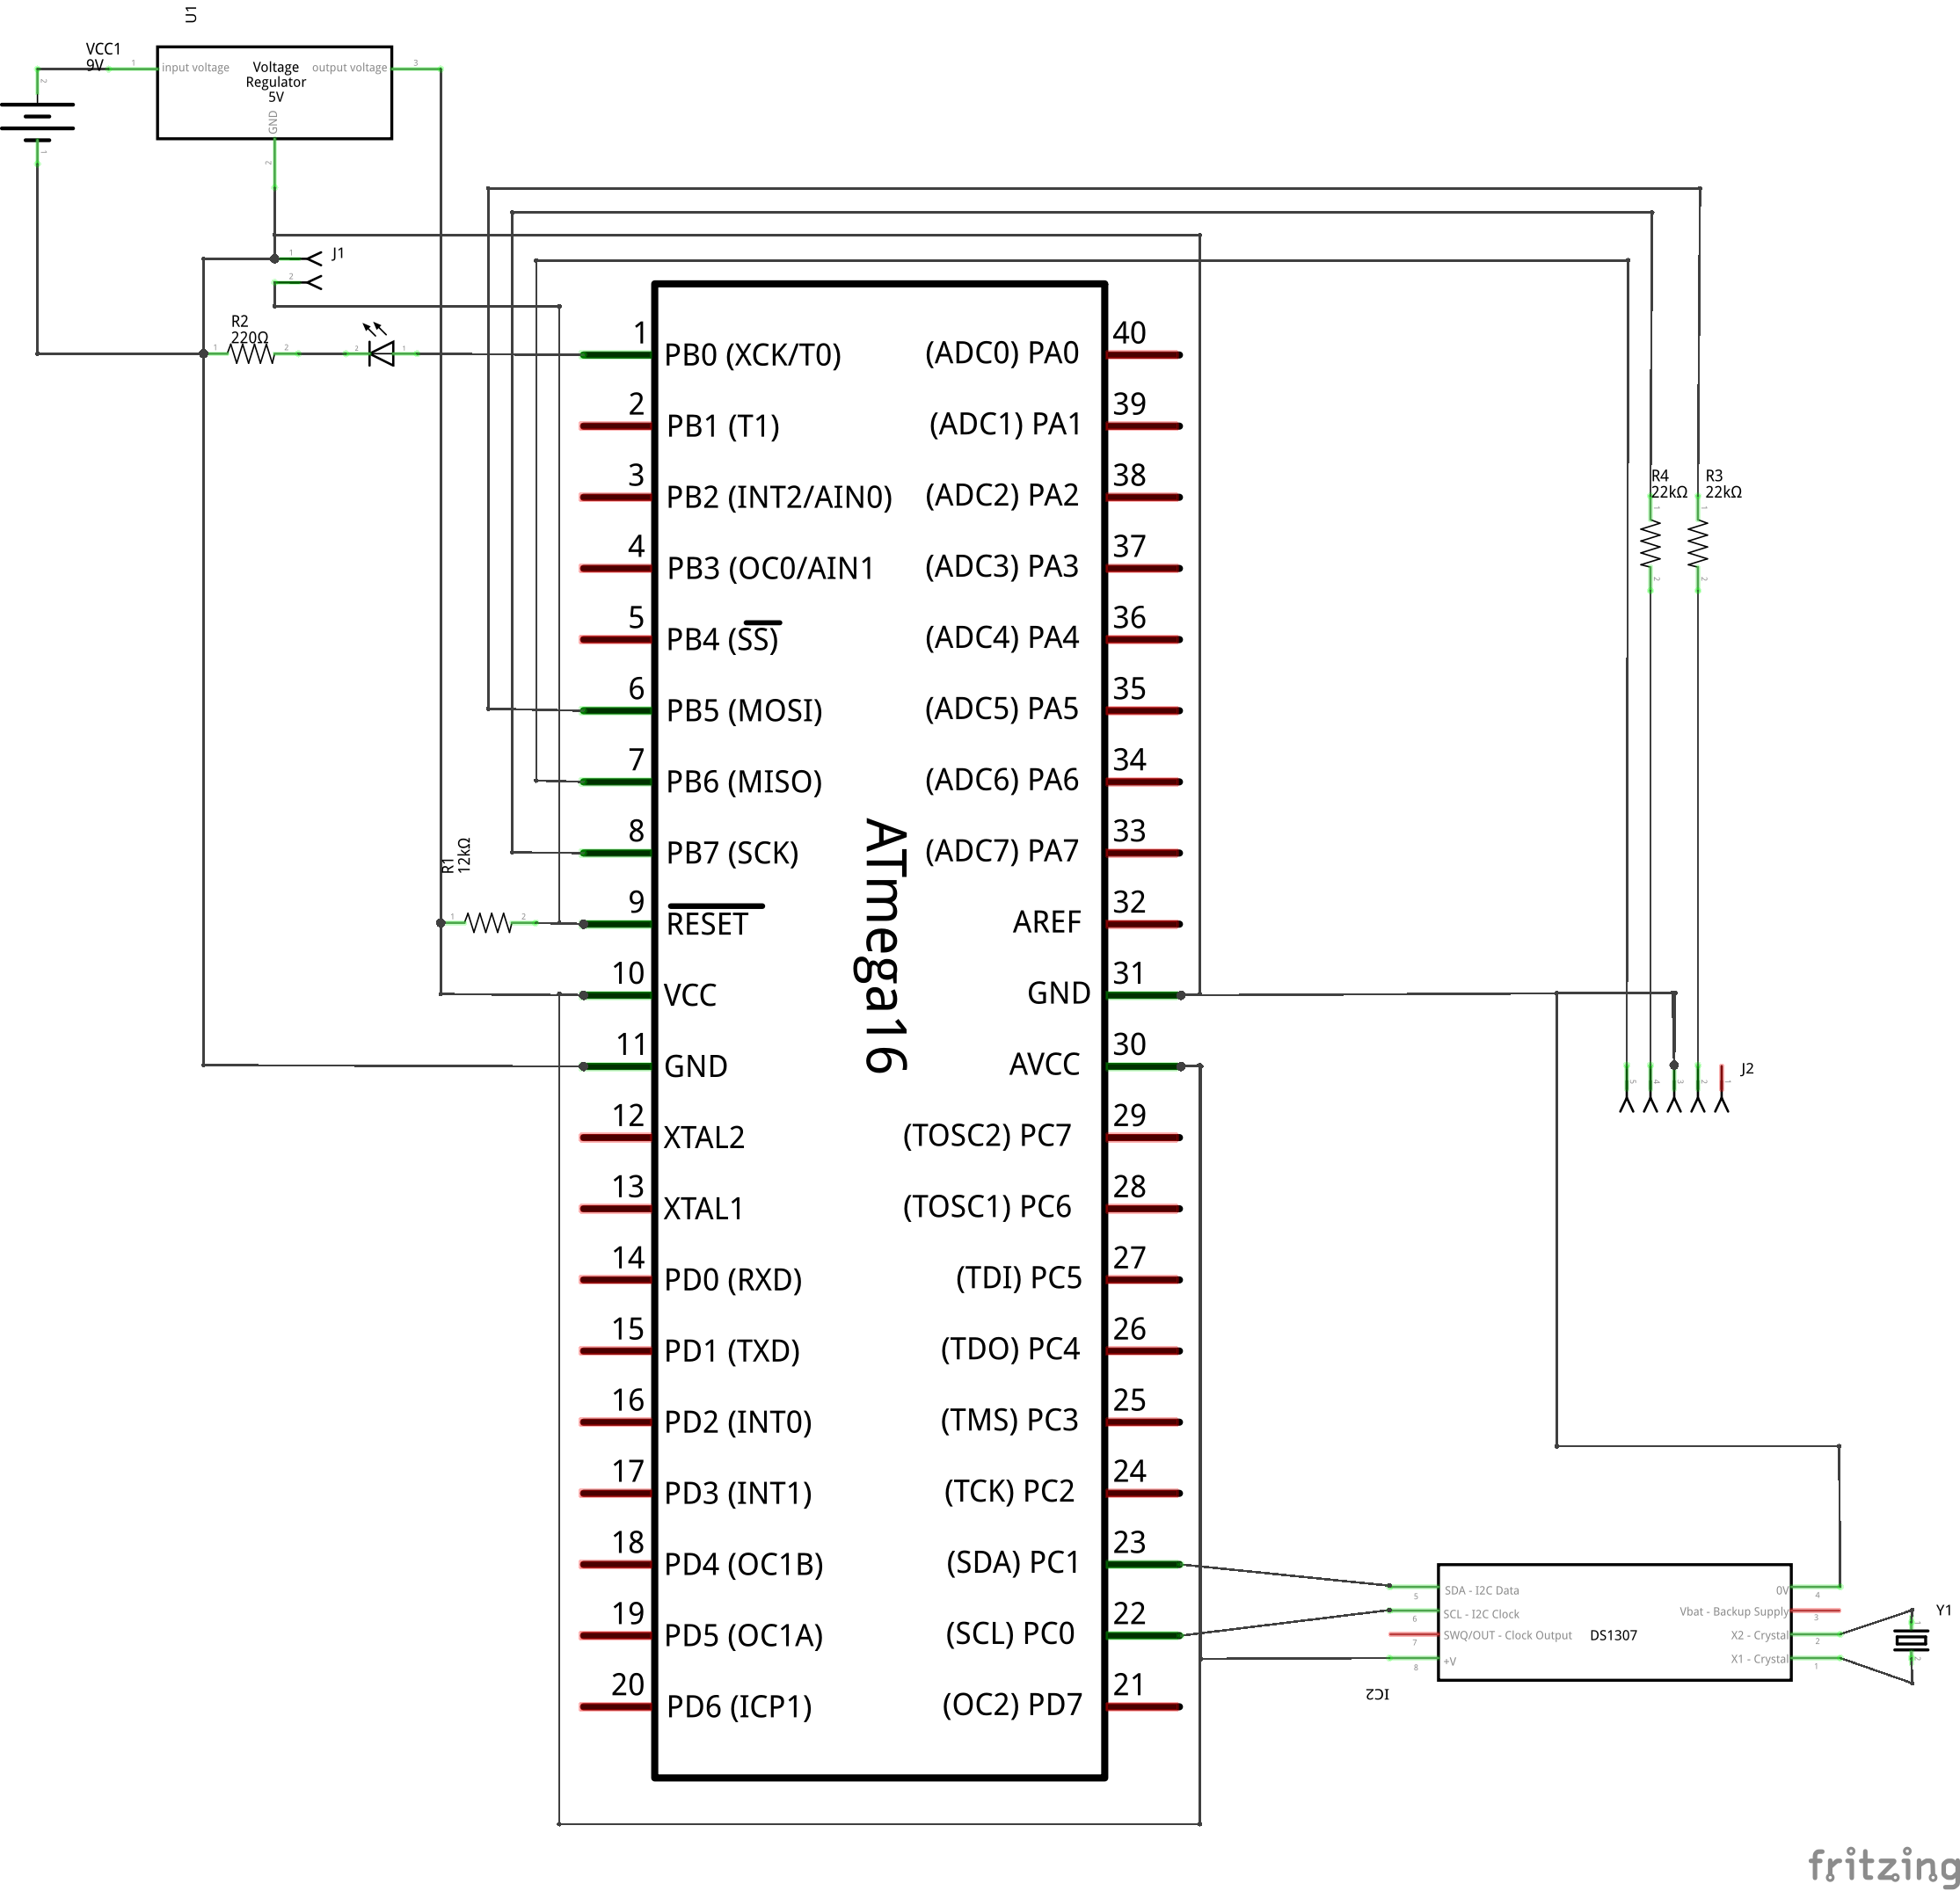
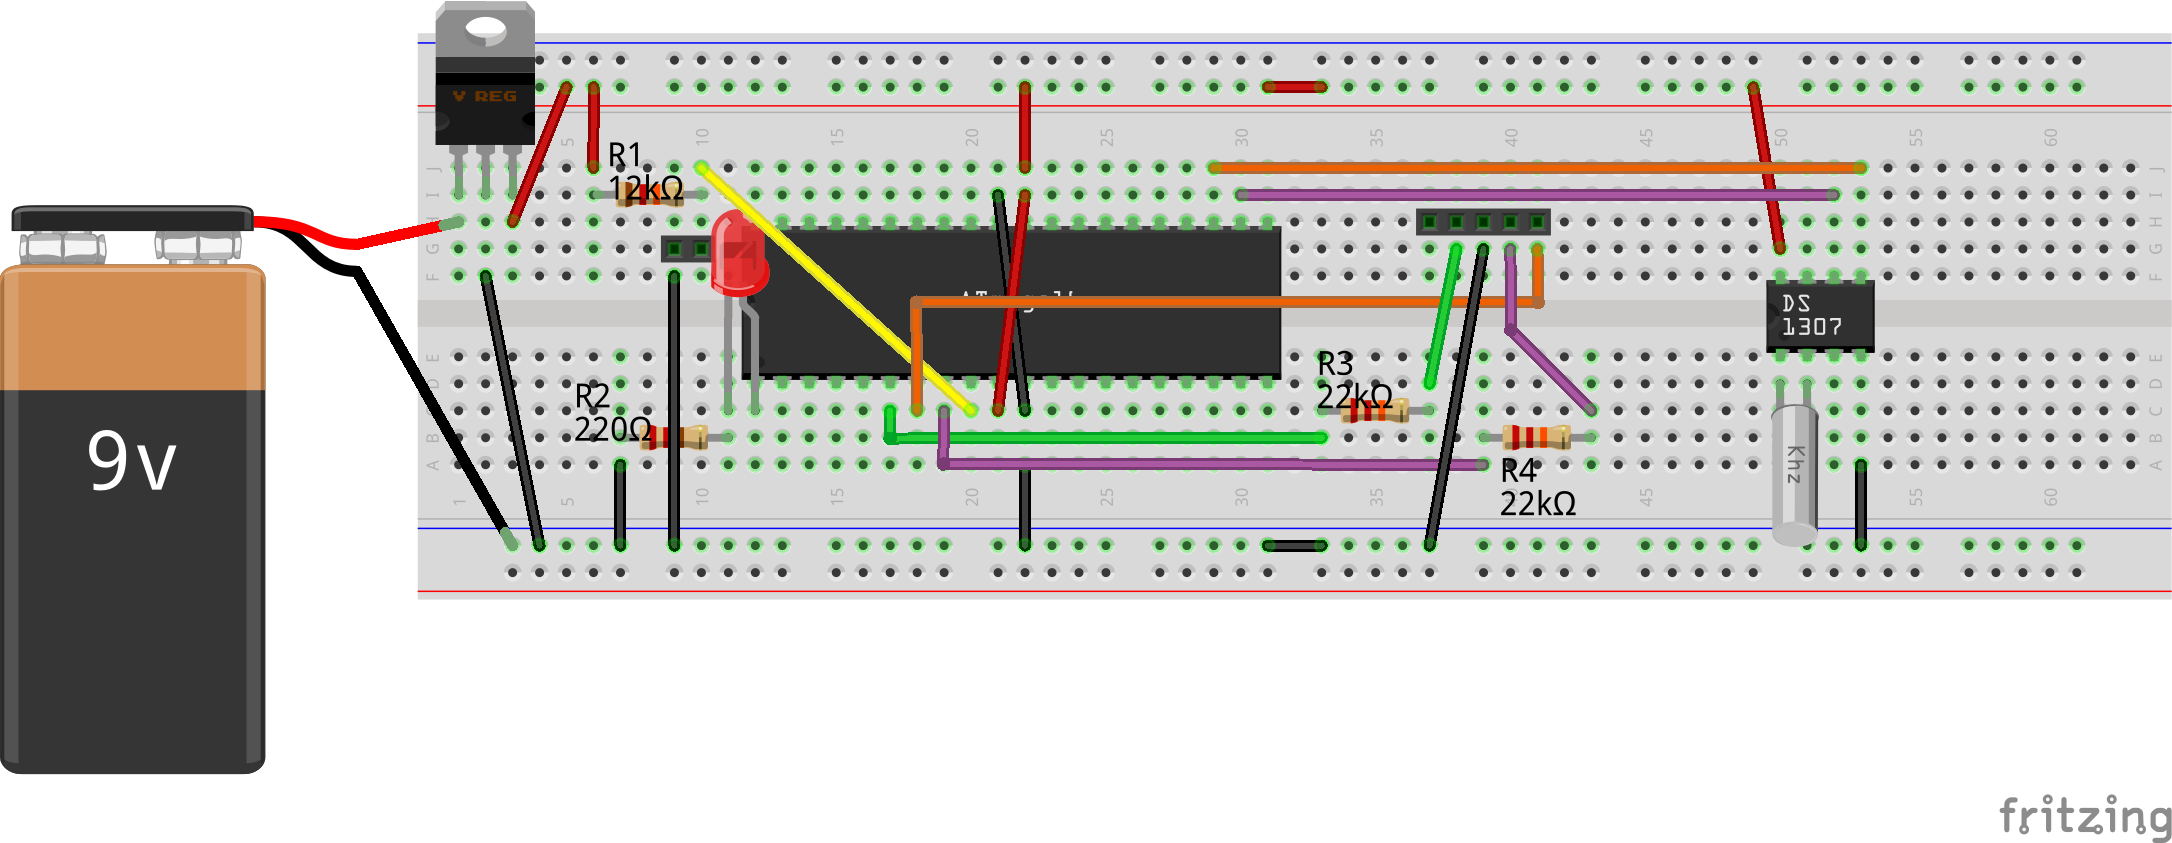
Once ready with all the components, here is how Pugs added the RTC circuit to his existing ATmega16 programming circuit, he has been using for all his experiments till now (aka in his previous articles):

AVR RTC Interfacing Schematic

AVR RTC Interfacing Schematic

AVR RTC Interfacing Bread Board Connections

AVR RTC Interfacing Bread Board Connections

And from the DS1307 datasheet pg 7, Pugs figured out that it is the chip’s first 7 registers (for second, minute, hour, day, date, month, year in binary coded decimal (BCD) format), which need to be read or written for reading or writing the real time from the chip. Also, that the RTC operates only in standard I2C mode (pg 10) and the 7-bit slave address of the RTC is 0b1101000 (pg 12). And accordingly, he prototyped the RTC logic in rtc.h and programmed them in rtc.c.

Header rtc.h is as follows:

#ifndef RTC_H
#define RTC_H

void rtc_init(void);
int rtc_set(uint8_t y, uint8_t mo, uint8_t d, uint8_t dy, uint8_t h, uint8_t m,
		uint8_t s);
int rtc_get(uint8_t *is_halted, uint8_t *y, uint8_t *mo, uint8_t *d, uint8_t *dy,
		uint8_t *h, uint8_t *m, uint8_t *s);
int rtc_get_str(uint8_t *is_halted, char date_str[15], char time_str[9]);

#endif

And the complete implementation of rtc.c goes here (Note the usage of TWI APIs implemented in the previous article):

#include <avr/io.h>

#include "twi.h"
#include "rtc.h"

#define RTC_DEV_ADDR 0b1101000

void rtc_init(void)
{
	twi_init(standard);
}

int rtc_set(uint8_t y, uint8_t mo, uint8_t d, uint8_t dy, uint8_t h, uint8_t m,
		uint8_t s)
{
	uint8_t rtc_data[8] = { /* RTC Registers' start address */ 0x00, };
	uint8_t *rtc_reg = rtc_data + 1;

	/* RTC Registers */
	rtc_reg[0] = ((s / 10) << 4) | (s % 10); /* seconds in BCD */
	rtc_reg[1] = ((m / 10) << 4) | (m % 10); /* minutes in BCD */
	rtc_reg[2] = ((h / 10) << 4) | (h % 10); /* hours in BCD */
	rtc_reg[3] = dy; /* day in BCD : 7 for Saturday */
	rtc_reg[4] = ((d / 10) << 4) | (d % 10); /* date in BCD */
	rtc_reg[5] = ((mo / 10) << 4) | (mo % 10); /* month in BCD */
	rtc_reg[6] = ((y / 10) << 4) | (y % 10); /* year in BCD */

	return twi_master_tx(RTC_DEV_ADDR, rtc_data, sizeof(rtc_data));
}

int rtc_get(uint8_t *is_halted, uint8_t *y, uint8_t *mo, uint8_t *d, uint8_t *dy,
		uint8_t *h, uint8_t *m, uint8_t *s)
{
	int ret;
	uint8_t rtc_data = 0x00; /* RTC Registers' start address */
	uint8_t rtc_reg[7];

	if ((ret = twi_master_tx_rx(RTC_DEV_ADDR, &rtc_data, 1, rtc_reg, 7)) == 0)
	{
		*is_halted = rtc_reg[0] >> 7;
		/* seconds from BCD */
		*s = 10 * ((rtc_reg[0] >> 4) & 0x7) + (rtc_reg[0] & 0xF);
		/* minutes from BCD */
		*m = 10 * (rtc_reg[1] >> 4) + (rtc_reg[1] & 0xF);
		/* hours from BCD */
		*h = 10 * (rtc_reg[2] >> 4) + (rtc_reg[2] & 0xF);
		/* day from BCD : 7 for Saturday */
		*dy = rtc_reg[3];
		/* date from BCD */
		*d = 10 * (rtc_reg[4] >> 4) + (rtc_reg[4] & 0xF);
		/* month from BCD */
		*mo = 10 * (rtc_reg[5] >> 4) + (rtc_reg[5] & 0xF);
		/* year from BCD */
		*y = 10 * (rtc_reg[6] >> 4) + (rtc_reg[6] & 0xF);
	}
	return ret;
}

int rtc_get_str(uint8_t *is_halted, char date_str[15], char time_str[9])
/* Format Example: date_str[] = "01.06.2075 Sat"; time_str[] = "03:07:00"; */
{
	int ret;
	uint8_t rtc_data = 0x00; /* RTC Registers' start address */
	uint8_t rtc_reg[7];
	uint8_t day;
	char *day_str[] = { "", "Sun", "Mon", "Tue", "Wed", "Thu", "Fri", "Sat" }; 

	if ((ret = twi_master_tx_rx(RTC_DEV_ADDR, &rtc_data, 1, rtc_reg, 7)) == 0)
	{
		*is_halted = rtc_reg[0] >> 7;
		date_str[0] = '0' + (rtc_reg[4] >> 4);
		date_str[1] = '0' + (rtc_reg[4] & 0xF);
		time_str[2] = '.';
		date_str[3] = '0' + (rtc_reg[5] >> 4);
		date_str[4] = '0' + (rtc_reg[5] & 0xF);
		time_str[5] = '.';
		time_str[6] = '2';
		time_str[7] = '0';
		date_str[8] = '0' + (rtc_reg[6] >> 4);
		date_str[9] = '0' + (rtc_reg[6] & 0xF);
		time_str[10] = ' ';

		day = rtc_reg[3] & 0xF;
		date_str[11] = day_str[day][0];
		date_str[12] = day_str[day][1];
		date_str[13] = day_str[day][2];
		date_str[14] = 0;

		time_str[0] = '0' + (rtc_reg[2] >> 4);
		time_str[1] = '0' + (rtc_reg[2] & 0xF);
		time_str[2] = ':';
		time_str[3] = '0' + (rtc_reg[1] >> 4);
		time_str[4] = '0' + (rtc_reg[1] & 0xF);
		time_str[5] = ':';
		time_str[6] = '0' + ((rtc_reg[0] >> 4) & 0x7);
		time_str[7] = '0' + (rtc_reg[0] & 0xF);
		time_str[8] = 0;
	}
	return ret;
}

With all code set to read and write the RTC, Pugs needed some application code to call these. That’s where he implemented the following rtc_serial.c to operate on the RTC using serial interface. Yes, the same serial interface, he had setup in the previous articles, using the TTL to USB converter. Note the usage of serial APIs implemented in the previous USART article, and used in the previous debugging article, with modified serial.c.

#include <avr/io.h>
#include <util/delay.h>

#include "rtc.h"
#include "serial.h"

char date[] = "01.06.2075 Sat";
char time[] = "03:07:00";

int main(void)
{
	uint8_t is_halted;

	rtc_init();
	usart_init(9600);

	/* Initialize the clock to 2075.June.1st Sat 03:07:00 */
	if (rtc_set(75, 6, 1, 7, 3, 7, 0) == 0)
	{
		usart_tx(date);
		usart_byte_tx(' ');
		usart_tx(time);
	}
	else
	{
		usart_tx("RTC set failed. Halting ... ");
		while (1);
	}
	usart_byte_tx('\n');

	while (1)
	{
		if (rtc_get_str(&is_halted, date, time) == 0)
		{
			usart_tx(date);
			usart_byte_tx(' ');
			usart_tx(time);
		}
		else
			usart_tx("RTC read failed");
		usart_byte_tx('\n');
		_delay_ms(5000);
	}

	return 0;
}

Then, Pugs compiled all the programs together as follows (Note the value of F_CPU defined as 8MHz unlike earlier cases):

$ avr-gcc -mmcu=atmega16 -DF_CPU=8000000 -Os rtc_serial.c rtc.c twi.c serial.c -o
rtc_serial.elf
$ avr-objcopy -O ihex rtc_serial.elf rtc_serial.hex

And finally, downloaded the rtc_serial.hex into the ATmega16 with J1 shorted (same as in the previous articles), using the following command:

$ avrdude -c ponyser -P /dev/ttyUSB0 -p m16 -U flash:w:rtc_serial.hex:i

Pugs then connected the USB to TTL converter to his laptop on the USB side, and the RX, TX, GND pins of the USB to TTL converter to the TXD, RXD, GND pins of the micro-controller. And started the serial application minicom as root on his laptop as follows (same as in the previous articles):

# minicom -D /dev/ttyUSB1 -b 9600 -o

Note that Pugs’ TTL to USB connector shows up as /dev/ttyUSB1 on his laptop. In case, yours is different, use that instead. But what’s this, even after removing the jumper J1, no output on the minicom – seems like it is stuck. Aha! suddenly, it clicked to Pugs that he has missed something important, which was decided during the TWI implementation (in the previous article). Yes, the fuse settings of the ATmega16 to be changed for it to operate at 8MHz. So, that’s what exactly he did next.

As per the ATmega16 datasheet pg 260-261 & pg 29, the low fuse byte needs to be updated to 0xE4 from 0xE1, for it to operate at 8MHz clock. Hence, Pugs issued the following avrdude command with J1 shorted:

$ avrdude -c ponyser -P /dev/ttyUSB0 -p m16 -U lfuse:w:0xE4:m

And yes, this time after removing the short of jumper J1, he started getting the date & time displayed every 5 seconds from 2075. And, to quit from minicom, Pugs typed Ctrl-A Q.
Next Article >>

   Send article as PDF   

Programming the I2C protocol

This 14th article in the series of “Do It Yourself: Electronics”, demonstrates programming the I2C protocol for the AVR micro-controller ATmega16.

<< Previous Article

Equipped with debugging power, Pugs dwelled further into stuff of more involved programming – the protocols – specifically the I2C protocol.

What is I2C protocol?

It is a 2-wire protocol to communicate between a master controller with its slave devices, which understand the same protocol. Physically, it consists of communication over two wires or lines, namely SDA and SCL – the data & clock lines. The data could be clocked either at 100kbps (standard mode) or 400kbps (fast mode). Many slaves can be connected on the same I2C bus. Hence, each slave is identified by a unique 7-bit address. Overall the communication can be summarized as follows:

For Master Transmission to Slave, a single transaction typically goes like this:

  • Indicate START of communication
  • Send out the slave address of the device to transmit to
  • Send out the data
  • Indicate STOP of communication

There may be confirmation handshakings using acknowledgments at various stages of the transaction.

For Master Reception from Slave, a single transaction typically goes like this:

  • Indicate START of communication
  • Send out the slave address of the device to receive from
  • Receive the data
  • Indicate STOP of communication

Here also, there may be confirmation handshakings using acknowledgments at various stages of the transaction, except typically the last one.

Many a times a transaction consisting of both transmission & reception is needed. That would go as follows:

  • Indicate START of communication
  • Send out the slave address of the device to transmit to
  • Send out the data
  • Indicate (re)START of communication
  • Send out the slave address of the device to receive from
  • Receive the data
  • Indicate STOP of communication

Notice that there is no stop indication between the transmit and receive, and the second start is very often termed as restart.

I2C on ATmega16

Based on the above principle, the 2-wire interface (TWI) for ATmega16 to behave as a master is implemented using just 4 registers:

  • Bit rate register TWBR to set up the data transfer rate along with TWPS bits in TWSR register
  • Control register TWCR for all controls including start (TWSTA), stop (TWSTO), ack (TWEN), enable (TWEN), interrupt (TWINT) using corresponding bits mentioned in the ()
  • Status register TWSR for the transaction status
  • Data register TWDR for transmitting and receiving data

Now, formula for the bit rate is given by:
f_{SCL} = \frac{f_{cpu}}{16 + 2 . {TWBR} . 4^{TWPS}}
where TWBR & TWPS are to be set in the ATmega16 registers.

On analyzing the formula, one would figure out that, we may not be able to use TWI at either 100kbps or 400kbps with the 1 MHz (f_{cpu}) default clock of the ATmega16, as there exists no values for TWBR & TWPS to achieve the same. So, we would need to change the fuse settings of ATmega16, to get a different clock. We would do that when downloading our code, say to 8MHz, the maximum possible without an external crystal. Assuming that, the values for TWBR and TWPS for the standard and fast bit rates would come out as follows:

  • Standard: 32 & 0
  • Fast: 2 & 0

Using all these information as per the ATmega16 datasheet pg 177-200, the TWI can be prototyped & programmed as follows in twi.h & twi.c, respectively. The header twi.h would be:

#ifndef TWI_H
#define TWI_H

typedef enum
{
	standard,
	fast
} TwiMode;

void twi_init(TwiMode mode);
void twi_shut(void);
int twi_master_tx(uint8_t addr, uint8_t *data, int len);
int twi_master_rx(uint8_t addr, uint8_t *data, int len);
int twi_master_tx_rx(uint8_t addr, uint8_t *tx_data, int tx_len, uint8_t *rx_data,
			int rx_len);
#endif

And the complete implementation of twi.c goes here:

#include <avr/io.h>

#include "twi.h"

#define QUIT_TWI_OP { send_stop(); return -1; }

typedef enum
{
	/* TWI Master Status Codes */
	st_start = 0x08,
	st_restart = 0x10,
	st_sla_w_ack = 0x18,
	st_sla_w_noack = 0x20,
	st_data_w_ack = 0x28,
	st_data_w_noack = 0x30,
	st_arb_lost = 0x38,
	st_sla_r_ack = 0x40,
	st_sla_r_noack = 0x48,
	st_data_r_ack = 0x50,
	st_data_r_noack = 0x58,
} TwiStatus;
typedef enum
{
	dir_write,
	dir_read
} TwiOperation;

void twi_init(TwiMode mode)
{
	// 1 = output, 0 = input
	DDRC &= ~0b00000011; // PC0 = SCL; PC1 = SDA
	PORTC |= 0b00000011; // Internal pull-up on both lines

	TWBR = (mode == standard) ? 32 : 2;
	TWSR &= ~(0b11 << TWPS0); // Clearing TWSP to 0

	TWCR |= (1 << TWEN); // Enable TWI, generating the SCLK
}
void twi_shut(void)
{
	TWCR &= ~(1 << TWEN); // Disable TWI

	TWBR = 0;
	TWSR &= ~(0b11 << TWPS0);

	// 1 = output, 0 = input
	DDRC &= ~0b00000011; // PC0 = SCL; PC1 = SDA
	PORTC &= ~0b00000011; // Clear pull-up on both lines
}

static uint8_t get_status(uint8_t status)
{
	uint8_t st;

	while (!(TWCR & (1 << TWINT)))
		;
	if ((st = (TWSR & 0xF8)) == status)
		return 0;
	else
		return st;
}
static int send_start(uint8_t status)
{
	TWCR = (1 << TWINT) | (1 << TWSTA) | (1 << TWEN);
	return get_status(status);
}
static void send_stop(void)
{
	TWCR = (1 << TWINT) | (1 << TWSTO) | (1 << TWEN);
}
static int send_data(uint8_t data, uint8_t status)
{
	TWDR = data;
	TWCR = (1 << TWINT) | (1 << TWEN);
	return get_status(status);
}
static int recv_data(uint8_t *data, uint8_t status, uint8_t ack)
{
	TWCR = (1 << TWINT) | (ack << TWEA) | (1 << TWEN);
	if (get_status(status) == 0)
	{
		*data = TWDR;
		return 0;
	}
	else
	{
		return -1;
	}
}

int twi_master_tx(uint8_t addr, uint8_t *data, int len)
{
	int i;

	if (send_start(st_start)) QUIT_TWI_OP;
	if (send_data((addr << 1) | dir_write, st_sla_w_ack)) QUIT_TWI_OP;
	for (i = 0; i < len; i++)
	{
		if (send_data(data[i], st_data_w_ack)) QUIT_TWI_OP;
	}
	send_stop();
	return 0;
}
int twi_master_rx(uint8_t addr, uint8_t *data, int len)
{
	int i;

	if (send_start(st_start)) QUIT_TWI_OP;
	if (send_data((addr << 1) | dir_read, st_sla_r_ack)) QUIT_TWI_OP;
	for (i = 0; i < len - 1; i++)
	{
		if (recv_data(&data[i], st_data_r_ack, 1)) QUIT_TWI_OP;
	}
	if (recv_data(&data[i], st_data_r_noack, 0)) QUIT_TWI_OP;
	send_stop();
	return 0;
}
int twi_master_tx_rx(uint8_t addr, uint8_t *tx_data, int tx_len, uint8_t *rx_data,
			int rx_len)
{
	int i;

	if (send_start(st_start)) QUIT_TWI_OP;
	if (send_data((addr << 1) | dir_write, st_sla_w_ack)) QUIT_TWI_OP;
	for (i = 0; i < tx_len; i++)
	{
		if (send_data(tx_data[i], st_data_w_ack)) QUIT_TWI_OP;
	}
	if (send_start(st_restart)) QUIT_TWI_OP;
	if (send_data((addr << 1) | dir_read, st_sla_r_ack)) QUIT_TWI_OP;
	for (i = 0; i < rx_len - 1; i++)
	{
		if (recv_data(&rx_data[i], st_data_r_ack, 1)) QUIT_TWI_OP;
	}
	if (recv_data(&rx_data[i], st_data_r_noack, 0)) QUIT_TWI_OP;
	send_stop();
	return 0;
}

All coded for the AVR master, but how to test without a slave. Exactly for that, we need a I2C device, say a real time clock (RTC). We would connect one, say the chip DS1307, and try it out in our next article. Till then, thrash out your understanding on the above I2C implementation and get the DS1307 chip and 32768Hz (clock) crystal ready.

Next Article >>

   Send article as PDF   

Debugging Micro-controller Programs over USART

This 13th article in the series of “Do It Yourself: Electronics”, demonstrates debugging of micro-controller programs over the USART.

<< Previous Article

With the working of the basic serial functionality, one can directly use that for debugging by logging on serial console. However, Pugs wanted to make it more sophisticated. So, he turned the earlier serial.c into a library file by including serial.h in it, and removing main() from it, with the corresponding function prototypes added into the new file serial.h. With that the serial.h looks as follows:

#ifndef SERIAL_H

#define SERIAL_H

#include <avr/io.h>

void usart_init(unsigned long baud);
void usart_shut(void);
void usart_byte_tx(uint8_t data);
int usart_byte_available(void);
uint8_t usart_byte_rx(void);
void usart_tx(char *str);
void usart_rx(char *str, int max_len);

#endif

Then, the debugging wrapper functions were implemented in debug.c with the following prototypes in debug.h:

#ifndef DEBUG_H

#define DEBUG_H

#include <avr/io.h>

void debug_init(void);
void debug_shut(void);
void print_nl(void);
void print_str(char *str);
void print_str_nl(char *str);
void print_num(uint32_t n);
void print_hex(uint32_t n);
char scan_char(void);
void scan_line(char *line, int max_len);

#endif

The complete implementation of debug.c goes here:

#include "serial.h"
#include "debug.h"

void debug_init(void)
{
	usart_init(9600);
}
void debug_shut(void)
{
	usart_shut();
}

void print_nl(void)
{
	usart_tx("\r\n");
}
void print_str(char *str)
{
	usart_tx(str);
}
void print_str_nl(char *str)
{
	usart_tx(str);
	usart_tx("\r\n");
}
void print_num(uint32_t n)
{
	int i;
	char num[11];

	for (i = 9; i >= 0; i--)
	{
		num[i] = '0' + (n % 10);
		n /= 10;
	}
	num[10] = 0;
	usart_tx(num);
}
void print_hex(uint32_t n)
{
	int i;
	char c;

	usart_byte_tx('0');
	usart_byte_tx('x');
	for (i = 7; i >= 0; i--)
	{
		c = ((n >> (i << 2)) & 0xF);
		c += ((c <= 9) ? '0' : (-10 + 'A'));
		usart_byte_tx(c);
	}
}
char scan_char(void)
{
	return usart_byte_rx();
}
void scan_line(char *line, int max_len)
{
	usart_rx(line, max_len);
}

And to test the complete debug library, Pugs wrote the following debug_test.c:

#include <avr/io.h>

#include "debug.h"

int main(void)
{
	char str[32];
	uint32_t value = (1L << 26);

	debug_init();

	scan_char(); // Waiting for a character, typically an 
	print_str_nl("Welcome to SysPlay's serial debugger");
	print_str("(1L << 26) in decimal: ");
	print_num(value);
	print_nl();
	print_str("(1L << 26) in hexadecimal: ");
	print_hex(value);
	print_nl();
	while (1)
	{
		print_str("SysPlay> ");
		scan_line(str, 32);
		print_str("You gave: ");
		print_str(str);
		print_nl();
	}

	debug_shut();

	return 0;
}

Then, Pugs compiled all the programs together as follows:

$ avr-gcc -mmcu=atmega16 -DF_CPU=1000000 -Os debug_test.c serial.c debug.c -o
debug_test.elf
$ avr-objcopy -O ihex debug_test.elf debug_test.hex

And finally, downloaded the debug_test.hex into the ATmega16 with J1 shorted (same as in the previous articles), using the following command:

$ avrdude -c ponyser -P /dev/ttyUSB0 -p m16 -U flash:w:debug_test.hex:i

Pugs then connected the USB to TTL converter to his laptop on the USB side, and the RX, TX, GND pins of the USB to TTL converter to the TXD, RXD, GND pins of the micro-controller. And started the serial application minicom as root on his laptop as follows:

# minicom -D /dev/ttyUSB1 -b 9600 -o

Note that Pugs’ TTL to USB connector shows up as /dev/ttyUSB1 on his laptop. In case, yours is different, use that instead. And then, as soon as Pugs removed the jumper J1, he got the value printed in decimal and then in hexadecimal followed by the “SysPlay> ” prompt for taking string inputs and displaying them back. To see what he was typing, Pugs typed Ctrl-A E on minicom. And, to quit from minicom, Pugs typed Ctrl-A Q.
Next Article >>

   Send article as PDF   

Waiting / Blocking in Linux Driver Part – 4

<< Previous Article

In the last article, we discussed the usage of wait queues in Linux kernel. We saw the variants of wait_event(). Just for completeness, we will discuss how the wait queues are implemented internally. First step is the creation and initialization of wait queue entry. This is done as below:

DEFINE_WAIT(wait_entry);

Next step is to add the wait queue entry to the queue and set the process state. Both of these things are being done by a single function declared below:

prepare_to_wait(wait_queue_head_t *wq_head, wait_queue_t *wq, int state);

After this, we schedule out the process by invoking the schedule() API. Once we are done with waiting, next step is to clean up with the API below:

finish_wait(wait_queue_head_t *wq_head, wait_queue_t *wq);

All the above are available from:

#include <linux/wait.h>

One more point worth noting is that the condition has to be tested manually as was done in our earlier article.

   Send article as PDF   

Micro-controller USART Interaction

This 12th article in the series of “Do It Yourself: Electronics”, demonstrates setting up of USART communication with a micro-controller.

<< Previous Article

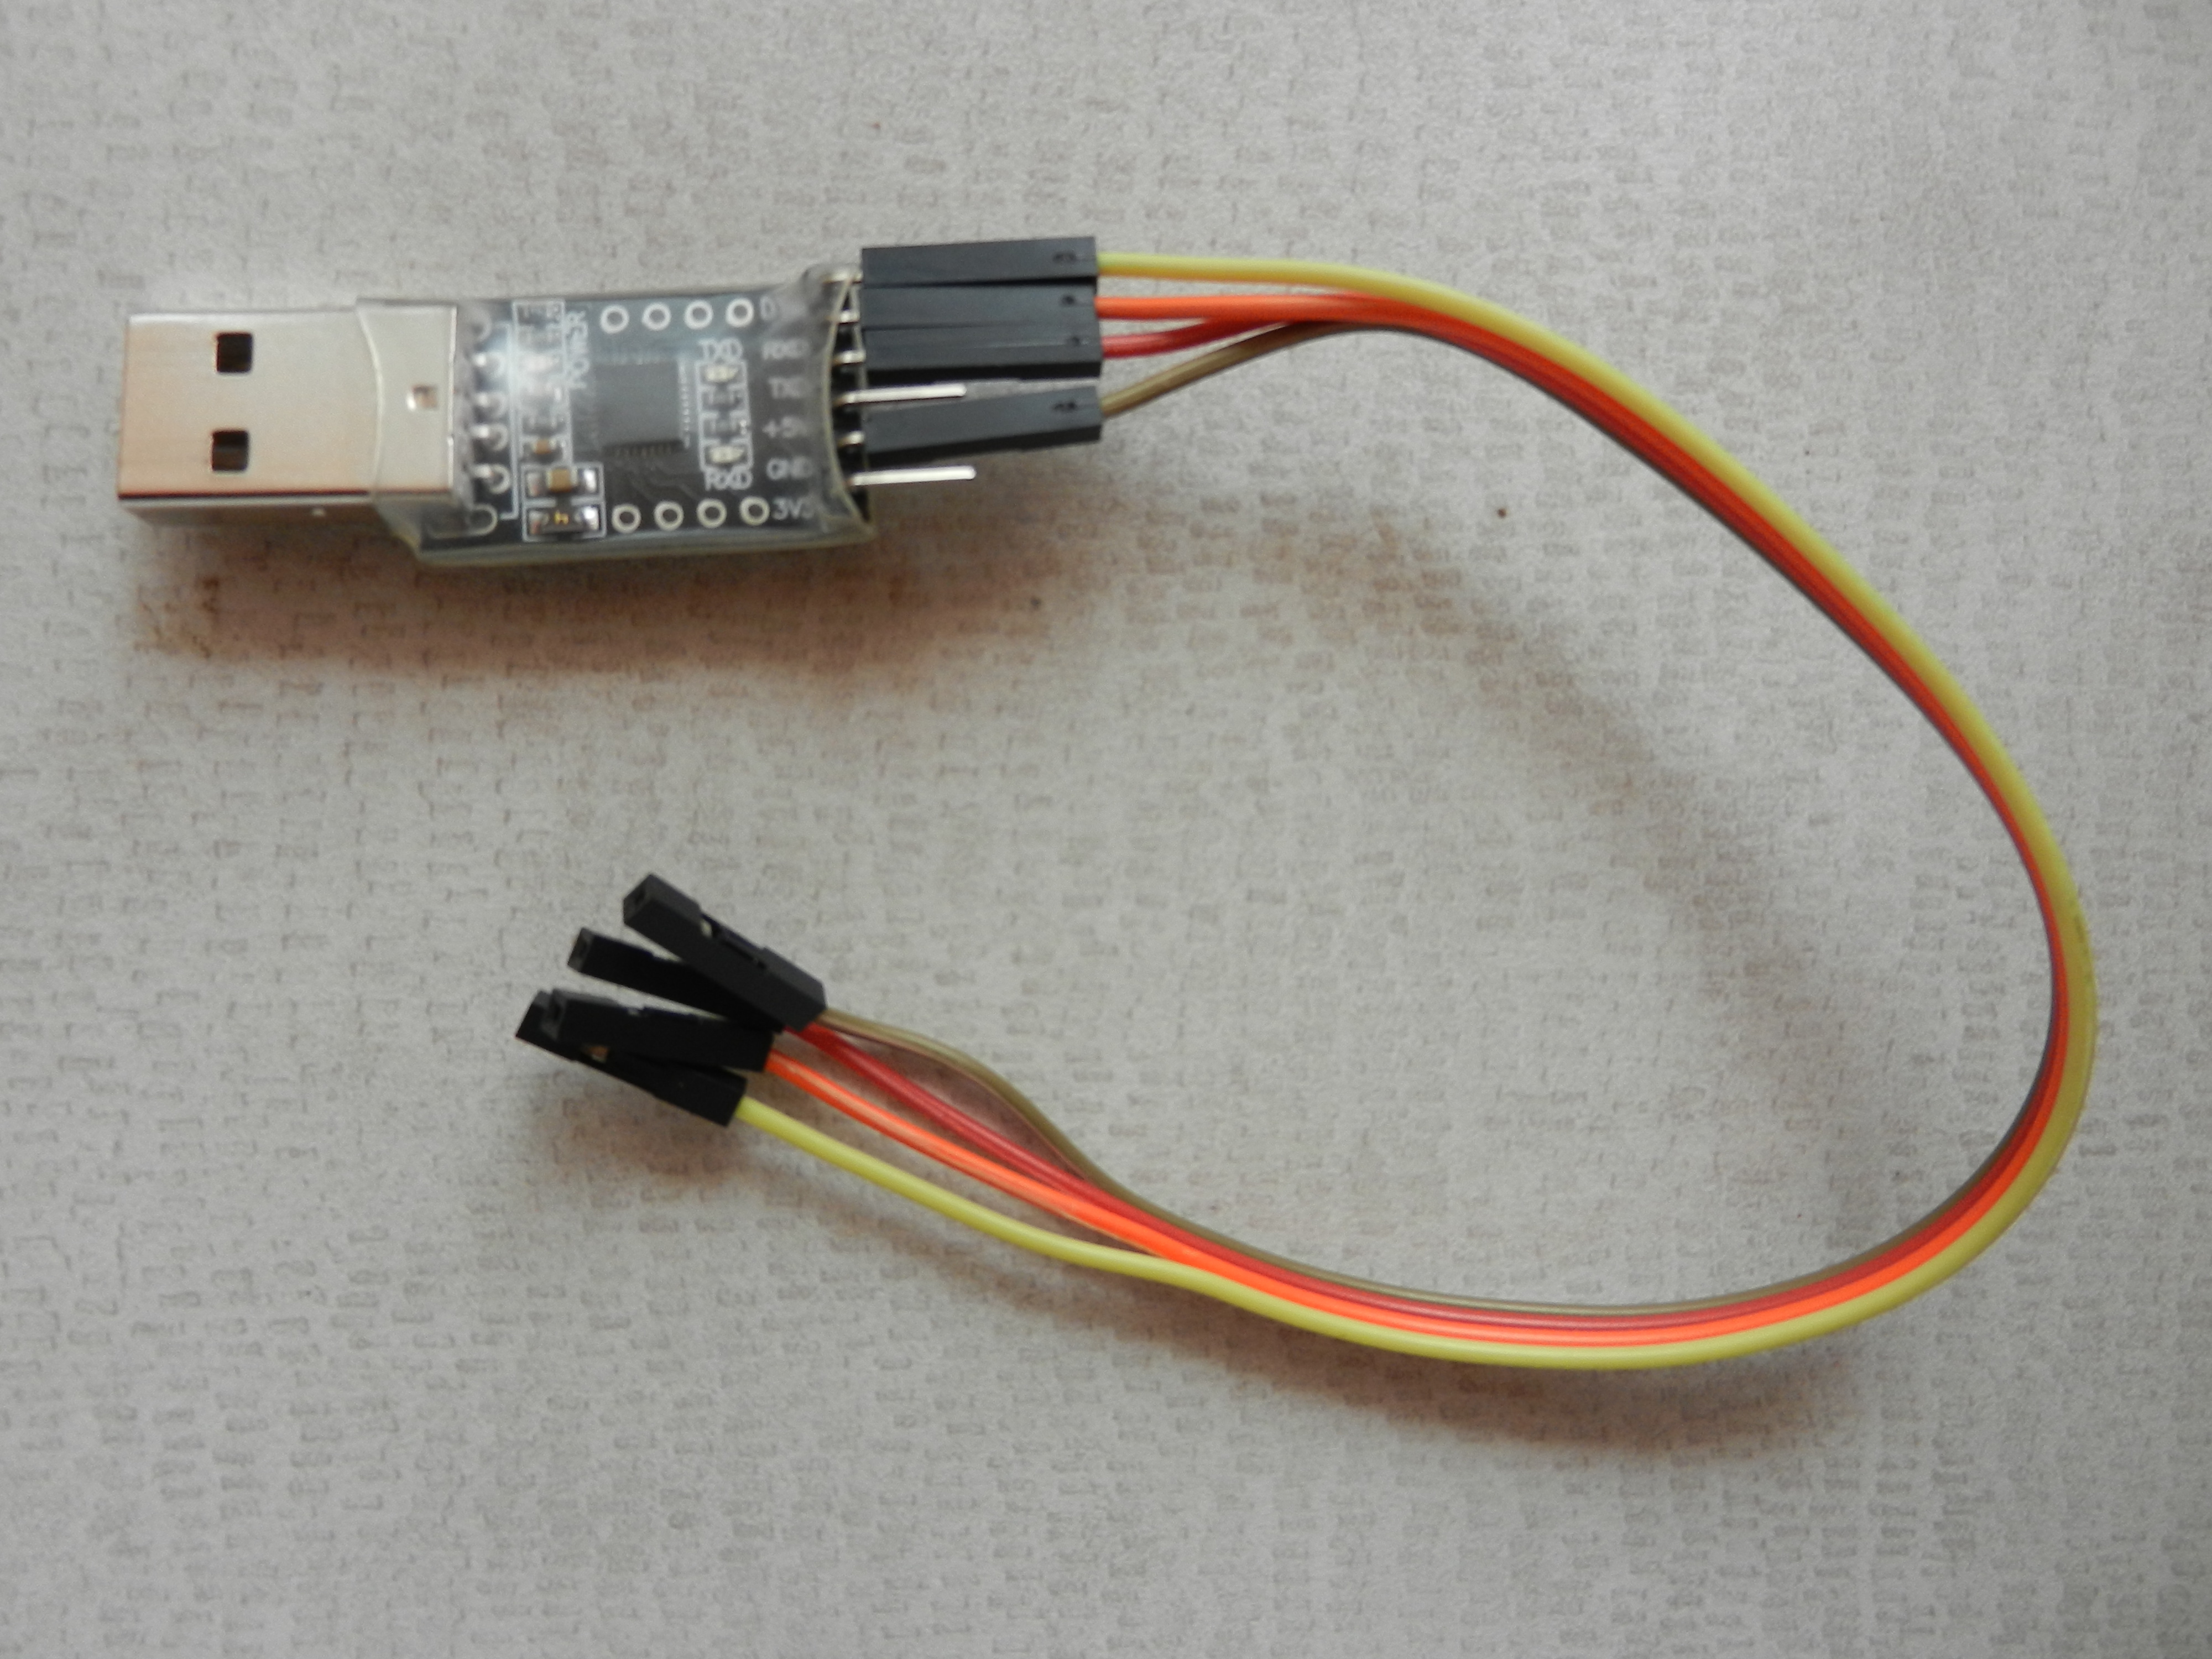
While trying out the various micro-controller programs, Rohit or for that matter even Pugs had many times faced a dire need for something more than blinking a LED but simple enough to debug their programs – something like printf(). And that brings them to the ubiquitous serial communication over serial port or the USART (Universal Synchronous Asynchronous serial Receiver Transmitter). Though it is vanishing from today’s PCs & laptops, almost every embedded device has it. And so is it with the ATmega16/32 – it has the pins 14 (PD0 / RXD) and 15 (PD1 / TXD) respectively for receiving and transmitting data serially. However, these pins operate at TTL voltage levels or so as to say at 0V & 5V in our case. So, if we want to communicate it with our PC, say over USB, we would need a TTL to USB converter. Figure below shows one such hardware readily available in the market.

TTL to USB Converter

TTL to USB Converter

Equipped with the information above, and a walk through the USART section of ATmega16 datasheet pg 144-171, lead to the following programming conclusions:

  • USART needs to be configured for baud rate aka data bit rate, data bit length, stop bit count, parity type
  • These configurations are achieved by programming the following registers: UBRRH, UBRRL for baud rate; UCSRB, UCSRC for others
  • Data transmission and reception are achieved for every data byte wrote in /read from the USART I/O Data (UDR) register
  • Before transmission and reception, the corresponding TXEN and RXEN bit need to be set in UCSRB register
  • On completion of transmission and reception, the corresponding TXC and RXC bits in UCSRA register are set
  • UDRE bit in UCSRA indicates state of the data register, ‘1’ meaning empty and ready to be written

Having obtained the above information, along with the following baud rate formula (from the ATmega16 datasheet pg 147):

baud = \frac{f_{cpu}}{16 . (UBRR + 1)}

Pugs coded the following serial.c:

#include <avr/io.h>

typedef enum
{
	p_none,
	p_even,
	p_odd
} Parity;

static void set_baud(unsigned long baud)
/*
 * For default of Asynchronous mode and for USART0.
 * For Normal mode: baud = (F_CPU / (16 * (UBRR + 1)))
 */
{
	uint16_t ubrr;

	ubrr = (F_CPU / 16 / baud) - 1;
	UBRRH = (uint8_t)(ubrr >> 8);
	UBRRL = (uint8_t)(ubrr);
}
static void set_format(uint8_t data_bits, Parity parity, uint8_t stop_bits)
{
	uint8_t control = (1 << URSEL);

	switch (data_bits)
	{
		case 5:
			control |= (0b00 << UCSZ0);
			// And, UCSRB &= ~(1 << UCSZ2);
			break;
		case 6:
			control |= (0b01 << UCSZ0);
			// And, UCSRB &= ~(1 << UCSZ2);
			break;
		case 7:
			control |= (0b10 << UCSZ0);
			// And, UCSRB &= ~(1 << UCSZ2);
			break;
		case 8:
		default:
			control |= (0b11 << UCSZ0);
			// And, UCSRB &= ~(1 << UCSZ2);
			break;
		case 9:
			control |= (0b11 << UCSZ0);
			// And, UCSRB |= (1 << UCSZ2);
			break;
	}
	switch (parity)
	{
		case p_none:
		default:
			control |= (0b00 << UPM0);
			break;
		case p_even:
			control |= (0b10 << UPM0);
			break;
		case p_odd:
			control |= (0b11 << UPM0);
			break;
	}
	switch (stop_bits)
	{
		case 1:
		default:
			control |= (0b0 << USBS);
			break;
		case 2:
			control |= (0b1 << USBS);
			break;
	}

	if (data_bits == 9)
		UCSRB |= (1 << UCSZ2);
	else
		UCSRB &= ~(1 << UCSZ2);
	UCSRC = control;
}

static void usart_enable(void)
{
	/* Enable receiver and transmitter */
	UCSRB |= (1 << RXEN) | (1 << TXEN);
}
static void usart_disable(void)
{
	/* Disable receiver and transmitter */
	UCSRB &= ~((1 << RXEN) | (1 << TXEN));
}

void usart_init(unsigned long baud)
{
	set_baud(baud);

	/* Default frame format: 8 data, No Parity, 1 stop bit (8N1) */
	set_format(8, p_none, 1);

	usart_enable();
}
void usart_shut(void)
{
	usart_disable();
}

void usart_byte_tx(uint8_t data)
{
	/* Wait for empty transmit buffer */
	while (!(UCSRA & (1 << UDRE)))
		;
	/* Put data into buffer, sends the data */
	UDR = data;
}
int usart_byte_available(void)
{
	return (UCSRA & (1 << RXC));
}
uint8_t usart_byte_rx(void)
{
	/* Wait for data to be received */
	while (!(UCSRA & (1 << RXC)))
		;
	/* Get and return received data from buffer */
	return UDR;
}
void usart_tx(char *str)
{
	while (*str)
	{
		usart_byte_tx(*str++);
	}
}
void usart_rx(char *str, int max_len)
{
	int i;

	for (i = 0; i < max_len - 1; i++)
	{
		str[i] = usart_byte_rx();
		if (str[i] == '\n')
			break;
	}
	str[i] = 0;
}

int main(void)
{
	char c;

	usart_init(38400);

	usart_byte_rx(); // Waiting for a character, typically an 
	usart_tx("Welcome to SysPlay's character echoer\r\n");

	while (1)
	{
		usart_tx("SysPlay> ");
		c = usart_byte_rx();
		usart_tx("You gave: ");
		usart_byte_tx(c);
		usart_tx("\r\n");
	}

	usart_shut();

	return 0;
}

Then, Pugs compiled the program as follows (as in the previous articles):

$ avr-gcc -mmcu=atmega16 -DF_CPU=1000000 -Os serial.c -o serial.elf
$ avr-objcopy -O ihex serial.elf serial.hex

And finally, downloaded the serial.hex into the ATmega16 with J1 shorted (same as in the previous articles), using the following command:

$ avrdude -c ponyser -P /dev/ttyUSB0 -p m16 -U flash:w:serial.hex:i

Pugs then connected the USB to TTL converter to his laptop on the USB side, and the RX, TX, GND pins of the USB to TTL converter to the corresponding pins of the micro-controller. And started the serial application minicom as root on his laptop as follows:

# minicom -D /dev/ttyUSB1 -b 38400 -o

Note that Pugs’ TTL to USB connector shows up as /dev/ttyUSB1 on his laptop. In case, yours is different, use that instead. And as usual, it didn’t work in the first shot, even though he removed the jumper J1. After some googling, Pugs realized that it should have been a common sense to connect the RXD of the micro-controller to the TX of the TTL to USB converter and TXD of the micro-controller to the RX of the TTL to USB converter, rather than TXD to TX and RXD to RX, because data transmitted from micro-controller would be received by the USB and vice versa. So, correcting the connections, Pugs got the input character echoing back on the serial console. To see what he was typing, Pugs typed Ctrl-A E on minicom. And, to quit from minicom, Pugs typed Ctrl-A Q.

Given the basic setup and operation of USART achieved, watch out for how Pugs designs a library to do some fancy debugging.

Next Article >>

   Send article as PDF   

Waiting / Blocking in Linux Driver Part – 3

<< Previous Article

The last article in this series focused on implementing the basic wait mechanism. It was a manual waiting where everything, starting from putting the process to the sleep to checking for the wake up event, was done by driver writer. But, such kind of manual waiting is error prone and may at times result in synchronization bugs. So, does kernel provide some robust wait mechanism? No points for guessing the right answer, yes it does. So, read on to explore more on wait mechanism in kernel.

Wait Queues

Wait queue is a mechanism provided in kernel to implement the wait. As the name itself suggests, wait queue is the list of processes waiting for an event. Below are the data structures for wait queues:

#include <linux/wait.h>
// Data structure: wait_queue_head_t
// Created statically 
DECLARE_WAIT_QUEUE_HEAD(wait_queue_name);
// Created dynamically
wait_queue_head_t my_queue;
init_waitqueue_head(&my_queue);

As seen above, wait queues can be defined and initialized statically as well as dynamically. Once the wait queue is initialized, next step is to add our process to wait queue. Below are variants for this:

// APIs for Waiting
wait_event(queue, condition);
wait_event_interruptible(queue, condition);
wait_event_timeout(queue, condition, timeout);
wait_event_interruptible_timeout(queue, condition, timeout);

As seen, there are two variants – wait_event() and wait_event_timeout(). The former is used for waiting for an event as usual, but the latter can be used to wait for an event with timeout. Say, if the requirement is to wait for an event till 5 milliseconds, after which we need to timeout.

So, this was about the waiting, other part of the article is to wake up. For this, we have wake_up() family of APIs as shown below:

// Wakes up all the processes waiting on the queue
wake_up(wake_queue_head_t *);
// Wakes up only the processes performing the interruptible sleep
wake_up_interruptible(wait_queue_head_t *);

Below is modified code from the last article where we use wait queues:

#include <linux/module.h>
#include <linux/kernel.h>
#include <linux/fs.h>
#include <linux/cdev.h>
#include <linux/device.h>
#include <linux/errno.h>
#include <asm/uaccess.h>
#include <linux/wait.h>
#include <linux/sched.h>
#include <linux/delay.h>

#define FIRST_MINOR 0
#define MINOR_CNT 1

static char flag = 'n';
static dev_t dev;
static struct cdev c_dev;
static struct class *cl;
static DECLARE_WAIT_QUEUE_HEAD(wq);

int open(struct inode *inode, struct file *filp)
{
	printk(KERN_INFO "Inside open\n");
	return 0;
}

int release(struct inode *inode, struct file *filp) 
{
	printk (KERN_INFO "Inside close\n");
	return 0;
}

ssize_t read(struct file *filp, char *buff, size_t count, loff_t *offp) 
{
	printk(KERN_INFO "Inside read\n");
	printk(KERN_INFO "Scheduling Out\n");
	wait_event_interruptible(wq, flag == 'y');
	flag = 'n';
	printk(KERN_INFO "Woken Up\n");
	return 0;
}

ssize_t write(struct file *filp, const char *buff, size_t count, loff_t *offp) 
{   
	printk(KERN_INFO "Inside write\n");
	if (copy_from_user(&flag, buff, 1))
	{
		return -EFAULT;
	}
	printk(KERN_INFO "%c", flag);
	wake_up_interruptible(&wq);
	return count;
}

struct file_operations pra_fops = {
	read:        read,
	write:       write,
	open:        open,
	release:     release
};

int wq_init (void)
{
	int ret;
	struct device *dev_ret;

	if ((ret = alloc_chrdev_region(&dev, FIRST_MINOR, MINOR_CNT, "SCD")) < 0)
	{
		return ret;
	}
	printk("Major Nr: %d\n", MAJOR(dev));

	cdev_init(&c_dev, &pra_fops);

	if ((ret = cdev_add(&c_dev, dev, MINOR_CNT)) < 0)
	{
		unregister_chrdev_region(dev, MINOR_CNT);
		return ret;
	}

	if (IS_ERR(cl = class_create(THIS_MODULE, "chardrv")))
	{
		cdev_del(&c_dev);
		unregister_chrdev_region(dev, MINOR_CNT);
		return PTR_ERR(cl);
	}
	if (IS_ERR(dev_ret = device_create(cl, NULL, dev, NULL, "mychar%d", 0)))
	{
		class_destroy(cl);
		cdev_del(&c_dev);
		unregister_chrdev_region(dev, MINOR_CNT);
		return PTR_ERR(dev_ret);
	}
	return 0;
}

void wq_cleanup(void)
{
	printk(KERN_INFO "Inside cleanup_module\n");
	device_destroy(cl, dev);
	class_destroy(cl);
	cdev_del(&c_dev);
	unregister_chrdev_region(dev, MINOR_CNT);
}

module_init(wq_init);
module_exit(wq_cleanup);

MODULE_LICENSE("GPL");
MODULE_AUTHOR("Pradeep");
MODULE_DESCRIPTION("Waiting Process Demo");

As seen, the earlier manual waiting has been replaced by single statement wait_event_interruptible() which is more robust.

Below is the sample run of the above program, assuming that the module is compiled as wait.ko:

$ insmod wait.ko
Major Nr: 250
$ cat /dev/mychar0
Inside open
Inside read
Scheduling out

This gets our process blocked. Open another shell to wake up the process:

$ echo 'y' > /dev/mychar0
Inside open
Inside write
y
Inside close
Woken up
Inside close

As seen above, this will wake up the process, since the condition of flag being ‘y’ is satisfied.

Next Article >>

   Send article as PDF   

Playing Music using a Micro-controller

This 11th article in the series of “Do It Yourself: Electronics”, demonstrates playing various audio frequncies using timer module of a micro-controller.

<< Previous Article

After seeing the dimming power of the timer module of a micro-controller, Rohit was excited enough to experiment with the various other modes of the timer module. The idea of generating waveforms of various frequencies was generating all kind of random thoughts in his head. “Sound is also waves with some frequency – so can I generate sound using the timer?”, was one of the thoughts getting stronger and stronger. He finally decided to try it out.

As he has already tried with the Timer0, this time he thought of giving a try to another similar timer.

“Hey Pugs! Timer2 seems to be similar to Timer0. Can I try similar experiments with that as well?”, quizzed Rohit.

“Yes. Why not? Timer2 is also 8-bit with similar registers and modes”, replied Pugs.

“Also, the ATmega16 datasheet pg 122 mentions that the clear timer on compare match aka CTC mode gives more control to (compare match) output frequency.”

“Yes, it does. So, what are you trying?”

“Just thought of creating some sound.”

“Hmmm! That would be cool. Let’s give it a try.”

Unlike the earlier tried fast PWM mode, the timer counter clears to zero on match with value of OCR2 in CTC mode (WGM2[1:0] = 2), instead of hitting the maximum value. Also, by setting the COM2[1:0] to 1 the output on OC2/PD7 would keep on toggling on every match, thus generating a 50% duty cycle square wave. As per the ATmega16 datasheet pg 123, the waveform frequency would be given by

f = \frac{f_{cpu}}{2 . N . (1 + OCR2)}

where N represents the prescaler, to be set in the same register TCCR2, as the above settings.

“Based on the frequency formula, seems like so many ways to get the same frequency using the various prescaler values. How do we choose the prescaler?”, asked Rohit puzzled with the possibilities.

“Don’t get swayed by that. Note that both OCR2 and prescaler are integral and hence can’t generate all frequencies”, replied Pugs after a keen observation on the formula. “Also, the various N values would give the varying frequency resolutions. Hence, depending on our required resolution and may be range, we’d have to carefully choose the prescaler”, completed Pugs.

“That looks complicated and also interesting. Let me try a few combinations to get a feel of it.”

“Just keep in mind that for your sound generation to be audible, you’d need frequencies only between 20Hz to 20KHz.”

“Yes. Yes. I know that”, quipped Rohit.

Meanwhile, Pugs gave a shot to his shell scripting prowess, and ran the following shell command:

$ for ps in 1 8 32 64 128 256 1024
>do
>	echo -e "\nprescaler = $ps"
>	for ocr2 in `seq 0 255`
>	do
>		echo -n $((500000 / $ps / (1 + $ocr2)))
>		echo -n " "
>	done
>done

And from its output, he got well-interspersed frequencies in the audio frequency range for a prescaler of 8, as follows:

...
prescaler = 8
62500 31250 20833 15625 12500 10416 8928 7812 6944 6250 5681 5208 4807 4464 4166 3906
3676 3472 3289 3125 2976 2840 2717 2604 2500 2403 2314 2232 2155 2083 2016 1953 1893
1838 1785 1736 1689 1644 1602 1562 1524 1488 1453 1420 1388 1358 1329 1302 1275 1250
1225 1201 1179 1157 1136 1116 1096 1077 1059 1041 1024 1008 992 976 961 946 932 919
905 892 880 868 856 844 833 822 811 801 791 781 771 762 753 744 735 726 718 710 702
694 686 679 672 664 657 651 644 637 631 625 618 612 606 600 595 589 584 578 573 568
563 558 553 548 543 538 534 529 525 520 516 512 508 504 500 496 492 488 484 480 477
473 469 466 462 459 456 452 449 446 443 440 437 434 431 428 425 422 419 416 413 411
408 405 403 400 398 395 393 390 388 385 383 381 378 376 374 372 369 367 365 363 361
359 357 355 353 351 349 347 345 343 341 339 337 336 334 332 330 328 327 325 323 322
320 318 317 315 314 312 310 309 307 306 304 303 301 300 299 297 296 294 293 292 290
289 288 286 285 284 282 281 280 279 277 276 275 274 272 271 270 269 268 267 265 264
263 262 261 260 259 258 257 256 255 254 253 252 251 250 249 248 247 246 245 244
...

So, they decided to go ahead with the prescaler of 8, which translates to CS2[2:0] = 2, and this is what buzzer.c Rohit coded:

/*
 * This example uses CTC mode of 8-bit Timer/Counter2 for generating various
 * audio frequencies on OC2/PD7 (Pin 21).
 * Hence, Buzzer/Speaker is to be connected between OC2/PD7 (Pin 21) & GND.
 */

#include <avr/io.h>
#include <util/delay.h>

#define HUMAN_AUDIBLE_MAX_FREQ 20000

#define PRESCALER (2 << CS20) /* Prescaler N = 8 */
#define N 8
#define MAX_FREQ (F_CPU / (2 * N)) /* F_CPU / (2 * N * (1 + (OCR2 = 0))) */
#define MIN_FREQ (F_CPU / (2 * N * 256)) /* F_CPU / (2 * N * (1 + (OCR2 = 255))) */

void set_frequency(unsigned long freq)
{
	if (freq < MIN_FREQ)
	{
		freq = MIN_FREQ;
	} else if (freq > MAX_FREQ)
	{
		freq = MAX_FREQ;
	}
	/* f = MAX_FREQ / (1 + OCR2), i.e. OCR2 = MAX_FREQ / f - 1; */
	OCR2 = MAX_FREQ / freq - 1;
}
void init_timer(unsigned long freq)
{
	DDRD |= (1 << PD7); // OC2 is PD7 - setting it as output

	set_frequency(freq);

	/*
	 * Setting the Timer/Counter2 in CTC (Clear Timer on Compare) (non-PWM) mode.
	 * Toggling on Match to generate square wave for a particular frequency,
	 * as per the prescaler and OCR2 setting.
	 * Output would come on OC2/PD7 (Pin 21).
	 */
	TCCR2 = (1 << WGM21) | (0 << WGM20) | (1 << COM20) | PRESCALER;
}
void stop_timer(void)
{
	TCCR2 = 0;
}

int main(void)
{
	unsigned long freq = MIN_FREQ;

	init_timer(freq);

	while (1)
	{
		_delay_ms(100);
		freq += MIN_FREQ;
		if (freq > HUMAN_AUDIBLE_MAX_FREQ)
		{
			freq = MIN_FREQ;
		}
		set_frequency(freq);
	}

	stop_timer();

	return 0;
}

Then, Rohit compiled the program as follows (as in the previous articles):

$ avr-gcc -mmcu=atmega16 -DF_CPU=1000000 -Os buzzer.c -o buzzer.elf
$ avr-objcopy -O ihex buzzer.elf buzzer.hex

And finally, downloaded the buzzer.hex into the ATmega16 with J1 shorted (same as in the previous articles), using the following command:

$ avrdude -c ponyser -P /dev/ttyUSB0 -p m16 -U flash:w:buzzer.hex:i

And … removing the jumper J1, … nothing happened. Aha! forgot to connect the buzzer. Connecting the buzzer between PD7 (Pin 21) and GND, echoed the varying sound tones going from flat (high bass) to shrill (high treble), repeatedly.

Next Article >>

   Send article as PDF   

Waiting / Blocking in Linux Driver Part – 2

<< Previous Article

In the last article, we managed to get our process blocked. As stated then, the code had couple of problems. One of them being unblocking the process. There was no one to wake our process up. Sleeping process is of no use. Another flaw was that our process was sleeping unconditionally. However, in real life scenarios, process never goes to sleep unconditionally. Read on to get the further understanding of wait mechanisms in the kernel.

Waking up the Process

We have the wake_up_process() API as shown below for waking up the process.

void wake_up_process(task_struct *ts);
ts - pointer to the task_struct of the waiting process

As our process would be blocked, we need some other process to invoke this API. Below is code snippet which demonstrates the usage of this API.

#include <linux/module.h>
#include <linux/kernel.h>
#include <linux/fs.h> 
#include <linux/cdev.h>
#include <linux/device.h>
#include <asm/uaccess.h>
#include <linux/wait.h>
#include <linux/sched.h>
#include <linux/delay.h>

#define FIRST_MINOR 0
#define MINOR_CNT 1

static dev_t dev;
static struct cdev c_dev;
static struct class *cl;
static struct task_struct *sleeping_task;

int open(struct inode *inode, struct file *filp)
{
	printk(KERN_INFO "Inside open\n");
	return 0;
}

int release(struct inode *inode, struct file *filp)
{
	printk(KERN_INFO "Inside close\n");
	return 0;
}

ssize_t read(struct file *filp, char *buff, size_t count, loff_t *offp)
{
	printk(KERN_INFO "Inside read\n");
	printk(KERN_INFO "Scheduling out\n");
	sleeping_task = current;
	set_current_state(TASK_INTERRUPTIBLE);
	schedule();
	printk(KERN_INFO "Woken up\n");
	return 0;
}

ssize_t write(struct file *filp, const char *buff, size_t count, loff_t *offp)
{
	printk(KERN_INFO "Inside Write\n");
	wake_up_process(sleeping_task);
	return count;
}

struct file_operations fops =
{
	.read = read,
	.write = write,
	.open = open,
	.release = release
};

int schd_init (void) 
{
	int ret;
	struct device *dev_ret;

	if ((ret = alloc_chrdev_region(&dev, FIRST_MINOR, MINOR_CNT, "wqd")) < 0)
	{
		return ret;
	}
	printk(KERN_INFO "Major Nr: %d\n", MAJOR(dev));

	cdev_init(&c_dev, &fops);

	if ((ret = cdev_add(&c_dev, dev, MINOR_CNT)) < 0)
	{
		unregister_chrdev_region(dev, MINOR_CNT);
		return ret;
	}

	if (IS_ERR(cl = class_create(THIS_MODULE, "chardrv")))
	{
		cdev_del(&c_dev);
		unregister_chrdev_region(dev, MINOR_CNT);
		return PTR_ERR(cl);
	}
	if (IS_ERR(dev_ret = device_create(cl, NULL, dev, NULL, "mychar%d", 0)))
	{
		class_destroy(cl);
		cdev_del(&c_dev);
		unregister_chrdev_region(dev, MINOR_CNT);
		return PTR_ERR(dev_ret);
	}
	return 0;
}

void schd_cleanup(void) 
{
	printk(KERN_INFO "Inside cleanup_module\n");
	device_destroy(cl, dev);
	class_destroy(cl);
	cdev_del(&c_dev);
	unregister_chrdev_region(dev, MINOR_CNT);
}

module_init(schd_init);
module_exit(schd_cleanup);

MODULE_LICENSE("GPL");
MODULE_AUTHOR("Pradeep Tewani");
MODULE_DESCRIPTION("Waiting Process Demo");

In the above example, we are using the global variable sleeping_task to hold the task_struct of the sleeping process. This variable is updated in read() function. In write() function, we use the sleeping_task as a parameter to the wake_up_process() API.

Below is the sample run for the above example. Assuming that the above module is compiled as sched.ko:

$ insmod wait.ko
Major Nr: 250
$ cat /dev/mychar0
Inside open
Inside read
Scheduling out

The above output is same as that of example from the last article. Now, comes the interesting part of waking up the process. For this, open another shell and execute the command as below:

$ echo 1 > /dev/mychar0
Inside open
Inside write
Woken up
Inside close
Inside close

When we execute the echo command, write operation gets invoked, which invokes the wake_up_process() to wake up the blocked process.

Waiting on an event

What we saw in the above example was the basic mechanism to block and unblock the process. However, as discussed earlier, the process always waits on some event. The event can be some specified amount of time, waiting for some resource or it can well be waiting for some data to arrive. Below is the modified version of above program to wait for an event.

ssize_t read(struct file *filp, char *buff, size_t count, loff_t *offp) 
{
	printk(KERN_INFO "Inside read\n");
	printk(KERN_INFO "Scheduling Out\n");
	sleeping_task = current;
slp:
	if (flag != 'y') 
	{
		set_current_state(TASK_INTERRUPTIBLE);
		schedule();
	}
	if (flag == 'y')
		printk(KERN_INFO "Woken Up\n");
	else 
	{
		printk(KERN_INFO "Interrupted by signal\n");
		goto slp;
	}
	flag = 'n';
	printk(KERN_INFO "Woken Up\n");
	return 0;
}

ssize_t write(struct file *filp, const char *buff, size_t count, loff_t *offp) 
{ 
	printk(KERN_INFO, "Inside write\n");
	ret = __get_user(flag, buffer);
	printk(KERN_INFO "%c", flag);
	wake_up_process(sleeping_task);
	return count;
}

Here, we use the global variable flag to signal the condition and the event for waking up is the flag being set to ‘y’. This flag is updated in write() function as per the data from the user space. Below is the sample run of the above program, assuming that the module is compiled as sched.ko:

$ insmod wait.ko
Major Nr: 250
$ cat /dev/mychar0
Inside open
Inside read
Scheduling out

This gets our process blocked. Open another shell to wake up the process:

$ echo 1 > /dev/mychar0
Inside open
Inside write
Interrupted by signal
Inside close

Unlike earlier program, this doesn’t unblock the process. The process wakes up and again goes to sleep, since the condition for waking up is not satisfied. The process will wake up only if the flag is set to ‘y’. Let’s execute the echo as below:

$ echo 'y' > /dev/mychar0
Inside open
Inside write
Woken up
Inside close
Inside close

As seen above, this will wake up the process, since the condition of flag being ‘y’ is satisfied.

Conclusion

In this article, we implemented the basic wait mechanism in the driver. This was more like a manual waiting where everything needs to be taken care by driver writer and as such is prone to some synchronization issues. So, this kind of manual waiting is rarely used. However, kernel does provide some robust mechanism to implement the waiting. So, stay tuned to my next article to learn more about the waiting in Linux driver.

Next Article >>

   Send article as PDF   

Digital to Analog Conversion using a Micro-controller

This 10th article in the series of “Do It Yourself: Electronics”, demonstrates a digital to analog conversion (DAC) approximation using pulse width modulation (PWM) of a micro-controller.

<< Previous Article

Once the fundamental setup for programming the micro-controller ATmega16 was up, the club members were on a spree to try out all kind of micro-controller programming based electronics experiments. If you have not yet got the setup, check out the previous article.

“With Diwali approaching and LED blinking just done, can we do LED dimming using a micro-controller”, queried Rohit.

“Should be possible. Basically we need to have a varying (analog) voltage between 0V & 5V, instead of just 0V & 5V as in the blinking of LED”, replied Pugs.

“But a micro-controller is all about digital electronics, right? How do we get analog voltage output?”

“We may not get perfect analog voltages but we definitely can do approximations, which would be practically good enough for cases like LED dimming.”

“What kind of approximations & how?”

“ATmega16 have pulse width modulation (PWM) support. We can use that for the purpose.”

“What is PWM?”

“It is a kind of timer mechanism, using which we can keep on generating square wave of desired frequency with desired duty cycle.”

“Meaning we can change the width of the square pulse on the fly as desired.”

“Yes. And that’s were the name pulse width modulation.”

“But, isn’t it still a digital waveform?”

“Yes. But, if the frequency is high enough, the voltage value averages out and the net voltage appears to be the average of the 0V & 5V, weighted by the duty cycle.”

“You mean to say, if I measure it as a DC voltage on multimeter, it would show me a stable averaged voltage.”

“Yes. And for many other practical purposes like LED dimming this is good enough an analog voltage.”

“That’s a great technique. So, I guess details of programming it would be in the datasheet.”

“Correct. Look into the timer section, say Timer0.”

Rohit and Pugs figure out the following about Timer0 from the ATmega16 datasheet pg 71-88:

  • Output of the PWM waveform would be on pin OC0/PB3, i.e Pin 4
  • For high frequency wave generation, there is a fast PWM mode, enabled by setting each of the 2 bits of WGM0 to 1 in TCCR0 register
  • Timer0 has a 8-bit counter TCNT0, which in fast PWM mode increments continuously from 0 to 255 and back to 0
  • The counter incrementing frequency is to be set by the 3-bit clock select CS0 in TCCR0 register
  • During the increment, it compares TCNT0 with OCR0, and updates the waveform output as per the settings of the 2-bit compare output mode COM0 in TCCR0 register
  • If COM0 is set to 2, pin OC0 is set to 0 on match with OCR0 and back to 1 on counter TCNT0 wrapping around to 0, generating a pulse during counting from 0 to OCR0
  • Thus values of 0 to 255 for OCR0 controls the duty cycle of the square wave between 0% to 100%, thus giving 0% to 100% of 5V averaged output

In a way, it can also be viewed as an 8-bit DAC converting the digital value 0 to 255 (in OCR0) to analog voltage 0V to 5V (on the pin PB3).

As the output waveform is pre-determined on PB3, Pugs connected the LED with a resistor (as in the previous article) but with the pin PB3 instead of PB0.

Rohit got the following dac.c program coded in C:

/*
 * DAC is basically averaging out PWM to analog voltages.
 * This example uses Fast PWM mode of 8-bit Timer/Counter0 for DAC output on
 * OC0/PB3/AIN1 (Pin 4)
 */

#include <avr/io.h>
#include <util/delay.h>

void set_digital(uint8_t digital)
{
	OCR0 = digital;
}
void init_pwm(uint8_t digital)
{
	set_digital(digital);

	/*
	 * Setting the Timer/Counter0 in Fast PWM for averaging DAC with highest
	 * possible frequency, i.e. clock select (CS0) as 1.
	 * Getting pulse during up-counting till it matches OCR0.
	 * Output would come on OC0/PB3 (Pin 4).
	 */
	TCCR0 = (1 << WGM01) | (1 << WGM00) | (0b10 << COM00);
	TCCR0 |= (0b001 << CS00);

	DDRB |= (1 << PB3); // OC0 is PB3. Setting it as output
}

int main(void)
{
	uint8_t digital = 0xFF; // Full output (5V)

	init_pwm(digital);

	while (1)
	{
		_delay_ms(10);
		if (--digital == 0x00) // Decrementing upto almost 0V
		{
			digital = 0xFF;
		}
		set_digital(digital);
	}

	return 0;
}

Then, Rohit compiled the program as follows (using the AVR toolchain already installed as in the previous article):

$ avr-gcc -mmcu=atmega16 -DF_CPU=1000000 -Os dac.c -o dac.elf
$ avr-objcopy -O ihex dac.elf dac.hex

And finally, downloaded the dac.hex into the ATmega16 with J1 shorted (same as in the previous article), using the following command:

$ avrdude -c ponyser -P /dev/ttyUSB0 -p m16 -U flash:w:dac.hex:i

And … removing the jumper J1, wow! they see the LED dimming and then bright again, dimming and bright again, …

Next Article >>

   Send article as PDF   

Waiting / Blocking in Linux Driver

<< Previous Article

Continuing our journey with Linux kernel internals, the next few articles in this series will focus on wait mechanisms in kernel. Now, you might be wondering, why do we need to wait in Linux driver? Well, there can be quite a lot of reasons to wait in driver. Let’s say you are interfacing with hardware such as LCD, which requires you to wait for 5ms before sending a subsequent command. Another example is say you want to read the data from disk, and since disk is a slower device, it may require you to wait until valid data is available. In these scenarios, we have no option, but to wait. One of the simplest way to implement the wait is a busy loop, but it might not be efficient way of waiting. So, does kernel provide any efficient mechanisms to wait? Yes, of course, kernel does provide a variety of mechanisms for waiting. Read on to get the crux of waiting in Linux kernel.

Process States in Linux

Before moving on to the wait mechanisms, it would be worthwhile to understand the process states in Linux. At any point of time, a process can be in any of the below mentioned states:

  • TASK_RUNNING :- Process is in run queue or is running
  • TASK_STOPPED :- Process stopped by debugger
  • TASK_INTERRUPTIBLE :- Process is waiting for some event, but can be woken up by signal
  • TASK_UNINTERRUPTIBLE :- Similar to TASK_INTERRUPTIBLE, but can’t be woken up by signal
  • TASK_ZOMBIE :- Process is terminated, but not cleaned up yet

For a process to be scheduled, it needs to be in TASK_RUNNING state, while TASK_INTERRUPTIBLE and TASK_INTERRUPTIBLE states correspond to a waiting process.

Wait Mechanism in Linux Kernel

API schedule() provides the basic wait mechanism in the linux kernel. Invoking this API yields the processor and invokes the scheduler to schedule any other process in run queue. Below is the programming example for the same:

#include <linux/module.h>
#include <linux/kernel.h>
#include <linux/fs.h>
#include <linux/cdev.h>
#include <linux/device.h>
#include <asm/uaccess.h>
#include <linux/wait.h>
#include <linux/sched.h>
#include <linux/delay.h>

#define FIRST_MINOR 0
#define MINOR_CNT 1

static dev_t dev;
static struct cdev c_dev;
static struct class *cl;

int open(struct inode *inode, struct file *filp)
{
	printk(KERN_INFO "Inside open\n");
	return 0;
}

int release(struct inode *inode, struct file *filp)
{
	printk(KERN_INFO "Inside close\n");
	return 0;
}

ssize_t read(struct file *filp, char *buff, size_t count, loff_t *offp)
{
	printk(KERN_INFO "Inside read\n");
	printk(KERN_INFO "Scheduling out\n");
	schedule();
	printk(KERN_INFO "Woken up\n");
	return 0;
}

ssize_t write(struct file *filp, const char *buff, size_t count, loff_t *offp)
{
	printk(KERN_INFO "Inside Write\n");
	return 0;
}

struct file_operations fops =
{
	.read = read,
	.write = write,
	.open = open,
	.release = release
};

int schd_init (void)
{
	int ret;
	struct device *dev_ret;

	if ((ret = alloc_chrdev_region(&dev, FIRST_MINOR, MINOR_CNT, "wqd")) < 0)
	{
		return ret;
	}
	printk("Major Nr: %d\n", MAJOR(dev));

	cdev_init(&c_dev, &fops);

	if ((ret = cdev_add(&c_dev, dev, MINOR_CNT)) < 0)
	{
		unregister_chrdev_region(dev, MINOR_CNT);
		return ret;
	}

	if (IS_ERR(cl = class_create(THIS_MODULE, "chardrv")))
	{
		cdev_del(&c_dev);
		unregister_chrdev_region(dev, MINOR_CNT);
		return PTR_ERR(cl);
	}
	if (IS_ERR(dev_ret = device_create(cl, NULL, dev, NULL, "mychar%d", 0)))
	{
		class_destroy(cl);
		cdev_del(&c_dev);
		unregister_chrdev_region(dev, MINOR_CNT);
		return PTR_ERR(dev_ret);
	}
	return 0;
}

void schd_cleanup(void)
{
	printk(KERN_INFO " Inside cleanup_module\n");
	device_destroy(cl, dev);
	class_destroy(cl);
	cdev_del(&c_dev);
	unregister_chrdev_region(dev, MINOR_CNT);
}

module_init(schd_init);
module_exit(schd_cleanup);

MODULE_LICENSE("GPL");
MODULE_AUTHOR("Pradeep Tewani");
MODULE_DESCRIPTION("Waiting Process Demo");

Example above is a simple character driver demonstrating the use of schedule() API. In read() function, we invoke schedule() to yield the processor. Below is the sample run, assuming that the above program is compiled as sched.ko:

$ insmod sched.ko
Major Nr: 244
$ cat /dev/mychar0
Inside open
Inside read
Scheduling out
Woken up

So, what do we get? Does the usage of schedule() API serves the purpose of waiting? Not really. Why is it so?  Well, if you recall the definition of schedule(), it states that the process invoking this API voluntarily yields the processor, but only yielding the processor is not enough. Process is still in run queue and as long as process is in run queue, it would be scheduled again to run. This is exactly what happens in the above example, which makes our process to come out of wait quite immediately. So, the pre-condition for performing the wait with schedule() is to first move the process out of the run queue. How do we achieve this? For this, we have a API called set_current_state(). Below is the modified code snippet for the read() function:

ssize_t read(struct file *filp, char *buff, size_t count, loff_t *offp)
{
	printk(KERN_INFO "Inside read\n");
	printk(KERN_INFO "Scheduling out\n");
	set_current_state(TASK_INTERRUPTIBLE);
	schedule();
	printk(KERN_INFO "Woken up\n");
	return 0;
}

In the above example, before invoking the schedule() API, we are setting the state of the process to TASK_INTERRUPTIBLE. This will move the process out of run queue and hence it won’t be scheduled again to run. Below is the sample run for the modified example:

$ insmod sched.ko
Major Nr: 250
$ cat /dev/mychar0
Inside open
Inside read
Scheduling out

Conclusion

So, finally we are able to get the process blocked. But do you see the problem with this code? This process is indefinitely blocked. When and who will wake this process up? Another thing worth noting is that in real life scenarios, process always waits on some event, but our process is put to an unconditional sleep. How do we make a process wait on an event? To find out the answer to these questions, stay tuned to my next article. Till then, Happy Waiting!

Next Article >>

   Send article as PDF