Tag Archives: Graphs

Playing with Graphs

This twenty-fourth article of the mathematical journey through open source, demonstrates the concepts of graph theory for playing with graphs using the graphs package of Maxima.

<< Twenty-third Article

In our previous article, we familiarized ourselves with the notion of simple graphs, and how graphs package of Maxima allows us to create and visualize them. Assuming that knowledge, in this article, we are going to play with graphs and their properties, using the functionalities provided by Maxima’s graphs package.

Graph modifications

We have already created various graphs with create_graph() and make_graph() functions of the graphs package of Maxima. What if we want to modify some existing graphs, say by adding or removing some edges or vertices? Exactly for such operations, Maxima provides the following functions:

  • add_edge(<edge>, <g>) – Adds <edge> into the graph <g>
  • add_edges(<edge_list>, <g>) – Adds edges specified by <edge_list> into the graph <g>
  • add_vertex(<vertex>, <g>) – Adds <vertex> into the graph <g>
  • add_vertices(<vertex_list>, <g>) – Adds vertices specified by <vertex_list> into the graph <g>
  • connect_vertices(<u_list>, <v_list>, <g>) – Connects all vertices from <u_list> to all vertices in <v_list> in the graph <g>
  • contract_edge(<edge>, <g>) – Merges the vertices of the <edge> and the edges incident on those vertices, in the graph <g>
  • remove_edge(<edge>, <g>) – Removes the <edge> from the graph <g>
  • remove_vertex(<vertex>, <g>) – Removes the <vertex> and the associated edges from the graph <g>

Some of the above functions are demonstrated below:

$ maxima -q
(%i1) load(graphs)$ /* Loading the graphs package */
...
0 errors, 0 warnings
(%i2) g: create_graph(4, [[0, 1], [0, 2]]);
(%o2)                     GRAPH(4 vertices, 2 edges)
(%i3) print_graph(g)$

Graph on 4 vertices with 2 edges.
Adjacencies:
  3 :
  2 :  0
  1 :  0
  0 :  2  1
(%i4) add_edge([1, 2], g)$
(%i5) print_graph(g)$

Graph on 4 vertices with 3 edges.
Adjacencies:
  3 :
  2 :  1  0
  1 :  2  0
  0 :  2  1
(%i6) contract_edge([0, 1], g)$
(%i7) print_graph(g)$

Graph on 3 vertices with 1 edges.
Adjacencies:
  3 :
  2 :  0
  0 :  2

In the above examples, if we do not intend to modify the original graph, we may make a copy of it using copy_graph(), and then operate on the copy, as follows:

(%i8) h: copy_graph(g);
(%o8)                     GRAPH(3 vertices, 1 edges)
(%i9) add_vertex(1, h)$
(%i10) print_graph(h)$

Graph on 4 vertices with 1 edges.
Adjacencies:
  1 :
  0 :  2
  2 :  0
  3 :
(%i11) print_graph(g)$ /* Notice g is unmodified */

Graph on 3 vertices with 1 edges.
Adjacencies:
  3 :
  2 :  0
  0 :  2
(%i12) quit();

Advanced graph creations

New graphs can also be created based on existing graphs and their properties by various interesting operations. Few of them are:

  • underlying_graph(<dg>) – Returns the underlying graph of the directed graph <dg>
  • complement_graph(<g>) – Returns the complement graph of graph <g>
  • line_graph(<g>) – Returns a graph that represents the adjacencies between the edges of graph <g>
  • graph_union(<g1>, <g2>) – Returns a graph with edges and vertices of both graphs <g1> and <g2>
  • graph_product(<g1>, <g2>) – Returns the Cartesian product of graphs <g1> and <g2>

Here are some examples to demonstrate the simpler functions:

$ maxima -q
(%i1) load(graphs)$
...
0 errors, 0 warnings
(%i2) g: create_graph(4, [[0, 1], [0, 2], [0, 3]], directed = true);
(%o2)                     DIGRAPH(4 vertices, 3 arcs)
(%i3) print_graph(g)$

Digraph on 4 vertices with 3 arcs.
Adjacencies:
  3 :
  2 :
  1 :
  0 :  3  2  1
(%i4) h: underlying_graph(g);
(%o4)                     GRAPH(4 vertices, 3 edges)
(%i5) print_graph(h)$

Graph on 4 vertices with 3 edges.
Adjacencies:
  0 :  1  2  3
  1 :  0
  2 :  0
  3 :  0
(%i6) print_graph(complement_graph(h))$

Graph on 4 vertices with 3 edges.
Adjacencies:
  3 :  2  1
  2 :  3  1
  1 :  3  2
  0 :
(%i7) print_graph(graph_union(h, complement_graph(h)))$

Graph on 8 vertices with 6 edges.
Adjacencies:
  4 :
  5 :  6  7
  6 :  5  7
  7 :  5  6
  3 :  0
  2 :  0
  1 :  0
  0 :  3  2  1
(%i8) quit();

Basic graph properties

graph_order(<g>), vertices(<g>) returns the number of vertices and the list of vertices, respectively, in the graph <g>. graph_size(<g>), edges(<g>) returns the number of edges and the list of edges, respectively, in the graph <g>.

A graph is a collection of vertices and edges. Hence, most of its properties are centred around them. The following are graph related predicates provided by the graphs package of Maxima:

  • is_graph(<g>) – returns true if <g> is a graph, false otherwise
  • is_digraph(<g>) – returns true if <g> is a directed graph, false otherwise
  • is_graph_or_digraph(<g>) – returns true if <g> is a graph or a directed graph, false otherwise
  • is_connected(<g>) – returns true if graph <g> is connected, false otherwise
  • is_planar(<g>) – returns true if graph <g> can be placed on a plane without its edges crossing over each other, false otherwise
  • is_tree(<g>) – returns true if graph <g> has no simple cycles, false otherwise
  • is_biconnected(<g>) – returns true if graph <g> will remain connected even after removal of any one its vertices and the edges incident on that vertex, false otherwise
  • is_bipartite(<g>) – returns true if graph <g> is bipartite, i.e. 2-colourable, false otherwise
  • is_isomorphic(<g1>, <g2>) – returns true if graphs <g1> and <g2> have the same number of vertices and are connected in the same way, false otherwise. And, isomorphism(<g1>, <g2>) returns an isomorphism (that is a one-to-one onto mapping) between the graphs <g1> and <g2>, if it exists.
  • is_edge_in_graph(<edge>, <g>) – returns true if <edge> is in graph <g>, false otherwise
  • is_vertex_in_graph(<vertex>, <g>) – returns true if <vertex> is in graph <g>, false otherwise

The following example specifically demonstrates the isomorphism property, from the list above:

$ maxima -q
(%i1) load(graphs)$
...
0 errors, 0 warnings
(%i2) g1: create_graph(3, [[0, 1], [0, 2]]);
(%o2)                     GRAPH(3 vertices, 2 edges)
(%i3) g2: create_graph(3, [[1, 2], [0, 2]]);
(%o3)                     GRAPH(3 vertices, 2 edges)
(%i4) is_isomorphic(g1, g2);
(%o4)                                true
(%i5) isomorphism(g1, g2);
(%o5)                      [2 -> 0, 1 -> 1, 0 -> 2]
(%i6) quit();

Graph neighbourhoods

Lot of properties of graphs are to do with vertex and edge neighbourhoods, also referred as adjacencies.

For example, a graph itself could be represented by an adjacency list or matrix, which specifies the vertices adjacent to the various vertices in the graph. adjacency_matrix(<g>) returns the adjacency matrix of the graph <g>.

Number of edges incident on a vertex is called the valency or degree of the vertex, and could be obtained using vertex_degree(<v>, <g>). degree_sequence(<g>) returns the list of degrees of all the vertices of the graph <g>. In case of a directed graph, the degrees could be segregated as in-degree and out-degree, as per the edges incident into and out of the vertex, respectively. vertex_in_degree(<v>, <dg>) and vertex_out_degree(<v>, <dg>) respectively return the in-degree and out-degree for the vertex <v> of the directed graph <dg>.

neighbors(<v>, <g>), in_neighbors(<v>, <dg>), out_neighbors(<v>, <dg>) respectively return the list of adjacent vertices, adjacent in-vertices, adjacent out-vertices of the vertex <v> in the corresponding graphs.

average_degree(<g>) computes the average of degrees of all the vertices of the graph <g>. max_degree(<g>) finds the maximal degree of vertices of the graph <g>, and returns one such vertex alongwith. min_degree(<g>) finds the minimal degree of vertices of the graph <g>, and returns one such vertex alongwith.

Here follows a neighbourhood related demonstration:

$ maxima -q
(%i1) load(graphs)$
...
0 errors, 0 warnings
(%i2) g: create_graph(4, [[0, 1], [0, 2], [0, 3], [1, 2]]);
(%o2)                     GRAPH(4 vertices, 4 edges)
(%i3) string(adjacency_matrix(g)); /* string for output in single line */
(%o3)           matrix([0,0,0,1],[0,0,1,1],[0,1,0,1],[1,1,1,0])
(%i4) degree_sequence(g);
(%o4)                            [1, 2, 2, 3]
(%i5) average_degree(g);
(%o5)                                  2
(%i6) neighbors(0, g);
(%o6)                              [3, 2, 1]
(%i7) quit();

Graph connectivity

A graph is ultimately about connections, and hence lots of graph properties are centred around connectivity.

vertex_connectivity(<g>) returns the minimum number of vertices that need to be removed from the graph <g> to make the graph <g> disconnected. Similarly, edge_connectivity(<g>) returns the minimum number of edges that need to be removed from the graph <g> to make the graph <g> disconnected.

vertex_distance(<u>, <v>, <g>) returns the length of the shortest path between the vertices <u> and <v> in the graph <g>. The actual path could be obtained using shortest_path(<u>, <v>, <g>).

girth(<g>) returns the length of the shortest cycle in graph <g>.

vertex_eccentricity(<v>, <g>) returns the maximum of the vertex distances of vertex <v> with any other vertex in the connected graph <g>.

diameter(<g>) returns the maximum of the vertex eccentricities of all the vertices in the connected graph <g>.

radius(<g>) returns the minimum of the vertex eccentricities of all the vertices in the connected graph <g>.

graph_center(<g>) returns the list of vertices that have eccentricities equal to the radius of the connected graph <g>.

graph_periphery(<g>) is the list of vertices that have eccentricities equal to the diameter of the connected graph.

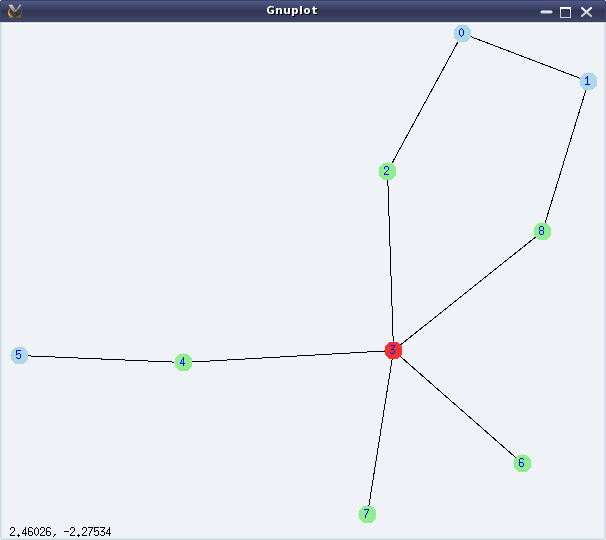
A minimal connectivity related demonstration for the graph shown in Figure 29 follows:

$ maxima -q
(%i1) load(graphs)$
...
0 errors, 0 warnings
(%i2) g: create_graph(9, [[0, 1], [0, 2], [1, 8], [8, 3], [2, 3], [3, 4], [4, 5],
        [3, 6], [3, 7]]);
(%o2)                     GRAPH(9 vertices, 9 edges)
(%i3) vertex_connectivity(g);
(%o3)                                  1
(%i4) edge_connectivity(g);
(%o4)                                 1
(%i5) shortest_path(0, 7, g);
(%o5)                           [0, 2, 3, 7]
(%i6) vertex_distance(0, 7, g);
(%o6)                                 3
(%i7) girth(g);
(%o7)                                 5
(%i8) diameter(g);
(%o8)                                 4
(%i9) radius(g);
(%o9)                                 2
(%i10) graph_center(g);
(%o10)                                [3]
(%i11) graph_periphery(g);
(%o11)                             [5, 1, 0]
Figure 29: Graph connectivities

Figure 29: Graph connectivities

Vertex 3 is the only centre of the graph and 0, 1, 5 are the peripheral vertices of the graph.

Graph colouring

Graph colouring has been a fascinating topic in graph theory, since its inception. It is all about colouring the vertices or edges of a graph in such a way that no adjacent elements (vertex or edge) have the same colour.

Smallest number of colours needed to colour the vertices of a graph, such that no two adjacent vertices have the same colour, is called the chromatic number of the graph. chromatic_number(<g>) computes the same. vertex_coloring(<g>) returns a list representing the colouring of the vertices of <g>, along with the chromatic number.

Smallest number of colours needed to colour the edges of a graph, such that no two adjacent edges have the same colour, is called the chromatic index of the graph. chromatic_index(<g>) computes the same. edge_coloring(<g>) returns a list representing the colouring of the edges of <g>, along with the chromatic index.

The following demonstration continues colouring the graph from the above demonstration:

(%i12) chromatic_number(g);
(%o12)                                 3
(%i13) vc: vertex_coloring(g);
(%o13) [3, [[0, 3], [1, 1], [2, 2], [3, 1], [4, 2], [5, 1], [6, 2], [7, 2], [8, 2]]]
(%i14) chromatic_index(g);
(%o14)                                 5
(%i15) ec: edge_coloring(g);
(%o15) [5, [[[0, 1], 1], [[0, 2], 2], [[1, 8], 2], [[3, 8], 5], [[2, 3], 1], 
                           [[3, 4], 2], [[4, 5], 1], [[3, 6], 3], [[3, 7], 4]]]
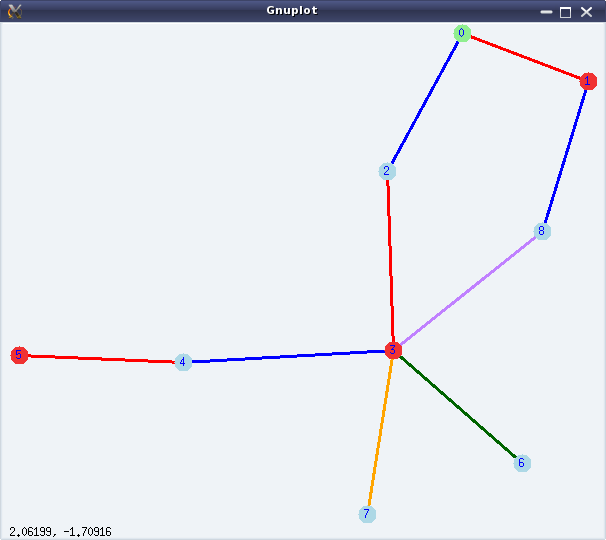
(%i16) draw_graph(g, vertex_coloring=vc, edge_coloring=ec, vertex_size=5,
        edge_width=3, show_id=true)$
(%i17) quit();

Figure 30 shows the coloured version of the graph, as obtained by %i16.

Figure 30: Graph colouring

Figure 30: Graph colouring

Bon voyage

With this article, we have completed a 2 year long mathematical journey through open source, starting from mathematics in Shell, covering Bench Calculator, Octave, and finally concluding with Maxima. I take this opportunity to thank my readers and wish them bon voyage with whatever they have gained through our interactions. However, this is not the end – get set for our next odyssey.
   Send article as PDF   

Visualizing Graph Theory

This twenty-third article of the mathematical journey through open source, introduces graph theory with visuals using the graphs package of Maxima.

<< Twenty-second Article

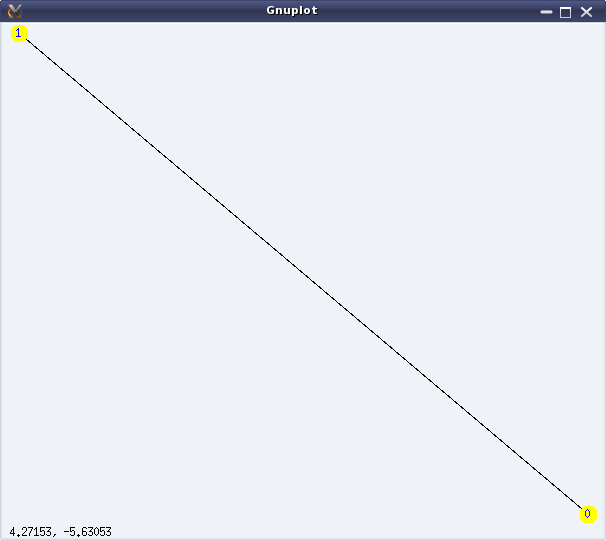
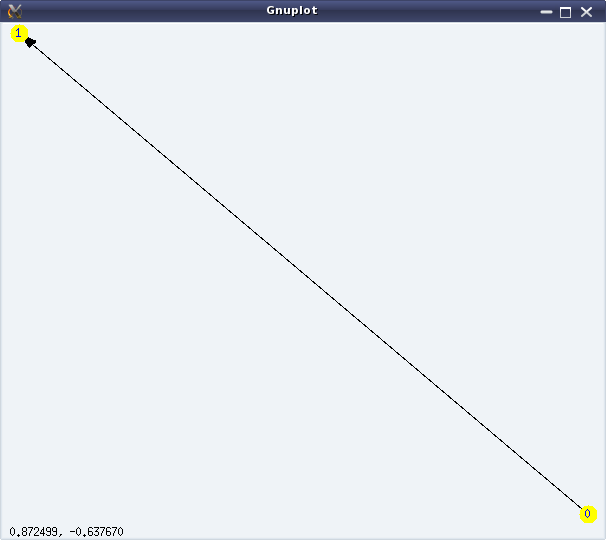
Graphs here refer to the structures formed using some points (or vertices), and some lines (or edges) connecting them. A simple example would be a graph with two vertices, say ‘0’ & ‘1’, and an edge between ‘0’ and ‘1’. If all the edges of a graph have a sense of direction from one vertex to another, typically represented by an arrow at their end(s), we call that a directed graph with directed edges. In such a case, we consider the edges to be not between two vertices but from one vertex to another vertex. Directed edges are also referred to as arcs. In the above example, we could have two directed arcs, one from ‘0’ to ‘1’, and another from ‘1’ to ‘0’. Figures 24 & 25 show an undirected and a directed graph, respectively.

Figure 24: Simple undirected graph

Figure 24: Simple undirected graph

Figure 25: Simple directed graph

Figure 25: Simple directed graph

Graph creation & visualization

Now, how did we get those figures? Using the graphs package of Maxima, which is loaded by invoking load(graphs) at the Maxima prompt. In the package, vertices are represented by whole numbers 0, 1, … and an edge is represented as a list of its two vertices. Using these notations, we can create graphs using the create_graph(<vertex_list>, <edge_list>[, directed]) function. And, then draw_graph(<graph>[, <option1>, <option2>, …]) would draw the graph pictorially. Code snippet below shows the same in action:

$ maxima -q
(%i1) load(graphs)$
...
0 errors, 0 warnings
(%i2) g: create_graph([0, 1], [[0, 1]])$
(%i3) dg: create_graph([0, 1], [[0, 1]], directed=true)$
(%i4) draw_graph(g, show_id=true, vertex_size=5, vertex_color=yellow)$
(%i5) draw_graph(dg, show_id=true, vertex_size=5, vertex_color=yellow)$

The “show_id=true” option draws the vertex numbers, and vertex_size and vertex_color draws the vertices with the corresponding size and colour.

Note that a graph without any duplicate edges and without any loops is called a simple graph. And, an edge from a vertex U to V is not duplicate of an edge from vertex V to U in a directed graph but is duplicate in an undirected graph. Maxima’s package supports only simple graphs, i.e. graphs without duplicate edges and loops.

A simple graph can also be equivalently represented by adjacency of vertices, meaning by lists of adjacent vertices for every vertex. print_graph(<graph>) exactly displays those lists. The following code demonstration, in continuation from the previous code, demonstrates that:

(%i6) print_graph(g)$

Graph on 2 vertices with 1 edges.
Adjacencies:
  1 :  0
  0 :  1
(%i7) print_graph(dg)$

Digraph on 2 vertices with 1 arcs.
Adjacencies:
  1 :
  0 :  1
(%i8) quit();

create_graph(<num_of_vertices>, <edge_list>[, directed]) is another way of creating a graph using create_graph(). Here, the vertices are created as 0, 1, …, <num_of_vertices> – 1. So, both the above graphs could equivalently be created as follows:

$ maxima -q
(%i1) load(graphs)$
...
0 errors, 0 warnings
(%i2) g: create_graph(2, [[0, 1]]);
(%o2)                     GRAPH(2 vertices, 1 edges)
(%i3) dg: create_graph(2, [[0, 1]], directed=true);
(%o3)                     DIGRAPH(2 vertices, 1 arcs)
(%i4) quit();

make_graph(<vertices>, <predicate>[, directed]) is another interesting way of creating a graph, based on vertex connectivity conditions specified by the <predicate> function. <vertices> could be an integer or a set/list of vertices. If it is a positive integer, then the vertices would be 1, 2, …, <vertices>. In any case, <predicate> should be a function taking two arguments of the vertex type and returning true or false. make_graph() creates a graph with the vertices specified as above, and with the edges between the vertices for which the <predicate> function returns true.

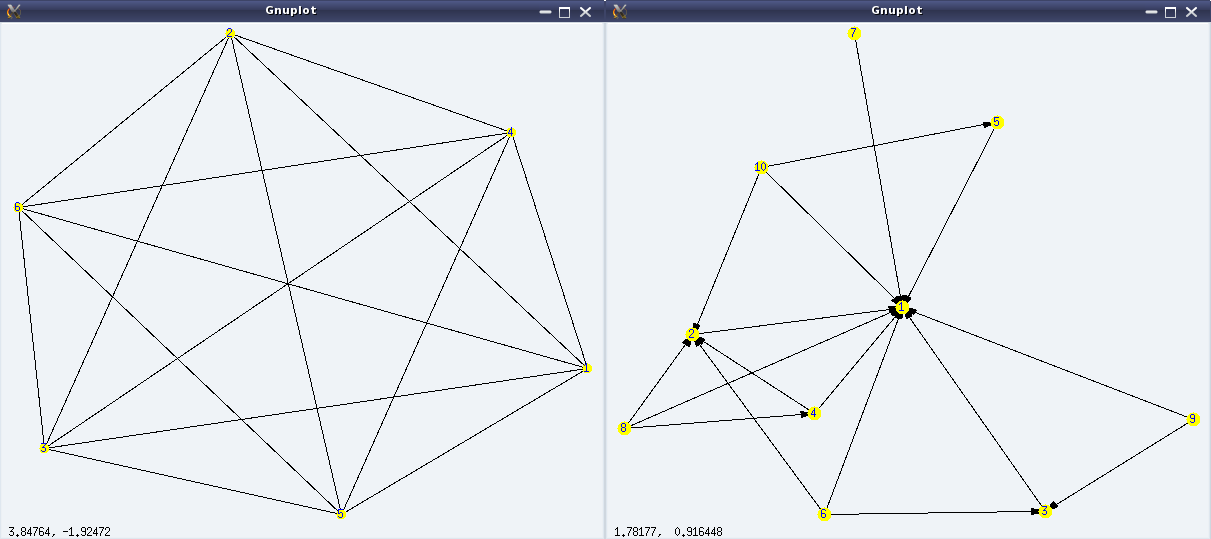
A trivial case would be, if the <predicate> always returns true, then it would create a complete graph, i.e. a simple graph where all vertices are connected to each other. Here are a couple of demonstrations of make_graph():

$ maxima -q
(%i1) load(graphs)$
...
0 errors, 0 warnings
(%i2) f(i, j) := true$
(%i3) g: make_graph(6, f);
(%o3)                   GRAPH(6 vertices, 15 edges)
(%i4) draw_graph(g, show_id=true, vertex_color=yellow)$
(%i5) f(i, j) := is(mod(i, j)=0)$
(%i6) g: make_graph(10, f, directed = true);
(%o6)                  DIGRAPH(10 vertices, 17 arcs)
(%i7) draw_graph(g, show_id=true, vertex_color=yellow, vertex_size=4)$
(%i8) quit();

Figures 26 shows the output graphs from the above code.

Figure 26: More simple graphs

Figure 26: More simple graphs

Graph varieties

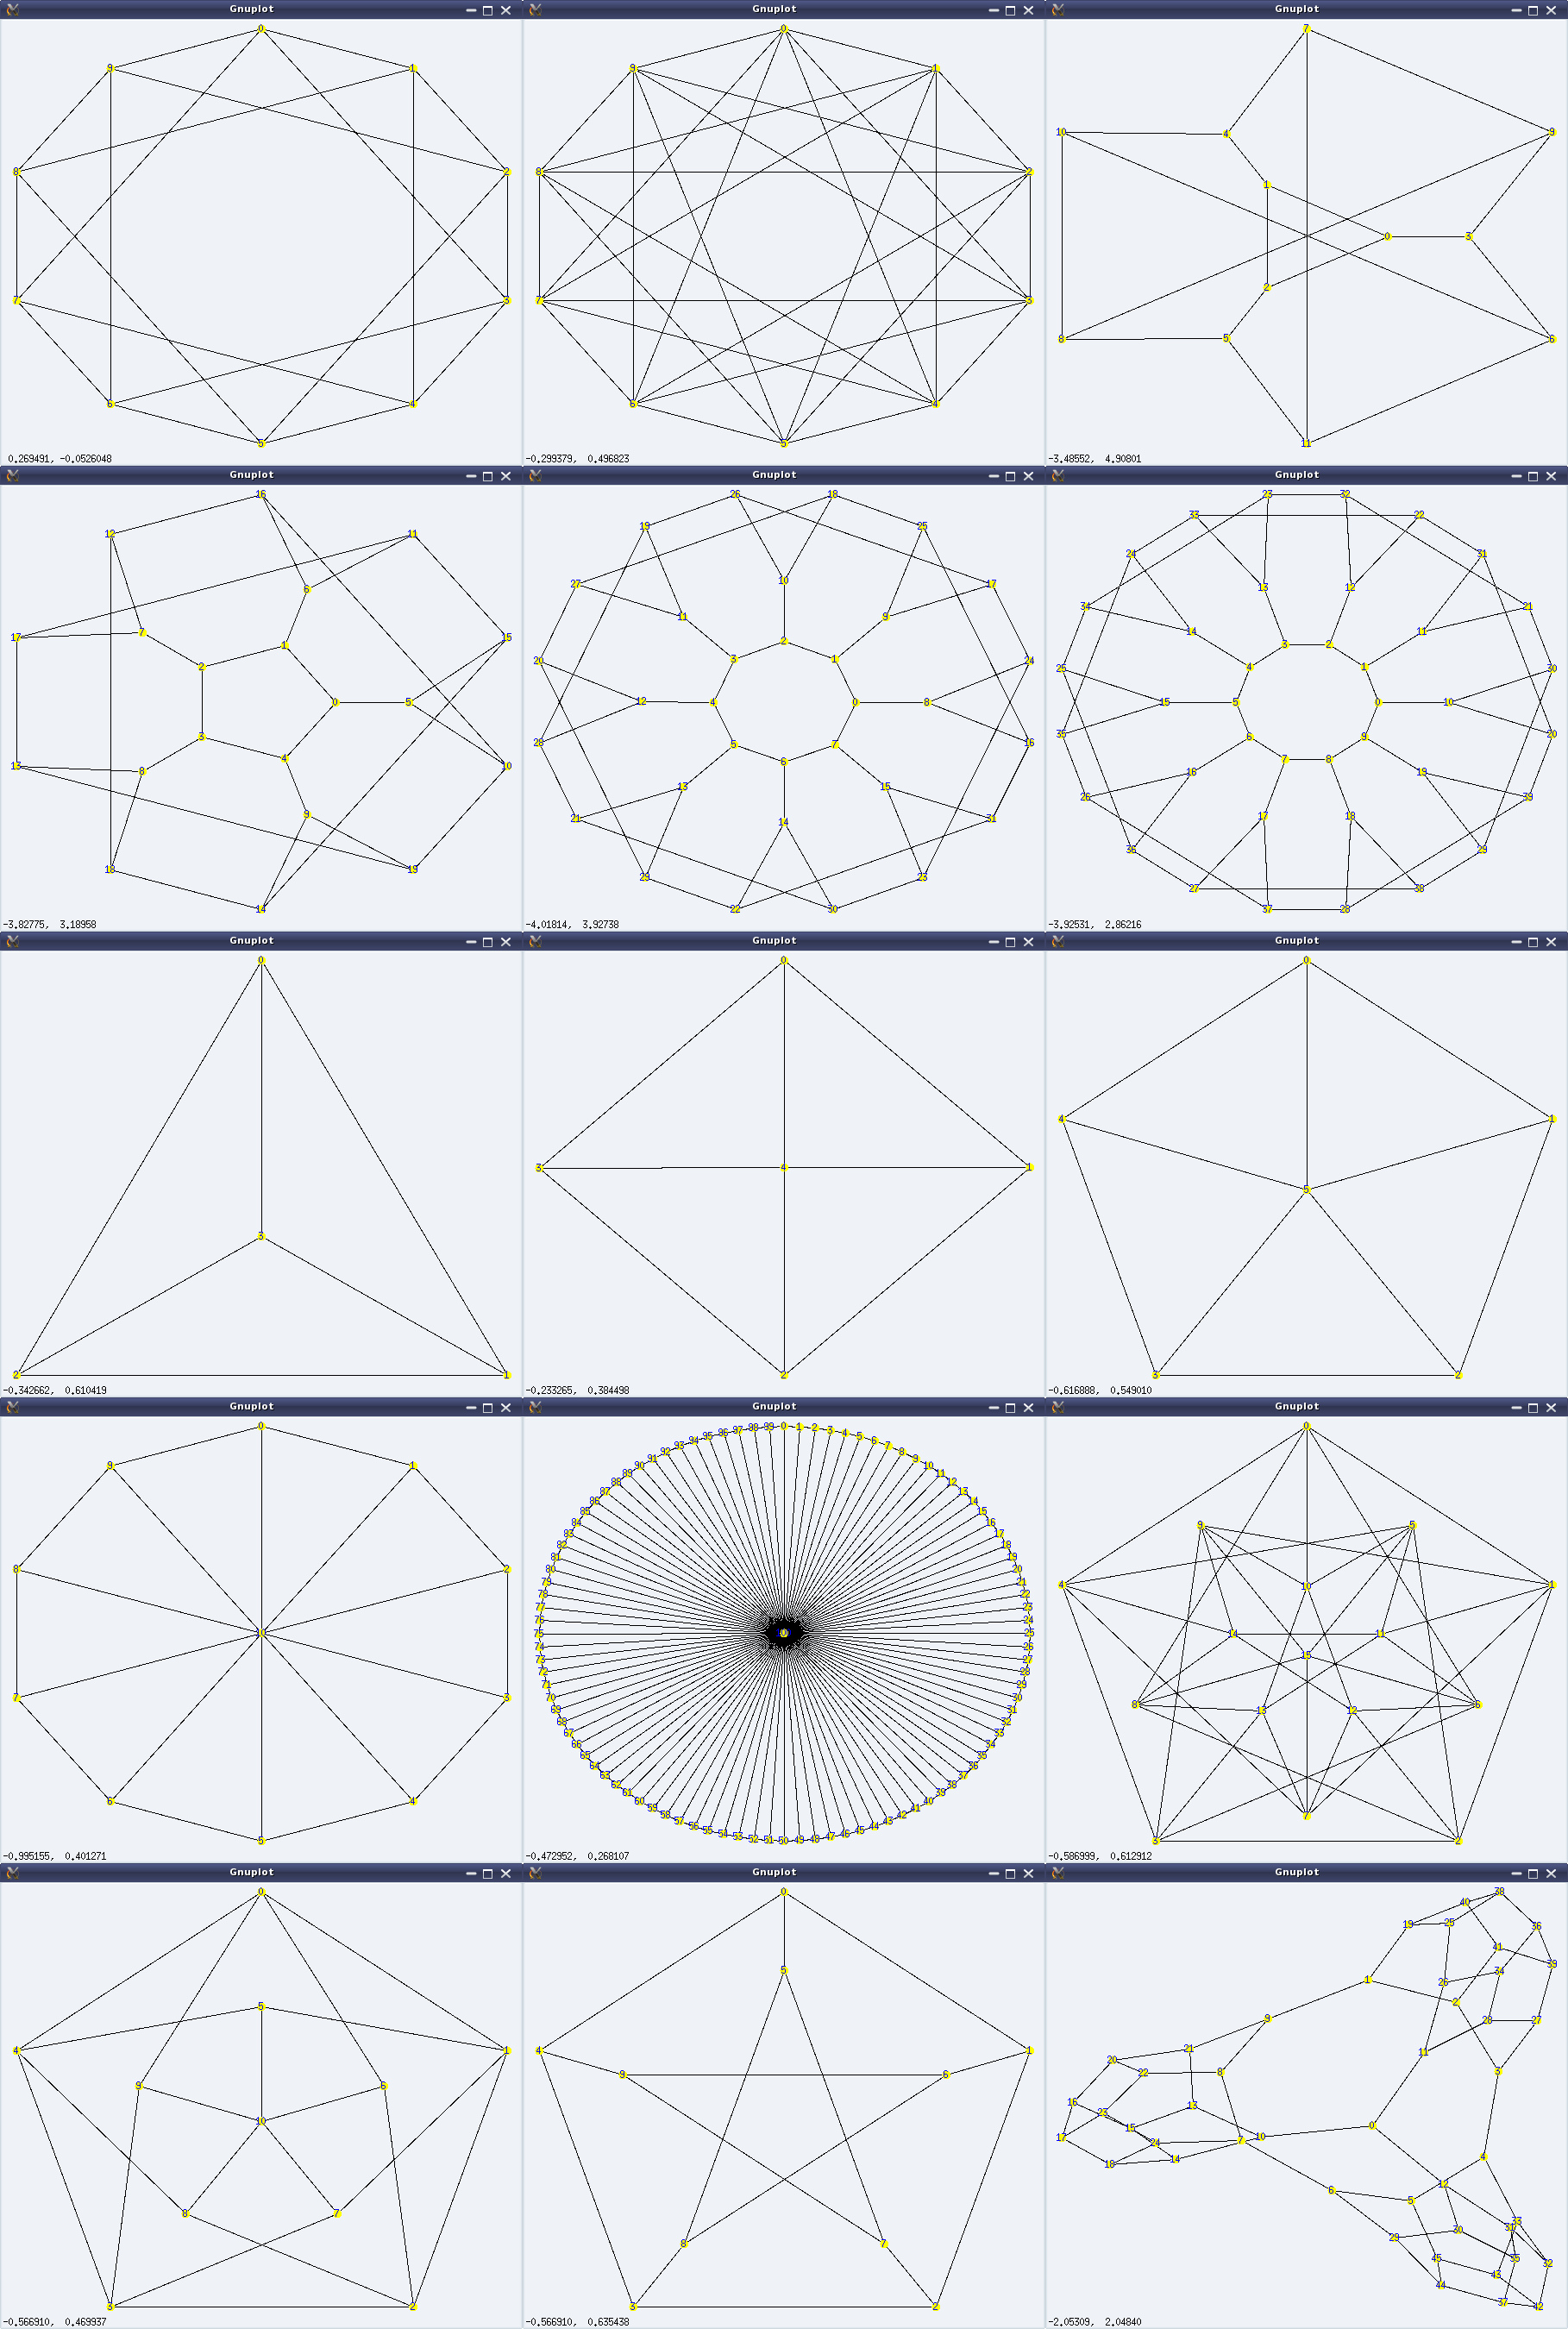
One aware of graphs, would have known or at least heard of a variety of them. Here’s a list of some of them, available in Maxima’s graphs package (through functions):

  • Empty graph (empty_graph(n)) – Graph with a given n vertices but no edges
  • Complete graph (complete_graph(n)) – Simple graph with all possible edges for a given n vertices
  • Complete bipartite graph (complete_bipartite_graph(m, n)) – Simple graph with two set of vertices, having all possible edges between the vertices from the two sets, but with no edge between the vertices of the same set.
  • Cube graph (cube_graph(n)) – Graph representing an n-dimensional cube
  • Dodecahedron graph (dodecahedron_graph()) – Graph forming a 3-D polyhedron with 12 pentagonal faces
  • Cuboctahedron graph (cuboctahedron_graph()) – Graph forming a 3-D polyhedron with 8 triangular faces and 12 square faces
  • Icosahedron graph (icosahedron_graph()) – Graph forming a 3-D polyhedron with 20 triangular faces
  • Icosidodecahedron graph (icosidodecahedron_graph()) – Graph forming a 3-D uniform star polyhedron with 12 star faces and 20 triangular faces

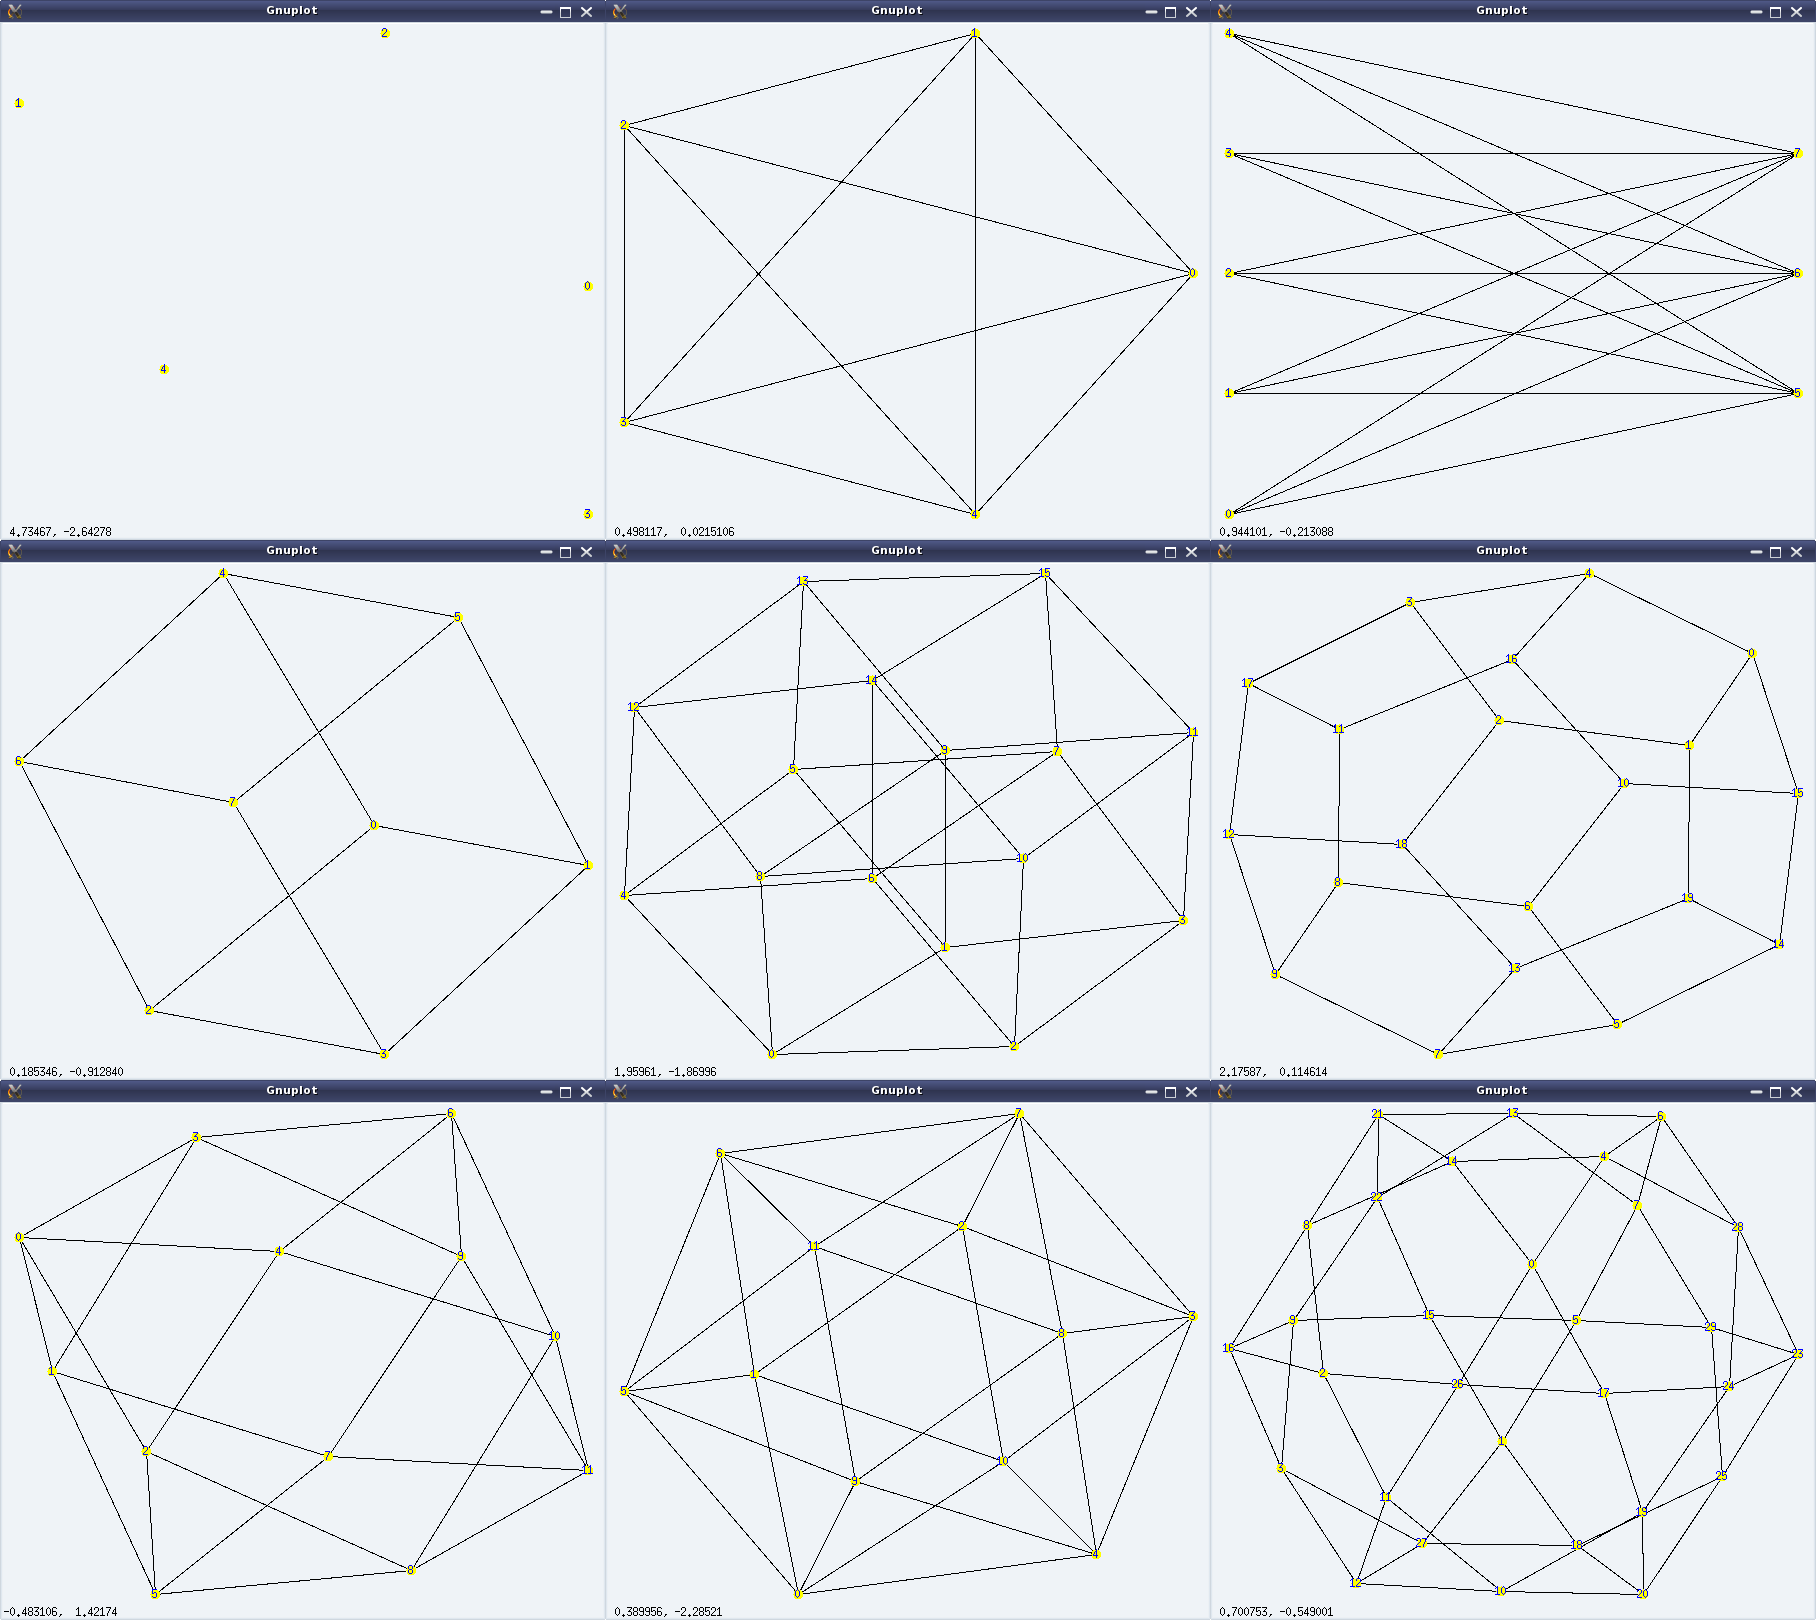
And here follows a demonstration of the above, along with the visuals (left to right, top to bottom) in Figure 27:

$ maxima -q
(%i1) load(graphs)$
...
0 errors, 0 warnings
(%i2) g: empty_graph(5);
(%o2)                     GRAPH(5 vertices, 0 edges)
(%i3) draw_graph(g, show_id=true, vertex_color=yellow)$
(%i4) g: complete_graph(5);
(%o4)                     GRAPH(5 vertices, 10 edges)
(%i5) draw_graph(g, show_id=true, vertex_color=yellow)$
(%i6) g: complete_bipartite_graph(5, 3);
(%o6)                     GRAPH(8 vertices, 15 edges)
(%i7) draw_graph(g, show_id=true, vertex_color=yellow)$
(%i8) g: cube_graph(3);
(%o8)                    GRAPH(8 vertices, 12 edges)
(%i9) draw_graph(g, show_id=true, vertex_color=yellow)$
(%i10) g: cube_graph(4);
(%o10)                   GRAPH(16 vertices, 32 edges)
(%i11) draw_graph(g, show_id=true, vertex_color=yellow)$
(%i12) g: dodecahedron_graph();
(%o12)                   GRAPH(20 vertices, 30 edges)
(%i13) draw_graph(g, show_id=true, vertex_color=yellow)$
(%i14) g: cuboctahedron_graph();
(%o14)                   GRAPH(12 vertices, 24 edges)
(%i15) draw_graph(g, show_id=true, vertex_color=yellow)$
(%i16) g: icosahedron_graph();
(%o16)                   GRAPH(12 vertices, 30 edges)
(%i17) draw_graph(g, show_id=true, vertex_color=yellow)$
(%i18) g: icosidodecahedron_graph();
(%o18)                   GRAPH(30 vertices, 60 edges)
(%i19) draw_graph(g, show_id=true, vertex_color=yellow)$
(%i20) quit();
Figure 27: Graph varieties

Figure 27: Graph varieties

Graph beauties

Graphs are really beautiful to visualize. Some of the many beautiful graphs, available in Maxima’s graphs package (through functions), are listed below:

  • Circulant graph (circulant_graph(n, [x, y, …])) – Graph with vertices 0, …, n-1, where every vertex is adjacent to its xth, yth, … vertices. Visually, it has a cyclic group of symmetries./li>
  • Flower graph (flower_snark(n)) – Graph like a flower with n petals and 4*n vertices
  • Wheel graph (wheel_graph(n)) – Graph like a wheel with n vertices
  • Clebsch graph (clebsch_graph()) – An another symmetrical graph beauty, named by J J Seidel
  • Frucht graph (frucht_graph()) – A graph with 12 vertices, 18 edges, and no nontrivial symmetries, such that every vertex have 3 neighbours. It is named after Robert Frucht
  • Grötzsch graph (grotzch_graph()) – A triangle-free graph with 11 vertices and 20 edges, named after Herbert Grötzsch
  • Heawood graph (heawood_graph()) – A symmetrical graph with 14 vertices and 21 edges, named after Percy John Heawood
  • Petersen graph (petersen_graph()) – A symmetrical graph with 10 vertices and 15 edges, named after Julius Petersen
  • Tutte graph (tutte_graph()) – A graph with 46 vertices and 69 edges, such that every vertex have 3 neighbours. It is named after W T Tutte

And here follows a demonstration of some of the above, along with the visuals (left to right, top to bottom) in Figure 28:

$ maxima -q
(%i1) load(graphs)$
...
0 errors, 0 warnings
(%i2) g: circulant_graph(10, [1, 3]);
(%o2)                   GRAPH(10 vertices, 20 edges)
(%i3) draw_graph(g, show_id=true, vertex_color=yellow)$
(%i4) g: circulant_graph(10, [1, 3, 4, 6]);
(%o4)                   GRAPH(10 vertices, 40 edges)
(%i5) draw_graph(g, show_id=true, vertex_color=yellow)$
(%i6) g: flower_snark(3);
(%o6)                   GRAPH(12 vertices, 18 edges)
(%i7) draw_graph(g, show_id=true, vertex_color=yellow)$
(%i8) g: flower_snark(5);
(%o8)                   GRAPH(20 vertices, 30 edges)
(%i9) draw_graph(g, show_id=true, vertex_color=yellow)$
(%i10) g: flower_snark(8);
(%o10)                   GRAPH(32 vertices, 48 edges)
(%i11) draw_graph(g, show_id=true, vertex_color=yellow)$
(%i12) g: flower_snark(10);
(%o12)                   GRAPH(40 vertices, 60 edges)
(%i13) draw_graph(g, show_id=true, vertex_color=yellow)$
(%i14) g: wheel_graph(3);
(%o14)                    GRAPH(4 vertices, 6 edges)
(%i15) draw_graph(g, show_id=true, vertex_color=yellow)$
(%i16) g: wheel_graph(4);
(%o16)                    GRAPH(5 vertices, 8 edges)
(%i17) draw_graph(g, show_id=true, vertex_color=yellow)$
(%i18) g: wheel_graph(5);
(%o18)                    GRAPH(6 vertices, 10 edges)
(%i19) draw_graph(g, show_id=true, vertex_color=yellow)$
(%i20) g: wheel_graph(10);
(%o20)                   GRAPH(11 vertices, 20 edges)
(%i21) draw_graph(g, show_id=true, vertex_color=yellow)$
(%i22) g: wheel_graph(100);
(%o22)                  GRAPH(101 vertices, 200 edges)
(%i23) draw_graph(g, show_id=true, vertex_color=yellow)$
(%i24) g: clebsch_graph();
(%o24)                   GRAPH(16 vertices, 40 edges)
(%i25) draw_graph(g, show_id=true, vertex_color=yellow)$
(%i26) g: grotzch_graph();
(%o26)                   GRAPH(11 vertices, 20 edges)
(%i27) draw_graph(g, show_id=true, vertex_color=yellow)$
(%i28) g: petersen_graph();
(%o28)                   GRAPH(10 vertices, 15 edges)
(%i29) draw_graph(g, show_id=true, vertex_color=yellow)$
(%i30) g: tutte_graph();
(%o30)                   GRAPH(46 vertices, 69 edges)
(%i31) draw_graph(g, show_id=true, vertex_color=yellow)$
(%i32) quit();
Figure 28: Graph beauties

Figure 28: Graph beauties

What next?

With all these visualizations, you may be wondering, what to do with these apart from just staring at them. Visualizations were just to motivate you, visually. In fact, every graph has a particular set of properties, which distinguishes it from the other. And, there is a lot of beautiful mathematics involved with these properties. If you are motivated enough, watch out for playing around with these graphs and their properties.

Twenty-fourth Article >>

   Send article as PDF   

Figures, Graphs, and Plots in Octave

This twelfth article of the mathematical journey through open source, shows the mathematical visualization in octave.

<< Eleventh Article

Mathematics is incomplete without visualization, without drawing the results, and without plotting the graphs. octave uses the powerful gnuplot as the backend of its plotting functionality. And in the frontend provides various plotting functions. Let’s look at the most beautiful ones.

Basic 2D Plotting

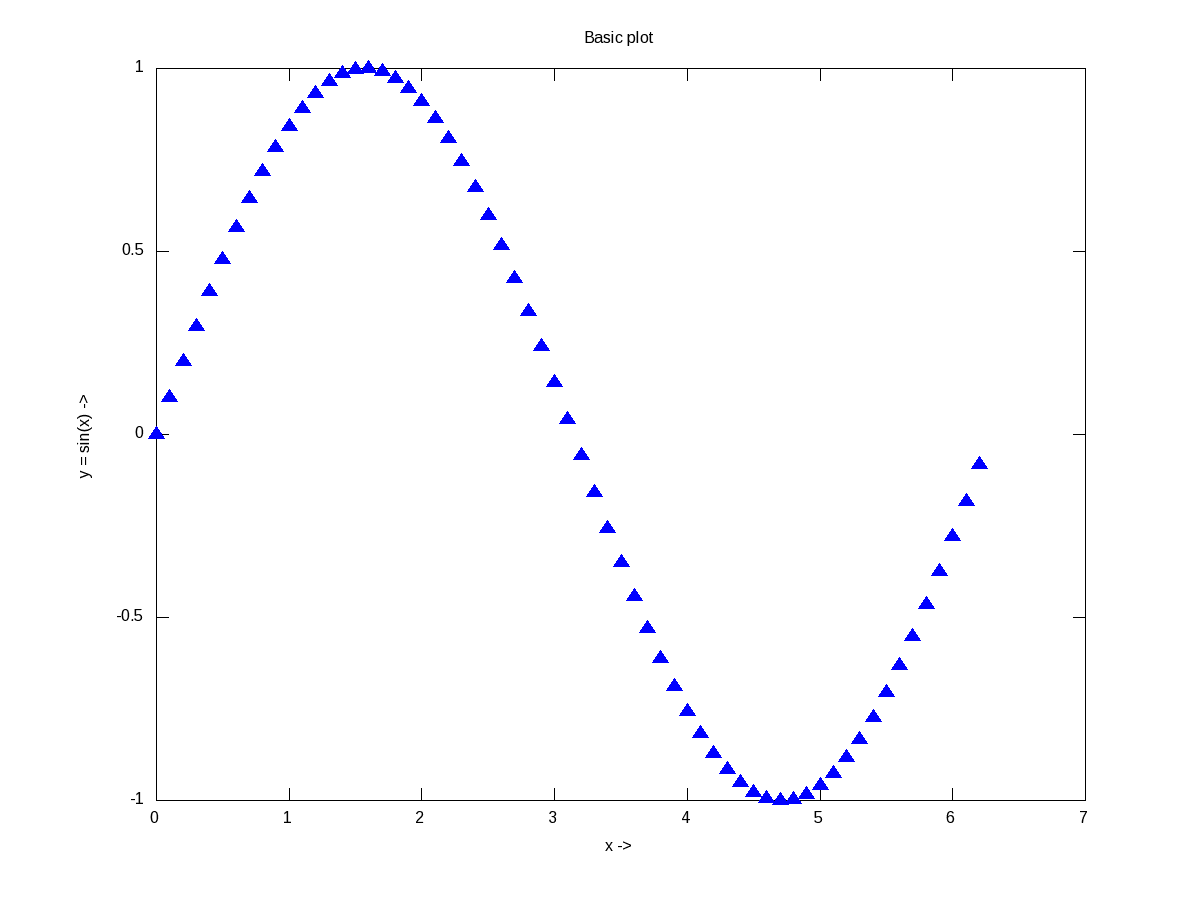
The most basic plotting is using the plot() function, which takes the Cartesian x & y values. Additionally, you may pass, as how to plot, i.e. as points or lines, their style, their colour, label, etc. Supported point styles are: +, *, o, x, ^, and lines are represented by -. Supported colours are: k (black), r (red), g (green), b (blue), y (yellow), m (magenta), c (cyan), w (white). With this background, here is how you plot a sine curve, and Figure 12 shows the plot.

$ octave -qf
octave:1> x = 0:0.1:2*pi;
octave:2> y = sin(x);
octave:3> plot(x, y, "^b");
octave:4> xlabel("x ->");
octave:5> ylabel("y = sin(x) ->");
octave:6> title("Basic plot");
octave:7>
Figure 12: Basic plotting in octave

Figure 12: Basic plotting in octave

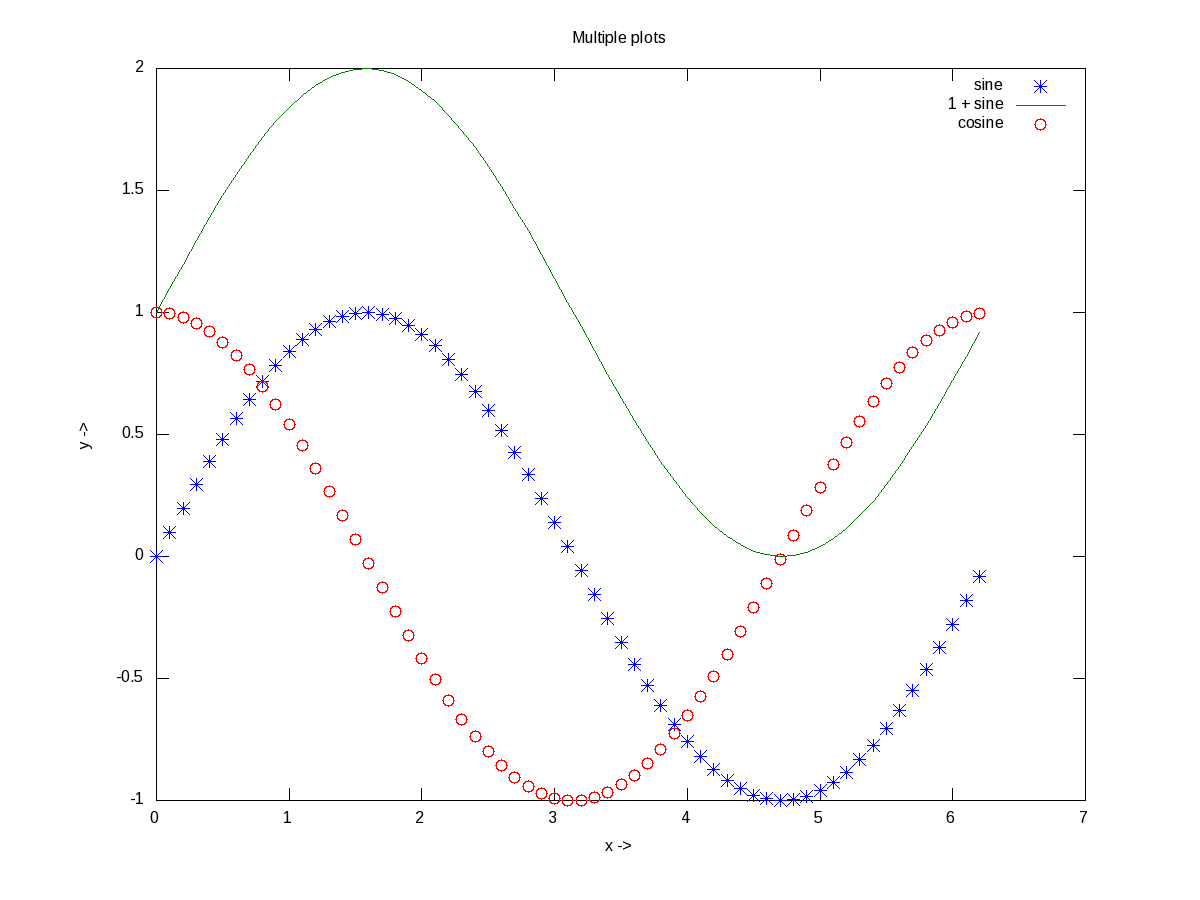
xlabel(), and ylabel() adds the corresponding labels, and title() adds the title. Multiple plots can be done on the same axis as follows, and Figure 13 shows the plots. Note the usage of legend() to mark the multiple plots.

$ octave -qf
octave:1> x = 0:0.1:2*pi;
octave:2> plot(x, sin(x), "*", x, 1 + sin(x), "-", x, cos(x), "o");
octave:3> xlabel("x ->");
octave:4> ylabel("y ->");
octave:5> legend("sine", "1 + sine", "cosine");
octave:6> title("Multiple plots");
octave:7>
Figure 13: Multiple plots on the same axis

Figure 13: Multiple plots on the same axis

Advanced 2D Figures

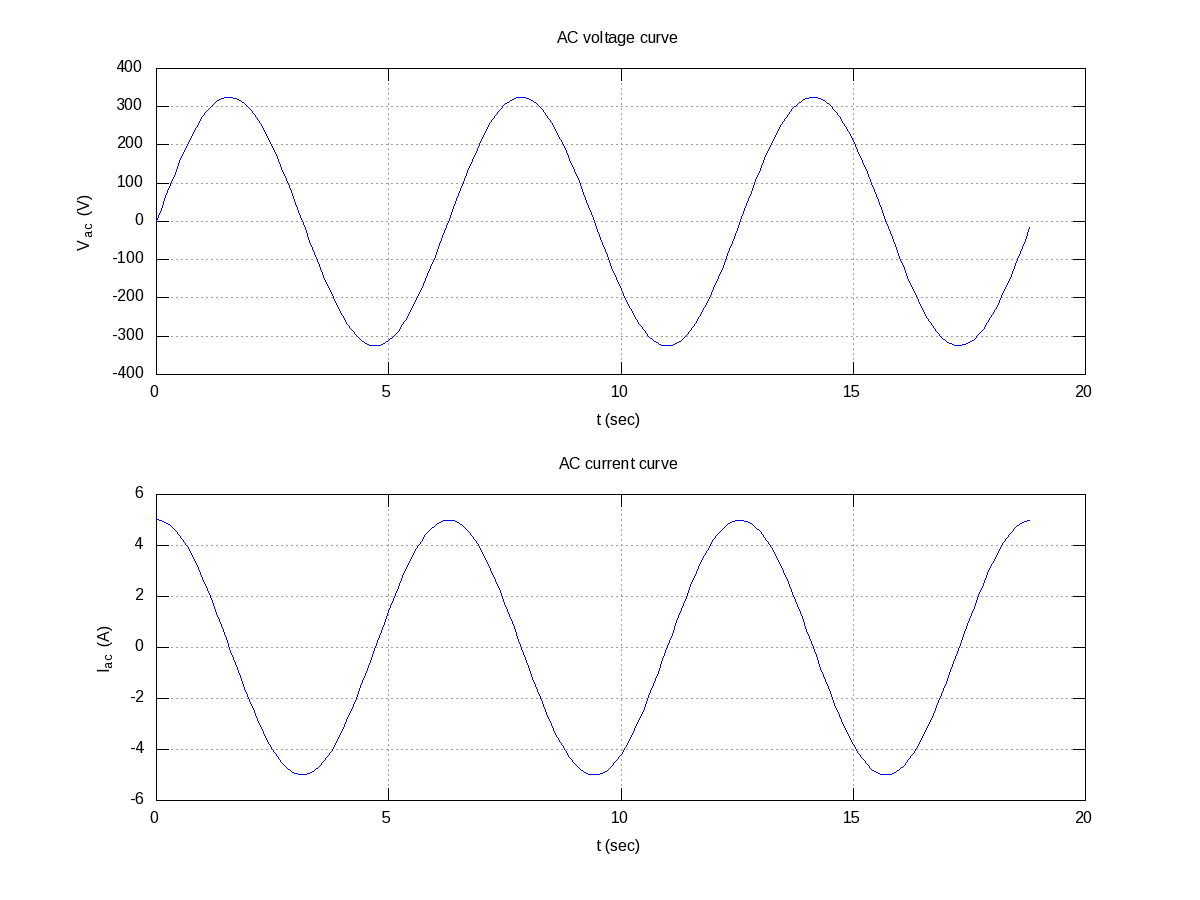
Now, if we want to have the multiple graphs on the same sheet but with different axes as shown in Figure 14, here is how to do that:

octave:1> t = 0:0.1:6*pi;
octave:2> subplot(2, 1, 1);
octave:3> plot(t, 325 * sin(t));
octave:4> xlabel("t (sec)");
octave:5> ylabel("V_{ac} (V)");
octave:6> title("AC voltage curve");
octave:7> grid("on");
octave:8> subplot(2, 1, 2);
octave:9> plot(t, 5 * cos(t));
octave:10> xlabel("t (sec)");
octave:11> ylabel("I_{ac} (A)");
octave:12> title("AC current curve");
octave:13> grid("on");
octave:14> print("-dpng", "multiple_plots_on_a_sheet.png");
octave:15>
Figure 14: Multiple plots on a sheet

Figure 14: Multiple plots on a sheet

Note the usage of subplot(), taking the matrix dimensions (row, column) and the plot number to create the matrix of plots. In the example above, it created a 2×1 matrix of plots. As add-ons, we have used the grid(“on”) to show up the dotted grid lines, and print() to save the generated figure as a .png file.

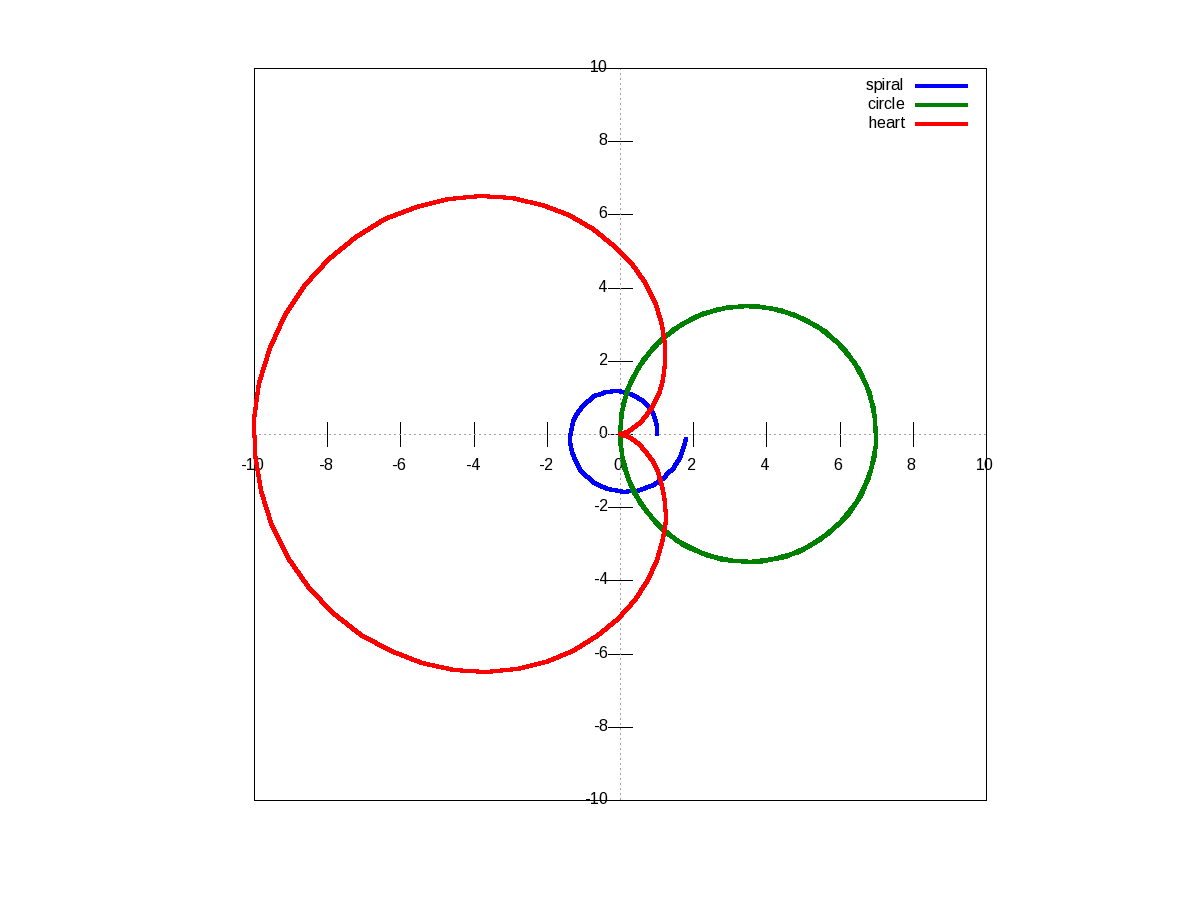
It is not always easy to plot everything in Cartesian co-ordinates, or rather many things are easier to plot in polar co-ordinates, e.g. a spiral, circle, heart, etc. The following code & Figure 15 shows a few such examples. Shown along with is a technique of modifying the figure properties, after drawing the figure using the set() function. Here it modifies the line thickness.

octave:1> th = 0:0.1:2*pi;
octave:2> r1 = 1.1 .^ th;
octave:3> r2 = 7 * cos(th);
octave:4> r3 = 5 * (1 - cos(th));
octave:5> r = [r1; r2; r3];
octave:6> ph = polar(th, r, "-");
octave:7> set(ph, "LineWidth", 4);
octave:8> legend("spiral", "circle", "heart");
octave:9>
Figure 15: Polar plots

Figure 15: Polar plots

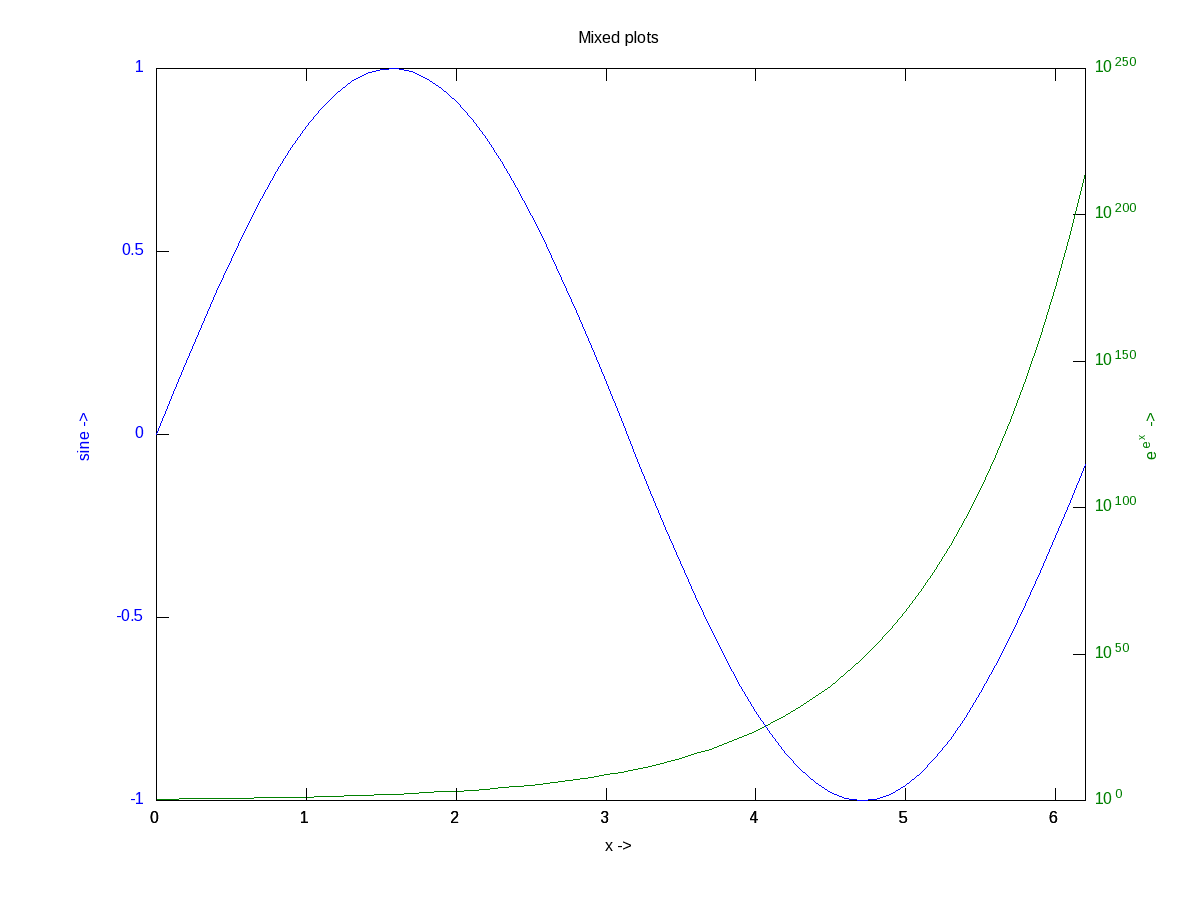
There are many other possible ways of drawing various interesting 2-D figures for all kind of mathematical & scientific requirements. So, before closing on 2-D plotting, let’s look into just one more often needed drawing – plotting with log axis, and more over with two y-axes on a single plot. The function for that is plotyy(). Note the plotyy() calling the corresponding function pointers @plot, @semilogy passed to it, in the following code segment. Figure 16 shows the output.

octave:1> x = 0:0.1:2*pi;
octave:2> y1 = sin(x);
octave:3> y2 = exp(exp(x));
octave:4> ax = plotyy(x, y1, x, y2, @plot, @semilogy);
octave:5> xlabel("x ->");
octave:6> ylabel(ax(1), "sine ->");
octave:7> ylabel(ax(2), "e^{e^x} ->");
octave:8> title("Mixed plots");
octave:9>
Figure 16: Mixed plots with semi log axis

Figure 16: Mixed plots with semi log axis

3D Visualization

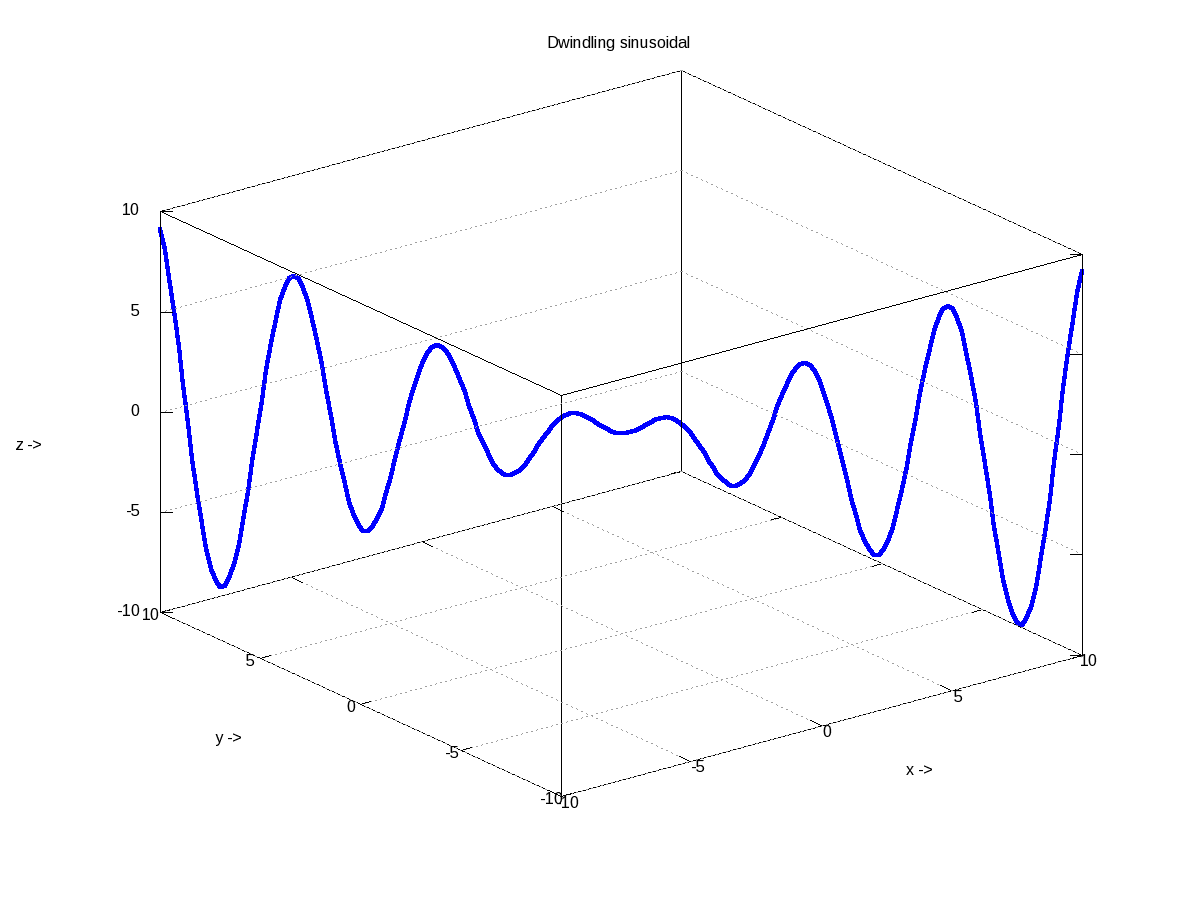
And finally, let’s do some 3-D plotting. plot3() is the simplest octave function to do a simple 3-D drawing, taking the set of (x, y, z) points. Here’s the sample code to draw the dwindling sinusoidal curve shown in Figure 17:

octave:1> x = -10:0.1:10;
octave:2> y = 10:-0.1:-10;
octave:3> z = x .* sin(x - y); 
octave:4> plot3(x, y, z, "-", "LineWidth", 4); 
octave:5> xlabel("x ->");
octave:6> ylabel("y ->");
octave:7> zlabel("z ->");
octave:8> title("Dwindling sinusoidal");
octave:9> grid("on");
octave:10>
Figure 17: 3-D plot of a dwindling sinusoidal

Figure 17: 3-D plot of a dwindling sinusoidal

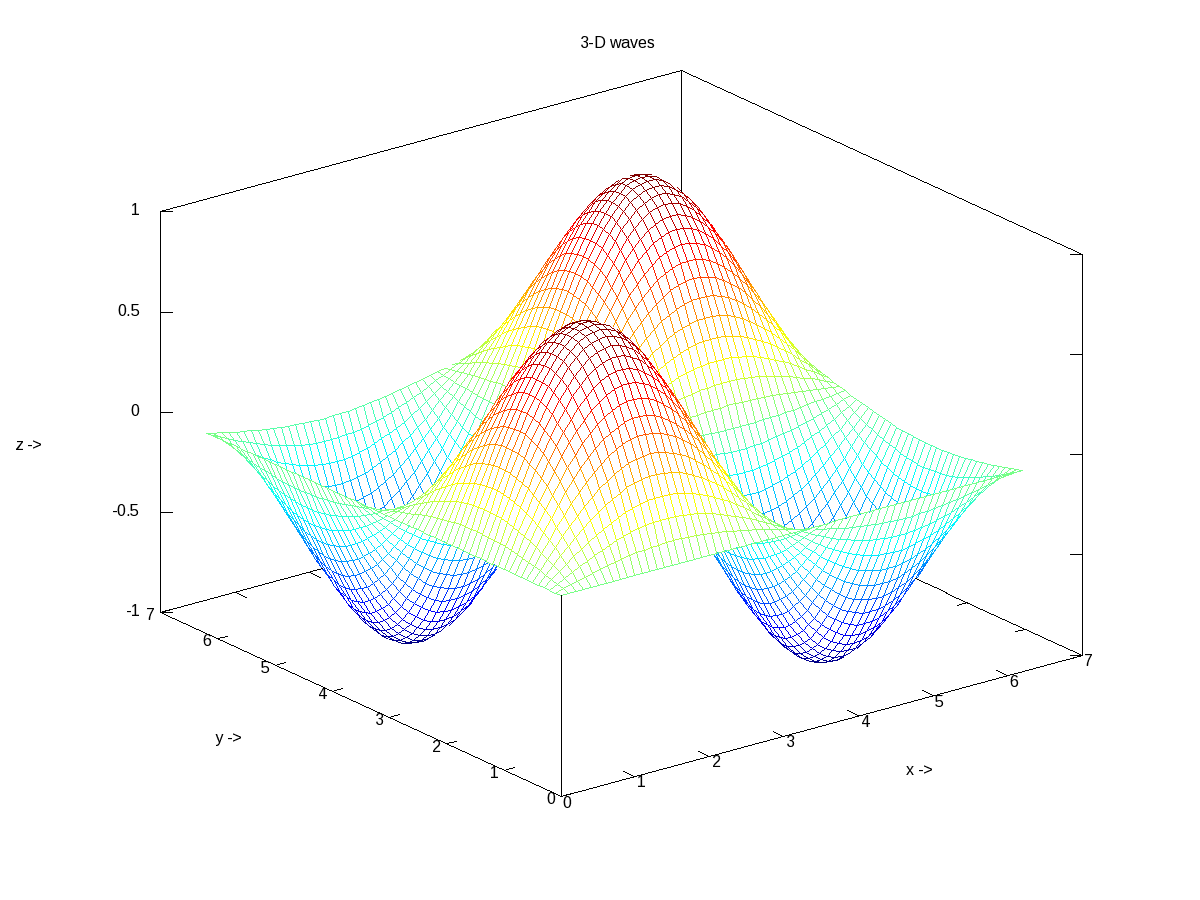
In case, we want to plot the values of a 2-D matrix against its indices (x, y), it could be done using mesh(), one of the many other 3-D plotting functions. Figure 18 shows the same, created using the following code:

octave:1> x = 0:0.1:2*pi;
octave:2> y = 0:0.1:2*pi;
octave:3> z = sin(x)' * sin(y);
octave:4> mesh(x, y, z); 
octave:5> xlabel("x ->");
octave:6> ylabel("y ->");
octave:7> zlabel("z ->");
octave:8> title("3-D waves");
octave:9>
Figure 18: 3-D waves

Figure 18: 3-D waves

What’s next?

Hope you enjoyed the colours of drawing. Next, we would look into octave from a statisticians perspective.

Thirteenth Article >>

   Send article as PDF