Micro-controller Programming on a Bread Board

This 9th article in the series of “Do It Yourself: Electronics”, programs a micro-controller without a hardware programmer.

<< Previous Article

In playing around with DIY electronics, Pugs has developed enough confidence to share his knowledge with his juniors. So, in one such occasion, he decided to give a try to program a micro-controller, as part of the electronics hobby club. There have been many hobbyist micro-controllers, like 8051, PIC, AVR, … and an equivalent or more varieties of hardware programmers to program them. However, Pugs’ goal was different – how can a DIY electronics learner, one as he is, do program a micro-controller in the simplest possible way with no unknown pieces of hardware, meaning no external hardware programmers. First fundamental question was if that was even possible.

“Hey Pugs, seems like it can be achieved with AVR controllers – they have a simple serial programming mechanism using their MOSI, MISO, SCK lines”, exclaimed his junior Vinay, while going through the AVR ATmega16 datasheet pg 273-277.

“Yes, seems possible, at least on the AVR side – we may just have to figure out, how to control these lines from a laptop”, asserted Pugs, reviewing the same.

“Can’t we use serial?”, ask Vinay.

“Yes, but our laptops don’t have a serial – hopefully USB to Serial converters would work”, replied Pugs.

“If it works, it would be great. We can then just connect the various serial port lines to the corresponding ATmega16 lines, and then write an application on laptop to download a ‘blink led’ program into the ATmega16”, supported Vinay.

“Regarding the application, we may not have to write one, as there is already one open source application called avrdude, specially for downloading or flashing programs into AVRs. We may just have to configure it properly”, replied Pugs.

“O! That’s good.”

“However, connecting the lines of ATmega16 to serial port may not be straight forward.”

“Why? That looks simpler than the flashing part.”

“Ya! but the challenge is that serial port lines operate on +/-12V – +12V being logic 0 and -12V being logic 1. And, micro-controllers understand 0/+5V – 0 being logic 0V and +5V being logic 1.”

“Oh! I didn’t know that there are things where 0 and 1 are not just 0V and 5V. Then, it might not be possible to connect them, right?”

“Don’t give up that easy. Where there is a problem, there would be a solution. Possibly there would be some way to do the proper voltage translations.”

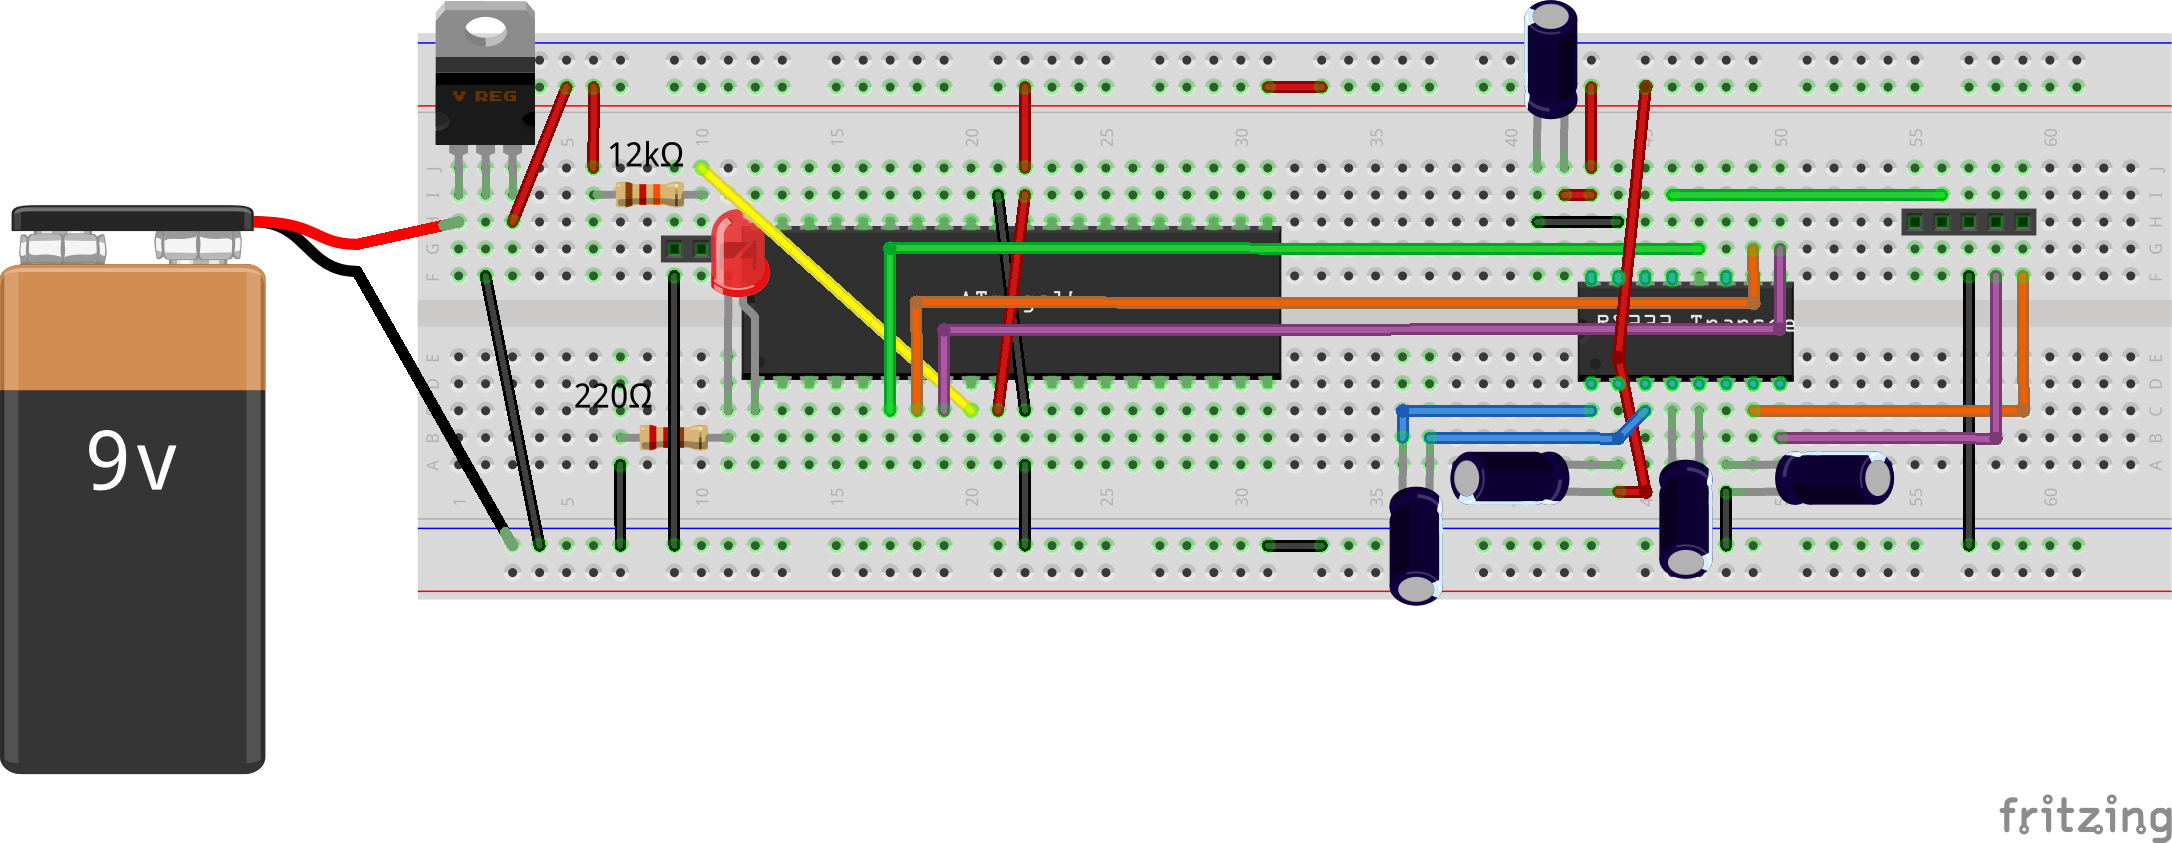
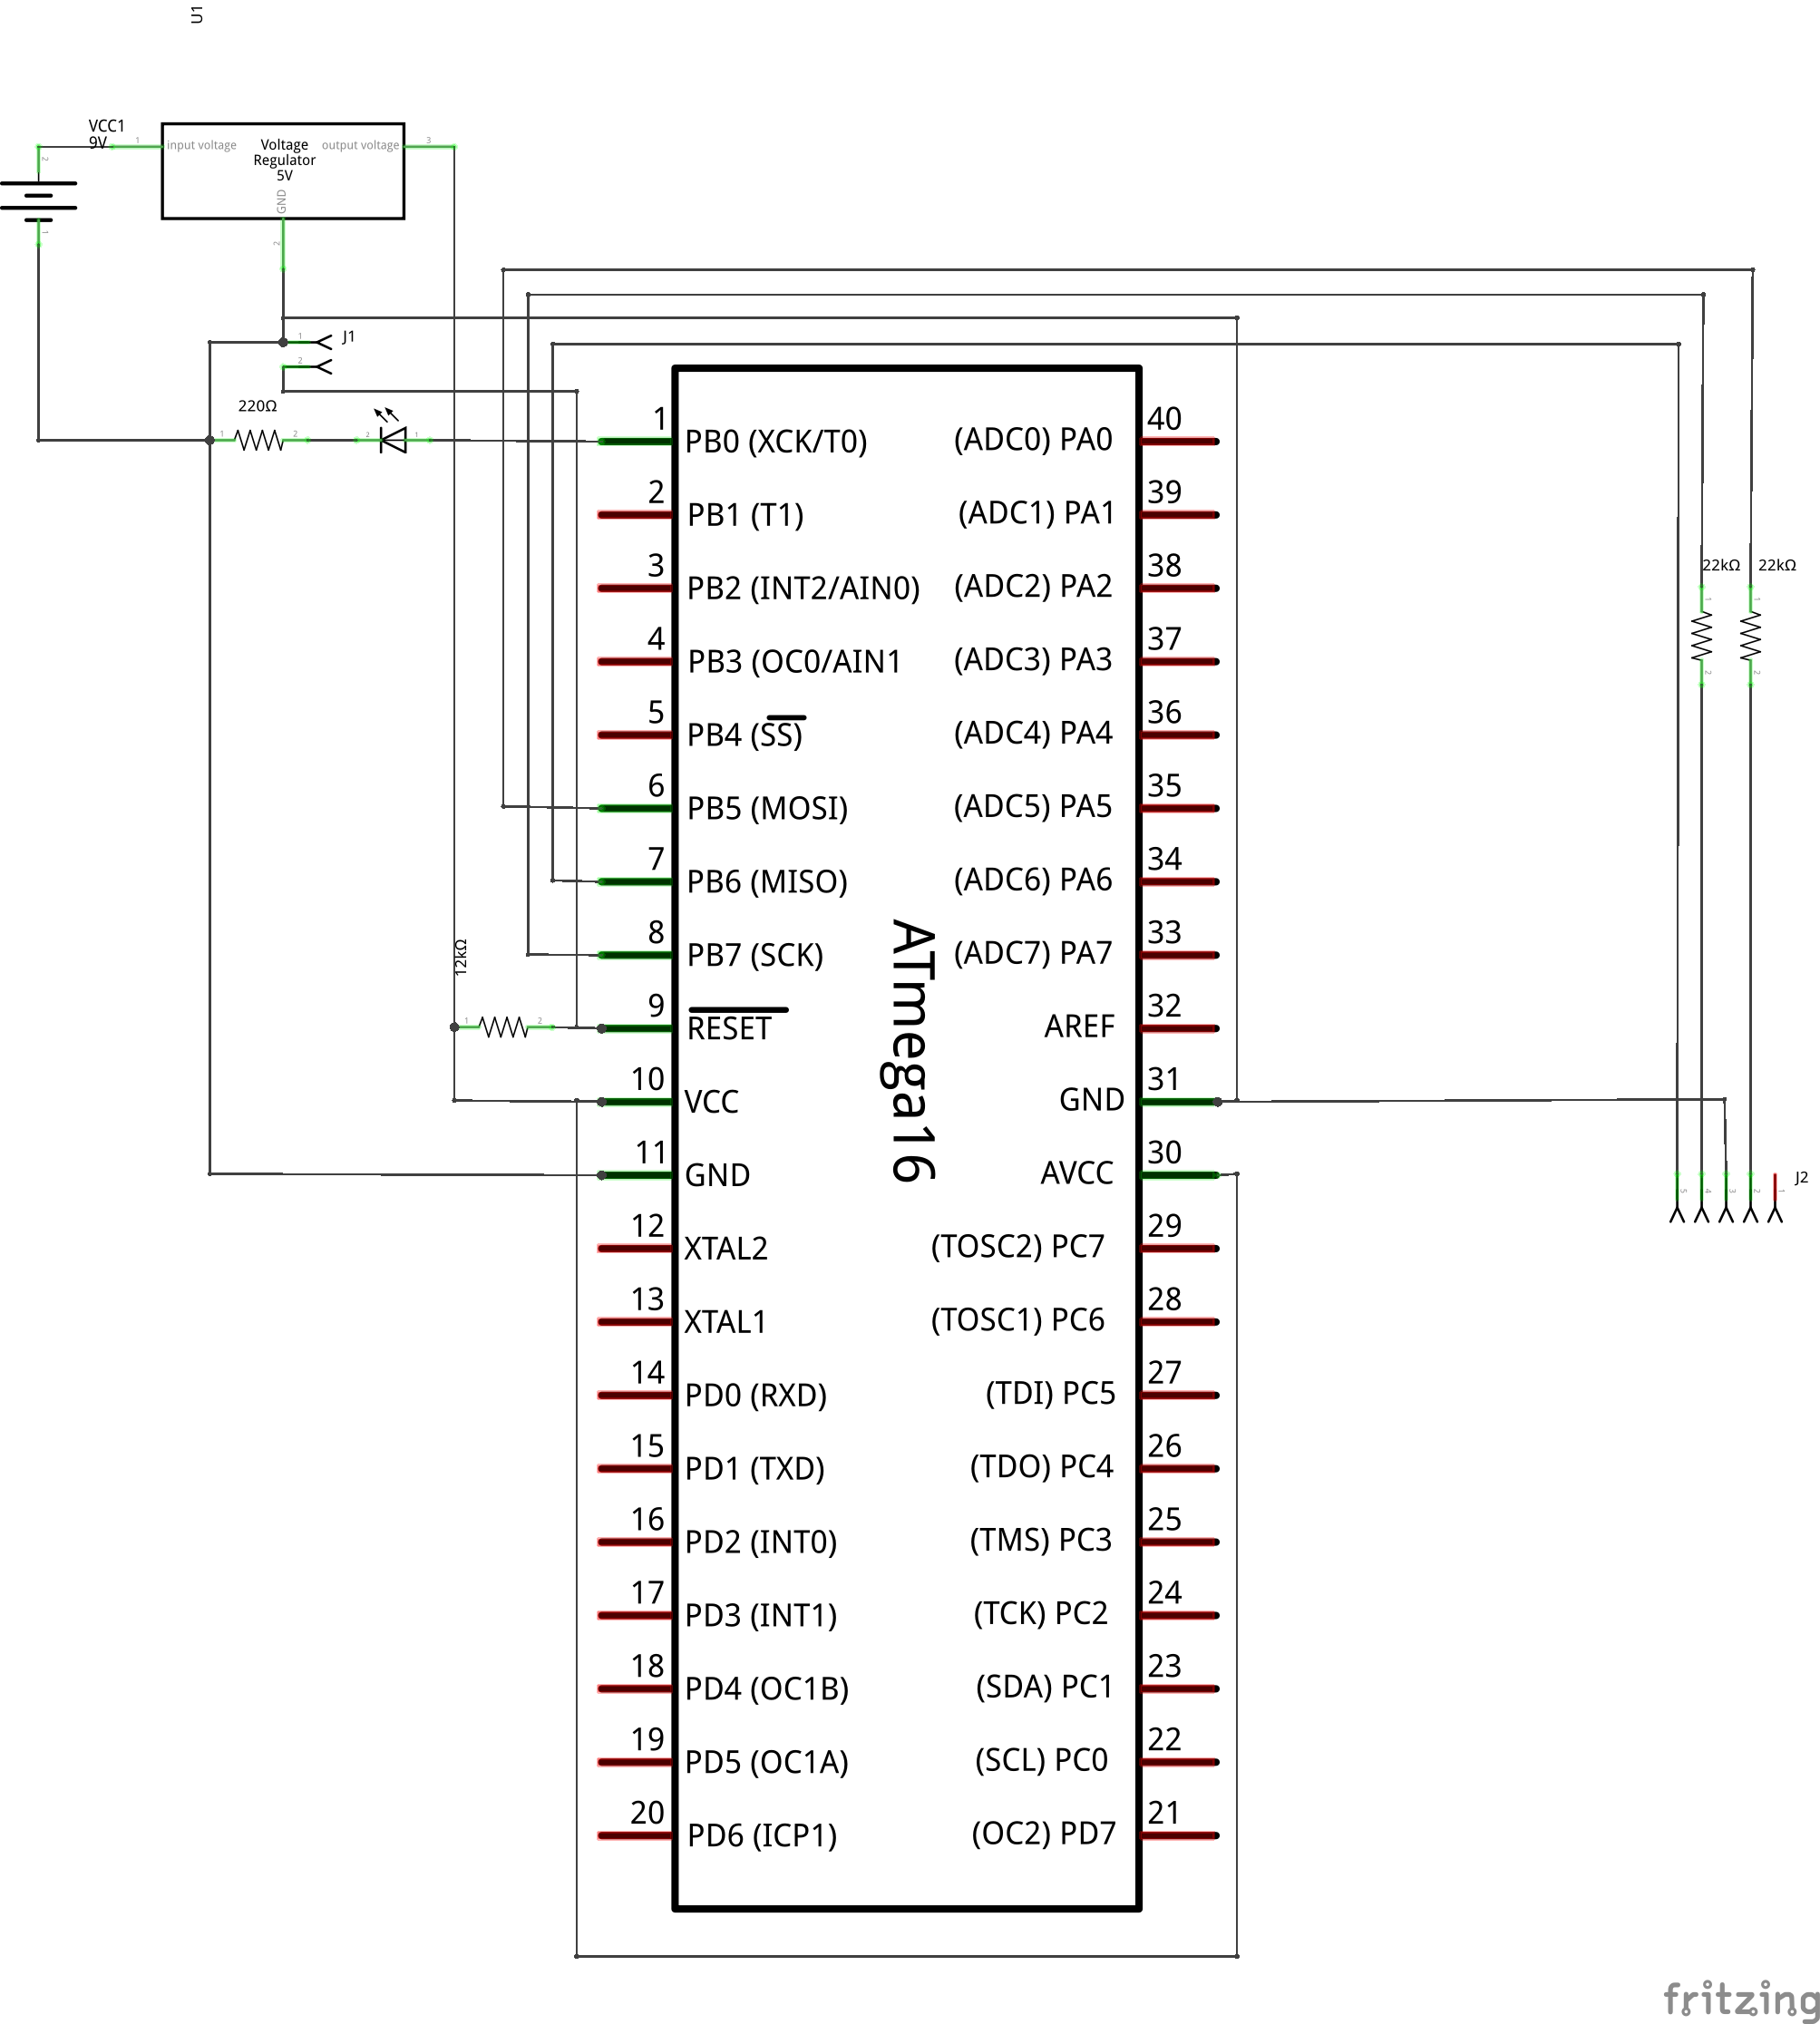
So, they explored further about the same and figured out that ICs like MAX232 are meant exactly for such purposes. MAX232 datasheet gave them the connection details. Using that, they set up the ATmega16 and MAX232 connections, as shown in the schematic and breadboard diagram below. They also connected an LED through a resistor to port pin B0 for “blink led” program. Also, they set up the reset circuitry using the pull-up resistor and the jumper J1, as reset needs to be pulled low for downloading the program into ATmega16, and needs to be set high for running the program. So, J1 would be shorted, before starting the programming, and opened for running the flashed program.

AVR Programming Schematic

AVR Programming Schematic

AVR Programming Bread Board Connections

AVR Programming Bread Board Connections

“Aha! That’s cool. So, now we have the jumper J2 to connect our ATmega16 to our laptop over the serial port. But how do we decide, which lines to connect to what?”, doubted Vinay.

“That should be simpler. Let’s open the avrdude‘s configuration file, and look for ponyser section, which is the mode we are going to use for flashing our program”, suggested Pugs.

The following is what they obtained from the avrdude.conf file (typically located under /etc/avrdude/ in Linux):

programmer
  id    = "ponyser";
  desc  = "design ponyprog serial, reset=!txd sck=rts mosi=dtr miso=cts";
  type  = "serbb";
  connection_type = serial;
  reset = ~3;
  sck   = 7;
  mosi  = 4;
  miso  = 8;
;

Based on this, they figured out and connected the following serial port line connections with the jumper J2 from left to right in the schematic: CTS (pin 8), RTS (pin 7), GND (pin 5), DTR (pin 4), using the jumper cables. And, finally powered the whole circuitry with 5V from an LM7805 & 9V battery, as shown in the schematic and breadboard diagram above.

Vinay got the following blink_led.c program coded in C:

/* Toggles the LED connected at PB0 at 1Hz */

#include <avr/io.h>
#include <util/delay.h>

void init_io(void)
{
	// 1 = output, 0 = input
	DDRB |= (1 << DDB0);
}

int main(void)
{
	init_io();

	while (1)
	{
		PORTB |= (1 << PB0);
		_delay_ms(500);
		PORTB &= ~(1 << PB0);
		_delay_ms(500);
	}

	return 0;
}

Alongwith, he installed the AVR toolchain and compiled the program as follows:

$ avr-gcc -mmcu=atmega16 -DF_CPU=1000000 -Os blink_led.c -o blink_led.elf
$ avr-objcopy -O ihex blink_led.elf blink_led.hex

Why the F_CPU=1000000? As Vinay figured out from the ATmega16 datasheet pg 260-261, that with the default fuse settings of the ATmega16, it runs on a 1MHz clock.

And finally, they downloaded the blink_led.hex into the ATmega16 (with J1 shorted), using the following command:

$ avrdude -c ponyser -P /dev/ttyUSB0 -p m16 -U flash:w:blink_led.hex:i

“Hey Pugs, avrdude says programmed successfully. But no LED blink. What could be wrong?”

“Did you remove the short from J1?”

“Aha! No. So, it is still in downloading mode.”

Vinay removes the short and viola LED connected to port pin B0 starts blinking with a 1Hz frequency.

Enhancement

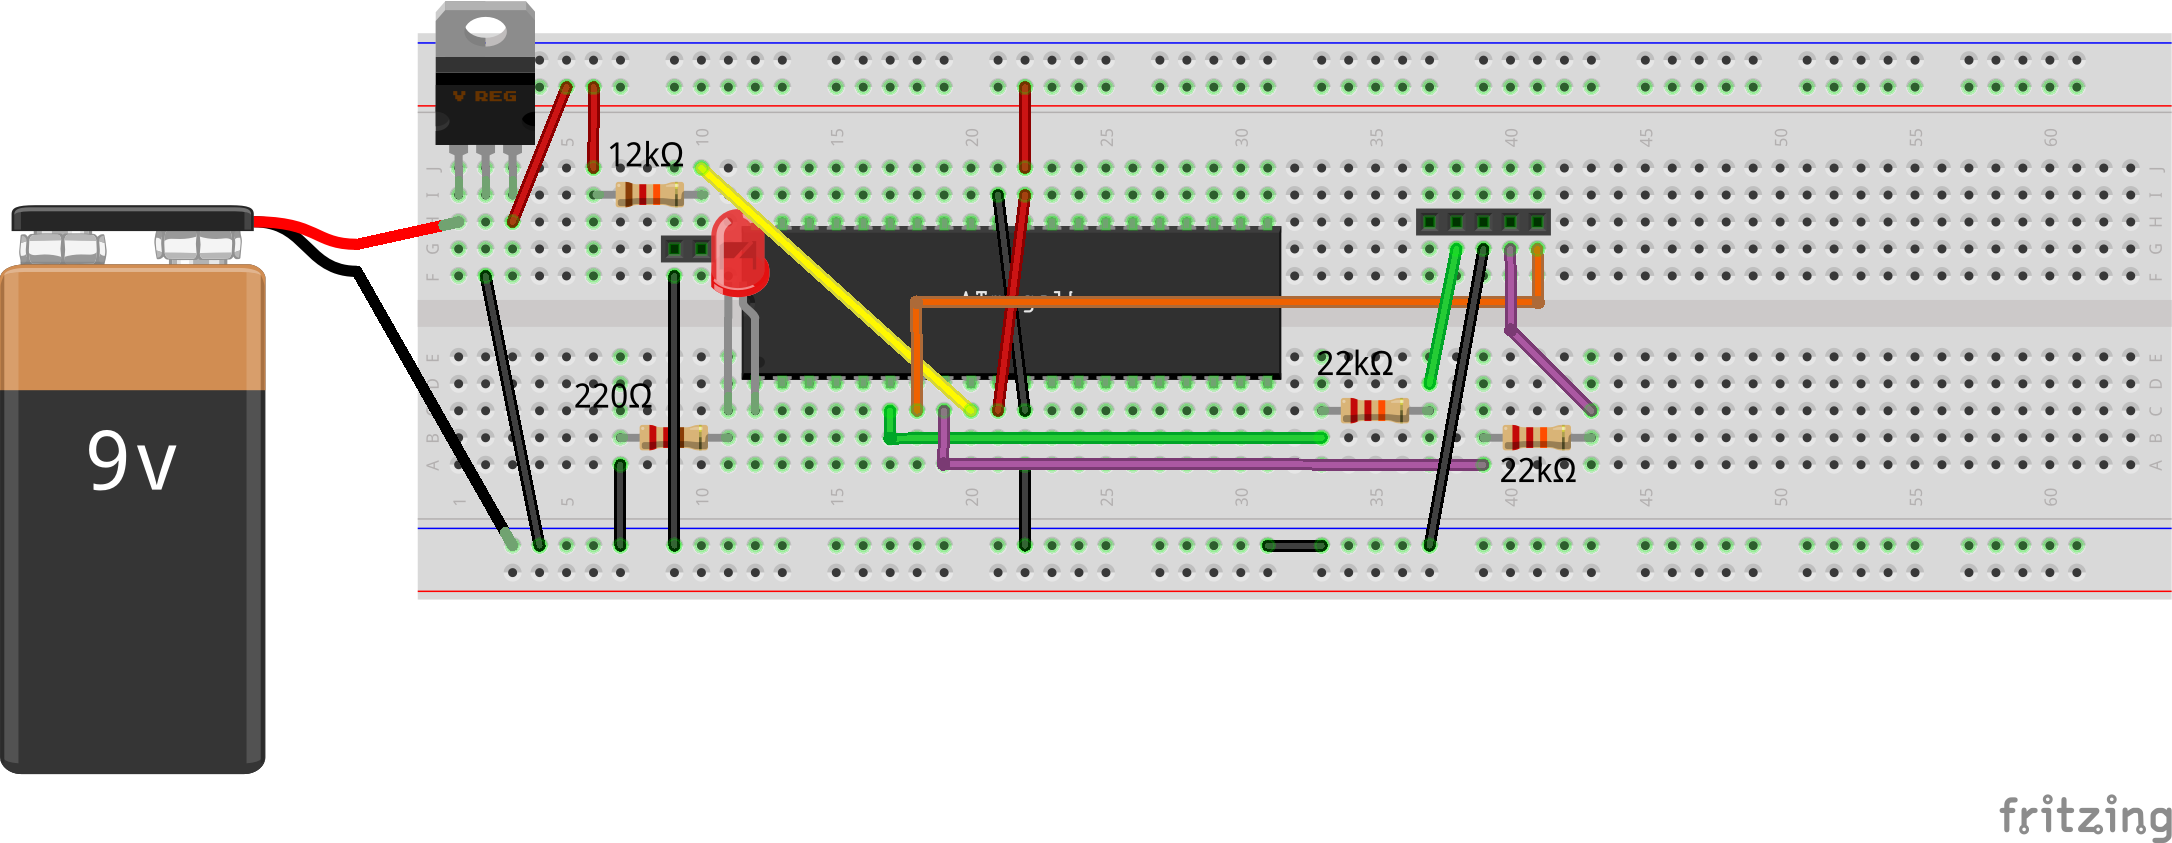
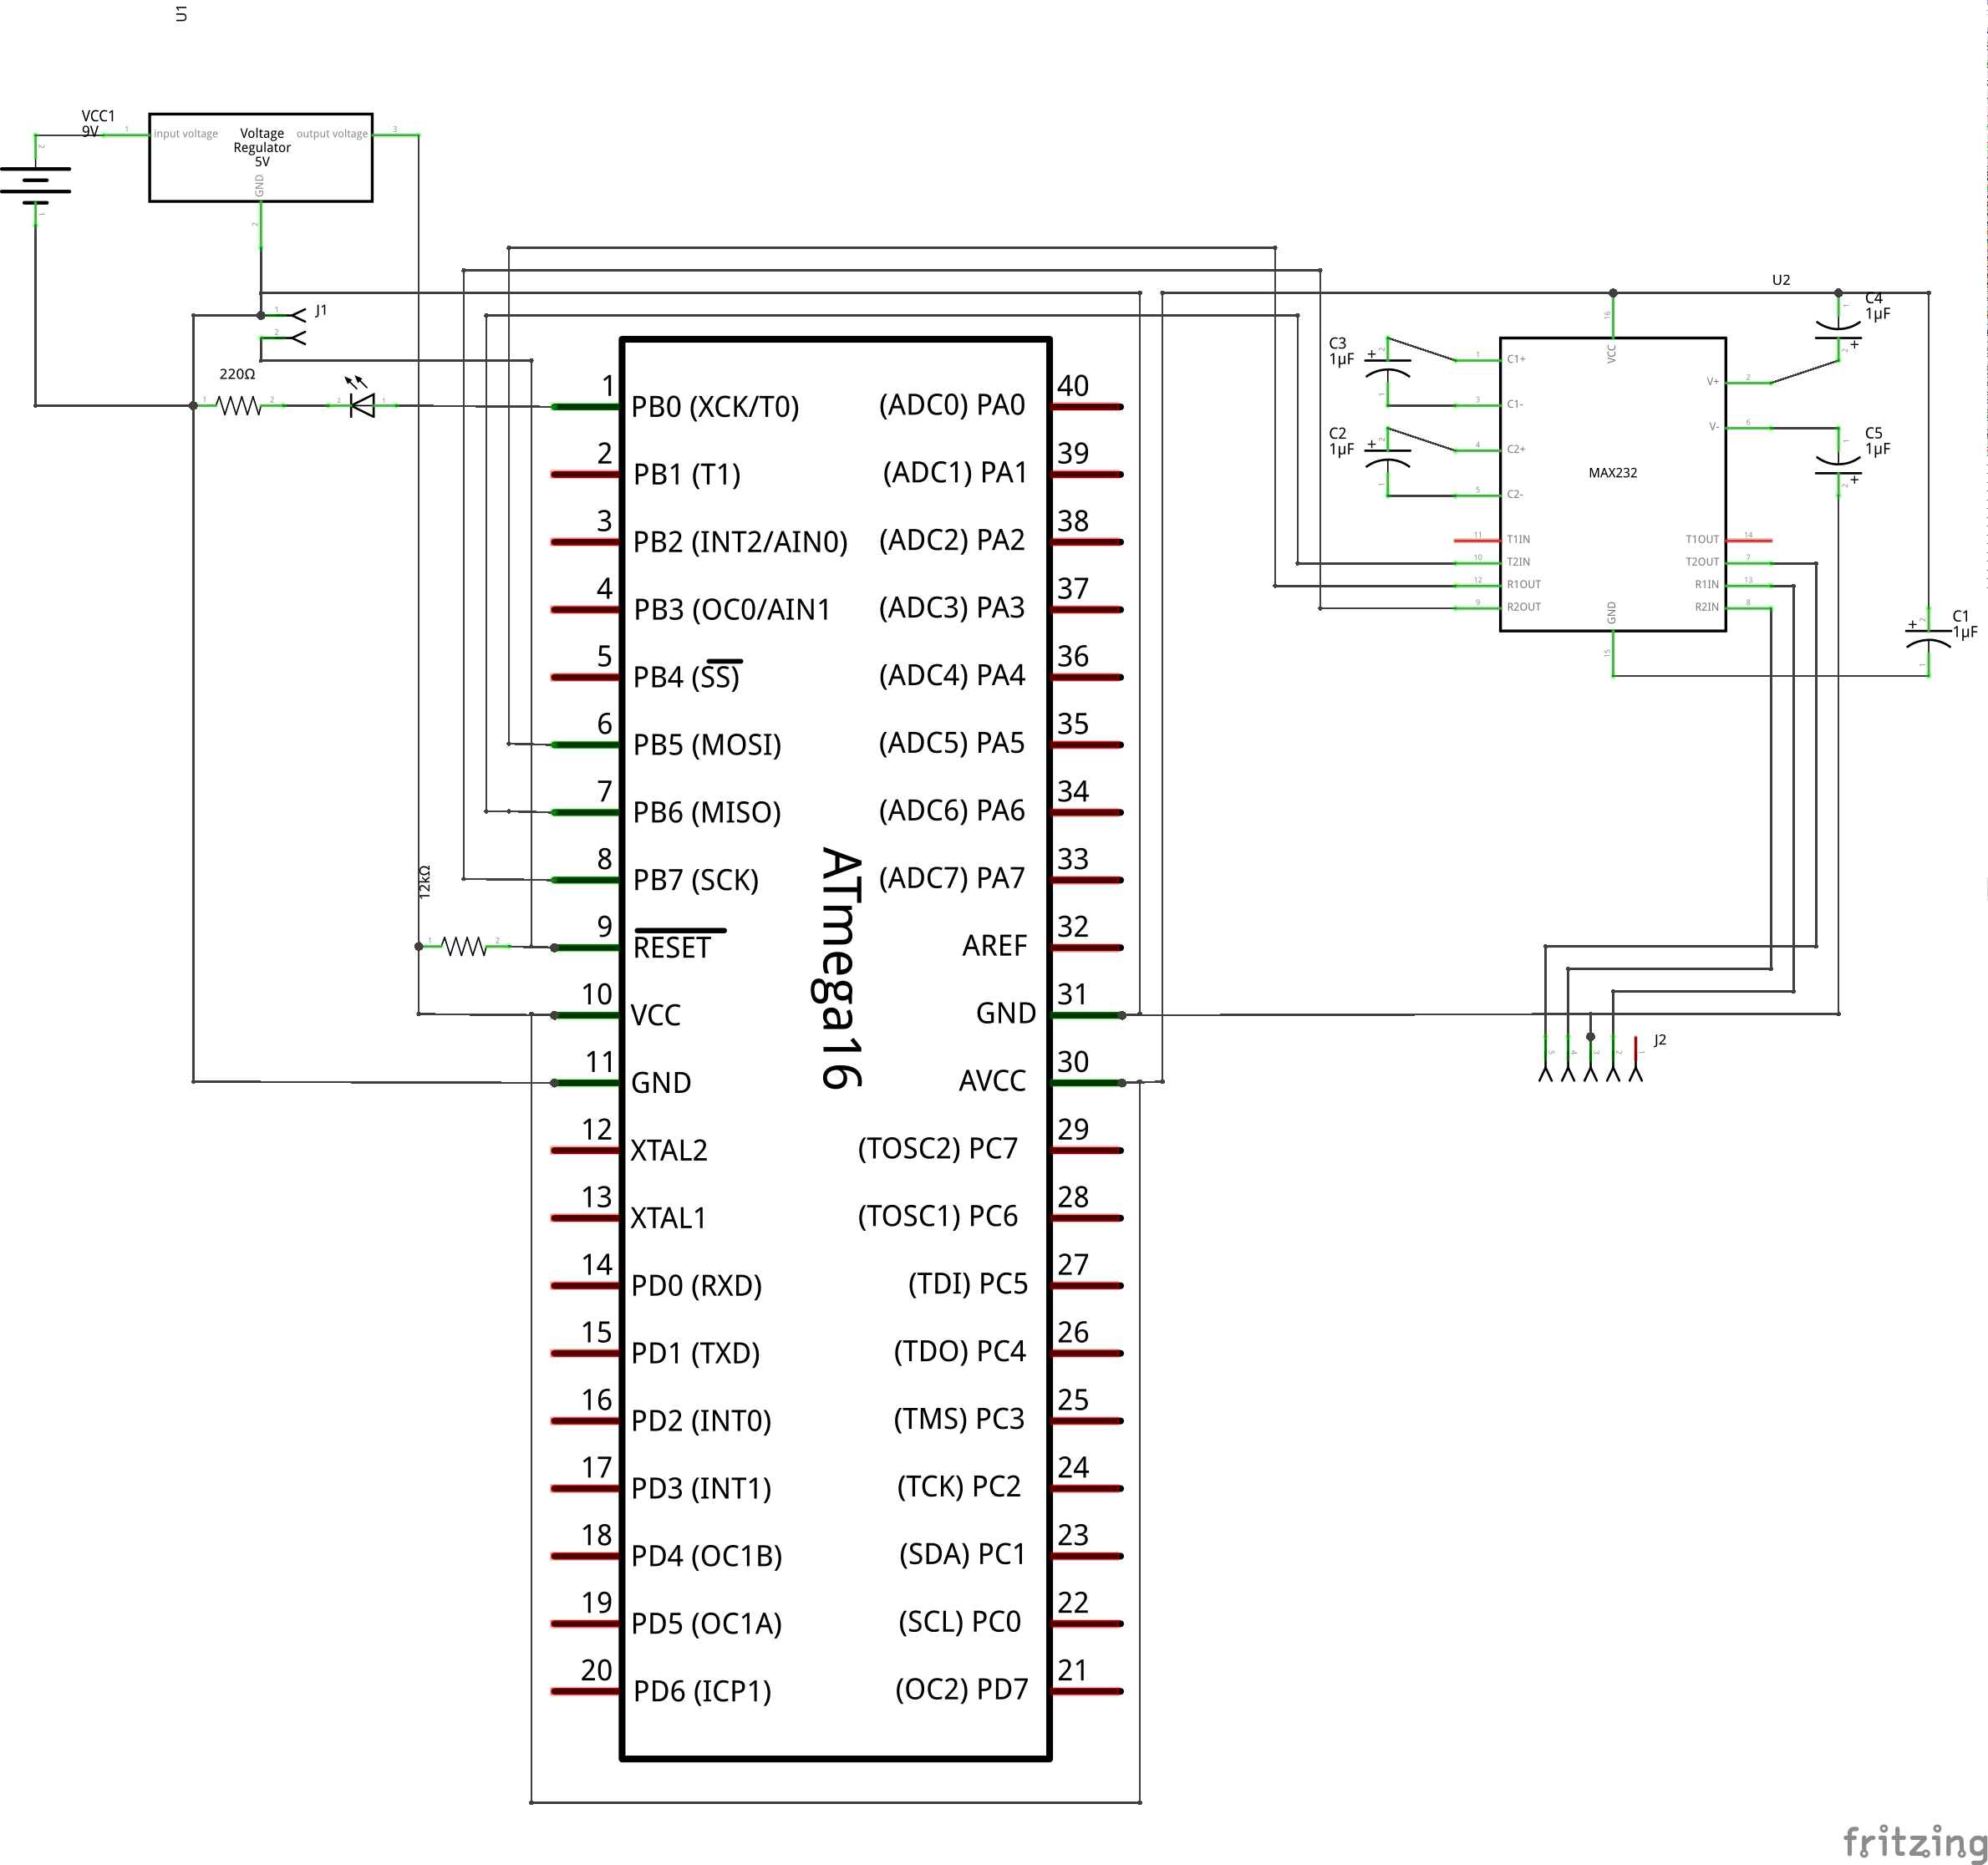
Interestingly, on his later explorations, Pugs figured out that you don’t even need the MAX232 & related circuitry to do the flashing of an AVR. One can directly connect the MISO line to the CTS pin, as this is input to the serial. And, the other two lines (MOSI to DTR, SCK to RTS) can be connected each through a 22K resistor, thus limiting the voltage into the ATmega16. See the schematic and breadboard diagram below.

AVR Programming Simplified Schematic

AVR Programming Simplified Schematic

AVR Programming Simplified Bread Board Connections

AVR Programming Simplified Bread Board Connections

But now, the logic is reversed on all the 3 lines, and hence an another entry, with values inverted from the ponyser entry, say ponyseri, has to be added in the avrdude.conf, as follows:

programmer
  id    = "ponyseri";
  desc  = "design ponyprog serial, reset=txd sck=!rts mosi=!dtr miso=!cts";
  type  = "serbb";
  connection_type = serial;
  reset = 3;
  sck   = ~7;
  mosi  = ~4;
  miso  = ~8;
;

And, then to be used in the avrdude command as follows:

$ avrdude -c ponyseri -P /dev/ttyUSB0 -p m16 -U flash:w:blink_led.hex:i
Next Article >>

   Send article as PDF   

Synchronization without Locking

<< Previous Article

We have covered the various synchronization mechanisms in the previous articles. One of the thing common among them was that they put the process to sleep, if the lock is not available. Also, all those are prone to deadlock, if not implemented carefully. Sometimes however, we require to protect a simple variable like integer. It can be as simple as setting a flag. Using semaphore or spinlock to protect such a variable may be overhead. So, does kernel provide any synchronization mechanism without locking? Read on to explore more on this.

Atomic Operations

Atomic operations are indivisible and uninterruptible. Each of these compile into a single machine instruction as far as possible and are guaranteed to be atomic. Kernel provides a atomic integer type atomic_t for atomic operations. Below are the operations:

#include <asm/atomic.h>

void atomic_set(atomic_t *a, int i); // Set the atomic variable a to integer value i
int atomic_read(atomic *a); // Return the value of atomic variable a
void atomic_add(int i, atomic_t *a); // Add i to atomic variable a
void atomic_sub(i, atomic_t *a); // Subtract i from atomic variable a
void atomic_inc(atomic_t *a); // Increment operation
void atomic_dec(atomic_t *a); // Decrement operation

Atomic Bit Operations

Many a times, the requirement is to flag some condition. For this, a single bit may serve the purpose well. However, atomic_t type variable doesn’t work well for manipulating the bits. For this, the kernel provides a set of operations as listed below:

#include <asm/bitops.h>

void set_bit(int nr, void *a); // Set the bit number nr in value pointed by a
void clear_bit(int nr, void *a); // Clear the bit number nr in value pointed by a
void change_bit(int nr, void *a); // Toggle the bit at position nr

Conclusion

So, these are the simple, yet powerful mechanisms to provide the synchronization without locking. These can be quite useful while dealing with integer and bit operations, respectively, and involve far less overhead as compared to the usual synchronization mechanisms such as semaphore and mutex. However, these might not be useful in achieving the critical sections.

With this, we are now familiar with most of the synchronization mechanisms provided by the kernel. As you understand, synchronization mechanisms come with its own pros and cons and we need to be very careful while selecting the right one.

Next Article >>

   Send article as PDF   

Multi-colour using RGB LED

This 8th article in the series of “Do It Yourself: Electronics”, discusses the multi colour generation using RGB LED.

<< Previous Article

Festival season was approaching fast. This time Pugs wanted to create some fancy lighting for the same to be decorated in his hostel room. First thought was to create some colourful lighting banner. Next thought was to possibly use the electronics, he has been learning. In electronics, lighting is synonymous to LEDs. But, then we are limited by colours – red, green, yellow, and blue – that is what Pugs used to think, before he explored further into LEDs. Upon exploration, he found out an orange LED, but more interestingly an RGB LED, where R stands for Red, G for Green, B for Blue. Yes, a single LED with three colours in it.

With his desire to create multi-colour lighting, that looked promising, as he has learnt from his computer graphics studies that with RGB, one can generate any colour. But that was computers, and this is electronics. So, what? Colours are colours. With all these thoughts ringing in his head, he walked towards his batch-mate & newly found electronics friend Vishal’s room.

Once at Vishal’s door, he knocked it. But no response. So, he pushed it, and it opened wide. Vishal was in his Krishna prayers. So, Pugs got inside and sat on the cot, waiting for Vishal to finish his prayers.

“What’s up Pugs? What brings you here?”, asked Vishal, after completing his prayers.

“Vishu! I can generate various colours using combination of RGB in computer graphics. Can I do similar things with RGB LEDs?”, queried Pugs.

“Yes! Of course, you can?”

“But how? In graphics, I have numbers from 0 to 255 for each of the colours, and I use different value combinations for different colours. How do I give that value in LEDs?”

“Think beyond numbers – what do they control?”

“Hmmm – intensity.”

“Exactly. So, here you control the intensity of the LED, by passing different currents through the LED.”

“Okay. But these RGB LEDs look so weird. I can do this for a single LED. But these RGB LEDs – some have 6 legs, but mostly have only 4 legs.”

“O! I see what’s your confusion. One with 6 legs looks fine to you, right?”

“Yes. 3 coloured LEDs in one. Each LED with 2 legs, and hence total of 6 legs.”

“But most of the time you don’t need all legs separate for them. You may control their intensity from the anode (+ve side), and the cathode (-ve side) could be common. Or, vice versa. And, in that case they would just need 4 legs.”

“Okay. Then, why do we have 6 leg LEDs.”

“Now, you are asking the other way round question – you can’t stop your questions.”

“That’s the way we learn, right?”

“Okay. Okay. Stop your gyaan. For example, if you want to connect the LEDs in series, it may not be possible with common cathode or common anode RGB LEDs.”

“Now, last question – how do I control the current through LEDs with the common terminal, say common cathode?”

“Same way, using variable resistors like potentiometers (pots) – just connect three – one with each colour’s anode.”

Concluding with thanks, Pugs rushes to his room to create a simple circuit to generate multi colours using his RGB LED(s). Some of the basis, which Pugs wants to try for his colour generation are as follows:

  • With Red + Green intensities – Brown, Orange, Yellow
  • With Green + Blue intensities – Cyan, Shades of Blue
  • With Blue + Red intensities – Pink, Magenta
  • With Red + Green + Blue intensities – White, Shades of Grey

What do you think? Will he be able to generate all these colours?

Next Article >>

   Send article as PDF   

Concurrency Management Part – 3

<< Previous Article

In the last two articles, we have discussed some of the commonly used synchronization mechanisms in kernel. It was observed that these synchronization mechanisms restrict the access to the resource, irrespective of the operation which thread/process wants to perform on the resource. This in turn, mean that even though one thread has acquired the resource for read access, another thread can’t access the  same resource for reading. In most of the cases, it is quite desirable to have two or more threads having the read access to the resource as far as they are not modifying the resource data structure.  This will result into the improved system performance. Read on to find out the mechanism provided by kernel to achieve this.

Reader / Writer Semaphore

This is the type of semaphore, which provides the access depending on operation which thread/process wants to perform on the data structure. With this, multiple readers can have the access to the resource at the same time, while only one writer gets access at a time. So, will reader be allowed if write operation is in progress? Definitely not. At a time, there can be either read or write operation in progress as usual, but there can be multiple read operations. So, let’s look at the data structures associated with the reader / writer semaphores:

#include <linux/rwsem.h>

// Data Structure
structure rw_semaphore rw_sem;

// Initialization
void init_rwsem(&rw_sem);

// Operations for reader
void down_read(&rw_sem);
void up_read(&rw_sem);

// Operations for writer
void down_write(&rw_sem);
void up_write(&rw_sem);

As seen above, initialization operation is similar to what we do with the regular semaphore, but key difference lies in the fact that we have separate operations for readers and writers.

Below is an example usage of reader / writer semaphore:

#include <linux/module.h>
#include <linux/kernel.h>
#include <linux/fs.h> 
#include <linux/cdev.h>
#include <linux/device.h>
#include <asm/uaccess.h>
#include <linux/semaphore.h>
#include <linux/sched.h>
#include <linux/delay.h>

#define FIRST_MINOR 0
#define MINOR_CNT 1

static dev_t dev;
static struct cdev c_dev;
static struct class *cl;
static struct task_struct *task;
static struct rw_semaphore rwsem;

int open(struct inode *inode, struct file *filp)
{
    printk(KERN_INFO "Inside open\n");
    task = current;
    return 0;
}

int release(struct inode *inode, struct file *filp)
{
    printk(KERN_INFO "Inside close\n");
    return 0;
}

ssize_t read(struct file *filp, char *buff, size_t count, loff_t *offp)
{
    printk("Inside read\n");
    down_read(&rwsem);
    printk(KERN_INFO "Got the Semaphore in Read\n");
    printk("Going to Sleep\n");
    ssleep(30);
    up_read(&rwsem);
    return 0;
}

ssize_t write(struct file *filp, const char *buff, size_t count, loff_t *offp)
{
    printk(KERN_INFO "Inside write. Waiting for Semaphore...\n");
    down_write(&rwsem);
    printk(KERN_INFO "Got the Semaphore in Write\n");
    up_write(&rwsem);
    return count;
}

struct file_operations fops =
{
    read:    read,
    write:   write,
    open:    open,
    release: release
};

int rw_sem_init(void)
{
    int ret;
    struct device *dev_ret;

    if ((ret = alloc_chrdev_region(&dev, FIRST_MINOR, MINOR_CNT, "rws")) < 0)
    {
        return ret;
    }
    printk("Major Nr: %d\n", MAJOR(dev));

    cdev_init(&c_dev, &fops);

    if ((ret = cdev_add(&c_dev, dev, MINOR_CNT)) < 0)
    {
        unregister_chrdev_region(dev, MINOR_CNT);
        return ret;
    }

    if (IS_ERR(cl = class_create(THIS_MODULE, "chardrv")))
    {
        cdev_del(&c_dev);
        unregister_chrdev_region(dev, MINOR_CNT);
        return PTR_ERR(cl);
    }
    if (IS_ERR(dev_ret = device_create(cl, NULL, dev, NULL, "mychar%d", 0)))
    {
        class_destroy(cl);
        cdev_del(&c_dev);
        unregister_chrdev_region(dev, MINOR_CNT);
        return PTR_ERR(dev_ret);
    }

    init_rwsem(&rwsem);

    return 0;
}

void rw_sem_cleanup(void)
{
    printk(KERN_INFO "Inside cleanup_module\n");
    device_destroy(cl, dev);
    class_destroy(cl);
    cdev_del(&c_dev);
    unregister_chrdev_region(dev, MINOR_CNT);
}

module_init(rw_sem_init);
module_exit(rw_sem_cleanup);

MODULE_LICENSE("GPL");
MODULE_AUTHOR("SysPlay Workshops <workshop@sysplay.in>");
MODULE_DESCRIPTION("Reader Writer Semaphore Demo");

Below is the sample run:

cat /dev/mychar0
Inside Open
Inside Read
Got the Semaphore in Read
Going to sleep

cat /dev/mychar0 (In different shell)
Inside Open
Inside Read
Got the Semaphore in Read
Going to sleep

echo 1 > /dev/mychar0 (In different shell)
Inside Write. Waiting for semaphore...

As seen above, multiple reader processes are able to access the resource simultaneously. However, writer process gets blocked, while the readers are accessing the resource.

Conclusion

With this, we have covered most of the commonly used synchronization mechanisms in the kernel. Apart from these, kernel provides some atomic operations, which provides instructions that execute atomically without interruption. Atomic operators are indivisible instructions. These are useful when we need to do some operations on integers and bits.

Next Article >>

   Send article as PDF   

PC based Oscilloscope

This 7th article in the series of “Do It Yourself: Electronics”, guides you to use your laptop as an oscilloscope for 0-5V 100Hz-20kHz range waveforms.

<< Previous Article

Based on his learnings till now and ideas which keeps on coming to his head, Pugs was building some circuit to understand the workings of resistor-inductor-capacitor (RLC) circuits. He had already done similar experiments in his semester lab. But what he wanted to do is all in his room, to be specific without any lab equipment like function generator, CRO, etc. With a function generator, one could straight away generate the required waveform – specifically sine wave of specific frequencies. With CRO, one can straight away see the various specific input / output waveforms, their magnitudes, phase differences. But how to do that without any of those expensive equipment.

Till now he has been using the digital multimeter (DMM) for all kinds of measurements. If it is a known waveform like sine wave, checking its magnitude and frequency is possible using DMM. But how to check phase difference between two such waveforms, or for that matter how to know whether it is really a sine wave or not.

Pugs was lost in all these thoughts with a basic RC circuit in front of him, when his friend Vinay arrived in the Innovation Garage.

“Hey Pugs! What experiment are you planning today?”, questioned Vinay.

No response came from Pugs.

Vinay shook Pugs, “Pugs, where are you?”

“Ya! what happened”, came out Pugs from his lost world.

“What are you doing?”, asked Vinay.

“I was thinking …”, slowly started Pugs.

“Yes that I could see”, interrupted Vinay, “Thinking what?”

“See, I want to measure the phase difference between the input and output of a given circuit. How do I do that?”

“Simple. Use an oscilloscope.”

“Without using any expensive equipment.”

“What are your voltage levels?”

“Say between 0 & 5 volts.”

“Okay, then make your own oscilloscope using your laptop.”

“Oscilloscope using a laptop?”, asked Pugs surprisingly.

“Yes.”

“That would be cool. But how?”

“Think and tell me which interface of your laptop is an analog one.”

Pugs thinks for a while. “Hmmm! Audio may be.”

“Why may be? That’s the one. You’d just need an audio cable and using your audio mic input, you can feed analog input to your laptop.”

“What connections do we need to do? We have 3 lines in an audio cable, right?”

“Yes. Connect the ground to the base of the connector. Other two could be your two inputs – the two channels of stereo.”

“How do I connect to the cable? Do I solder on it?”

“Not really. You may use crocodile clips.”

“Just a doubt. Wouldn’t it have frequency limitations because of the audio card?”

“Yes. It would work only for frequencies in audio range, say 100Hz to 20kHz. What is your requirement?”

“Nothing specific right now. I want to just start playing with RC circuits. Give some input, and compare with the output.”

“In that case, the audio range should be good enough to start with.”

“Okay, hardware-wise understood. I feed the input. But how to view it. Then do I write a program which reads audio input and displays that as a waveform.”

“Yes. But you don’t need to write one. There’s already many software available for it. You may just do a google. Or, may be try the open source software (OSS) called xoscope.”

“Does it come pre-installed?”

“In general not. Just install it using your distro’s installer. Or, you can download the latest source code from http://xoscope.sourceforge.net and build yourself.”

“That I can take care of.”

“Once you run it, select the input as the sound card to make your laptop an oscilloscope. That’s all.”

“Then, we must also be able to generate a sine wave from our audio output?”

“Yes. You are correct.”

“How do we do that?”

“Let’s go for lunch now. We’ll talk about it, later.”

Next Article >>

Note

  1. In general, MIC input voltage is expected to be in the range of around ±10mV and LINE input voltage is expected to be in the range of around ±1V. However, they typically have in-built protection and hence giving voltages upto 5V also doesn’t damage them. However, note that in case the input is beyond the corresponding range, the waveforms would show as saturated to the highest level possible, and one may not get the actual voltage levels.
   Send article as PDF   

Concurrency Management Part – 2

<< Previous Article

In the previous article, we discussed about the basic synchronization mechanisms such as mutex and semaphores. As a part of that, there came up a couple of questions. If binary semaphore can achieve the synchronization as provided by mutex, then why do we need mutex at all? Another question was, can we use semaphore / mutex in interrupt handlers? To find the answer to these questions, read on.

Mutex and Binary Semaphore

Below is the simple example using the binary semaphore:

#include <linux/module.h>
#include <linux/fs.h>
#include <linux/cdev.h>
#include <linux/device.h>
#include <linux/errno.h>
#include <asm/uaccess.h>
#include <linux/semaphore.h>

#define FIRST_MINOR 0
#define MINOR_CNT 1

static dev_t dev;
static struct cdev c_dev;
static struct class *cl;

static int my_open(struct inode *i, struct file *f)
{
    return 0;
}
static int my_close(struct inode *i, struct file *f)
{
    return 0;
}

static char c = 'A';
static struct semaphore my_sem;

static ssize_t my_read(struct file *f, char __user *buf, size_t len, loff_t *off)
{
    // Acquire the Semaphore
    if (down_interruptible(&my_sem))
    {
        printk("Unable to acquire Semaphore\n");
        return -1;
    }
    return 0;
}
static ssize_t my_write(struct file *f, const char __user *buf, size_t len,
        loff_t *off)
{
    // Release the semaphore
    up(&my_sem);
    if (copy_from_user(&c, buf + len - 1, 1))
    {
        return -EFAULT;
    }
    return len;
}

static struct file_operations driver_fops =
{
 .owner = THIS_MODULE,
 .open = my_open,
 .release = my_close,
 .read = my_read,
 .write = my_write
};

static int __init sem_init(void)
{
    int ret;
    struct device *dev_ret;

    if ((ret = alloc_chrdev_region(&dev, FIRST_MINOR, MINOR_CNT, "my_sem")) < 0)
    {
        return ret;
    }

    cdev_init(&c_dev, &driver_fops);

    if ((ret = cdev_add(&c_dev, dev, MINOR_CNT)) < 0)
    {
        unregister_chrdev_region(dev, MINOR_CNT);
        return ret;
    }

    if (IS_ERR(cl = class_create(THIS_MODULE, "char")))
    {
        cdev_del(&c_dev);
        unregister_chrdev_region(dev, MINOR_CNT);
        return PTR_ERR(cl);
    }

    if (IS_ERR(dev_ret = device_create(cl, NULL, dev, NULL, "mysem%d", FIRST_MINOR)))
    {
        class_destroy(cl);
        cdev_del(&c_dev);
        unregister_chrdev_region(dev, MINOR_CNT);
        return PTR_ERR(dev_ret);
    }

    sema_init(&my_sem, 0);
    return 0;
}

static void __exit sem_exit(void)
{
    device_destroy(cl, dev);
    class_destroy(cl);
    cdev_del(&c_dev);
    unregister_chrdev_region(dev, MINOR_CNT);
}

module_init(sem_init);
module_exit(sem_exit);

MODULE_LICENSE("GPL");
MODULE_AUTHOR("Pradeep");
MODULE_DESCRIPTION("Binary Semaphore Demonstration");

In the above example, we initialize the semaphore with the value of 0 with sem_init(). In my_read(), we decrement the semaphore and in my_write(), we increment the semaphore. Below is the sample run:

insmod sem.ko
cat /dev/mysem0 - This will block
echo 1 > /dev/mysem0 - Will unblock the cat process

Now, let’s try achieving the same with mutex. Below is the example for the same.

#include <linux/module.h>
#include <linux/fs.h>
#include <linux/cdev.h>
#include <linux/device.h>
#include <linux/errno.h>
#include <asm/uaccess.h>
#include <linux/mutex.h>

#define FIRST_MINOR 0
#define MINOR_CNT 1

DEFINE_MUTEX(my_mutex);

static dev_t dev;
static struct cdev c_dev;
static struct class *cl;

static int my_open(struct inode *i, struct file *f)
{
    return 0;
}
static int my_close(struct inode *i, struct file *f)
{
    return 0;
}

static char c = 'A';

static ssize_t my_read(struct file *f, char __user *buf, size_t len, loff_t *off)
{
    if (mutex_lock_interruptible(&my_mutex))
    {
        printk("Unable to acquire Semaphore\n");
        return -1;
    }
    return 0;
}
static ssize_t my_write(struct file *f, const char __user *buf, size_t len,
        loff_t *off)
{
    mutex_unlock(&my_mutex);
    if (copy_from_user(&c, buf + len - 1, 1))
    {
        return -EFAULT;
    }
    return len;
}

static struct file_operations driver_fops =
{
    .owner = THIS_MODULE,
    .open = my_open,
    .release = my_close,
    .read = my_read,
    .write = my_write
};

static int __init init_mutex(void)
{
    int ret;
    struct device *dev_ret;

    if ((ret = alloc_chrdev_region(&dev, FIRST_MINOR, MINOR_CNT, "my_mutex")) < 0)
    {
        return ret;
    }

    cdev_init(&c_dev, &driver_fops);

    if ((ret = cdev_add(&c_dev, dev, MINOR_CNT)) < 0)
    {
        unregister_chrdev_region(dev, MINOR_CNT);
        return ret;
    }

    if (IS_ERR(cl = class_create(THIS_MODULE, "char")))
    {
        cdev_del(&c_dev);
        unregister_chrdev_region(dev, MINOR_CNT);
        return PTR_ERR(cl);
    }

    if (IS_ERR(dev_ret = device_create(cl, NULL, dev, NULL, "mymutex%d",
        FIRST_MINOR)))
    {
        class_destroy(cl);
        cdev_del(&c_dev);
        unregister_chrdev_region(dev, MINOR_CNT);
        return PTR_ERR(dev_ret);
    }

    return 0;
}

static void __exit exit_mutex(void)
{
    device_destroy(cl, dev);
    class_destroy(cl);
    cdev_del(&c_dev);
    unregister_chrdev_region(dev, MINOR_CNT);
}

module_init(init_mutex);
module_exit(exit_mutex);

MODULE_LICENSE("GPL");
MODULE_AUTHOR("Pradeep");
MODULE_DESCRIPTION("Mutex Demonstration");

In the above example, I have replaced the semaphore with mutex. Below is the sample run:

cat /dev/mymutex0 - This will acquire the mutex
cat /dev/mymutex0 - This will block
echo 1 > /dev/mymutex0

So, what do you get after executing the echo command? I get the warning as below:

DEBUG_LOCKS_WARN_ON(lock->owner != current)

So, what does this warning mean? It warns that the process that is trying to unlock the mutex is not the owner of the same. But same thing worked without any warning with semaphore. What does this mean? This brings us to the important difference between the mutex and semaphore. Mutex have ownership associated with it. The process that acquires the lock is the one that should unlock the mutex. While such ownership didn’t exist with the semaphore. While using the semaphores for synchronization, its completely upto the user to ensure that the down & up are always called in pairs. But, mutex is designed in a way that lock and unlock must always be called in pairs.

Spinlock

Now, let’s come to the second question – can we use the semaphore / mutex in interrupt handlers. The answer is yes and no. I mean you can use the up and unlock, but can’t use down and lock, as these are blocking calls which put the process to sleep and we are not supposed to sleep in interrupt handlers. So, what if I want to achieve the synchronization in interrupt handlers? For this, there is a mechanism called spinlock. Spinlock is a lock which never yields. Similar to mutex, it has two operations – lock and unlock. If the lock is available, process will acquire it and will continue in the critical section and unlock it, once its done. This is pretty much similar to mutex. But, what if lock is not available? Here, comes the interesting difference. With mutex, the process will sleep, until the lock is available. But, in case of spinlock, it goes into the tight loop, where it continuously checks for a lock, until it becomes available. This is the spinning part of the spin lock. This was designed for multiprocessor systems. But, with the preemptible kernel, even a uniprocessor system behaves like an SMP. Below are the data structures associated with the spinlock:

#include <linux/spinlock.h>

// Data structure
struct spinlock_t my_slock

// Initialization
spinlock_init(&my_slock)

// Operations
spin_lock(&my_slock)
spin_unlock(&my_slock)

Now, let’s try to understand the complications associated with the spinlock. Let’s say, thread T1 acquires the spinlock and enters the critical section. Meanwhile, some high priority thread T2 becomes runnable and preempts the thread T1. Now, thread T2 also tries to acquire the spinlock and since the lock is not available, T2 will spin. Now, since T2 has a higher priority, T1 won’t run ever and this in turn will result in deadlock. So, how do we avoid such scenarios? Spinlock code is designed in such a way that any time kernel code holds a spinlock, the preemption is disabled on the local processor. Therefore, its very important to hold a spinlock for minimum possible time. What if the spinlock is shared between the thread T1 and interrupt handler? For this, there is a variant of spinlock, which disables the interrupts on local processor.

Conclusion

One common thing which we observed with mutex and semaphore is that they block the process, irrespective of the operation it wants to perform on the data structure. As you understand, there are two different operations a process can perform on the data structure – read and write. In most of the cases, it is innocuous to allow multiple readers at a time as far as they don’t modify the data structure. Such a parallelism would improve the performance. So, how do we achieve this? To find the answer to this, stay tuned to my next article. Till then, good bye!

Next Article >>

   Send article as PDF   

Wearable LED Wristband

This 6th article in the series of “Do It Yourself: Electronics”, walks you through creating a wearable wristband with LEDs.

<< Previous Article

Campus was abuzz with the planning of the upcoming cultural fest “Spring Spree”. Various clubs have swung into full action, each one to showcase their mettle. LED Displays being placed at various strategic locations. Multi-cuisine food arrangements by the taste experts. Multiple stages being set up for events ranging from technical quizzes, games, dance shows, … to musical night. Various student teams assisted by some faculty members, all set for the event launch tomorrow.

And comes the electronics man Surya showing off an LED wrist band, to help his team members.

“Wow!”, exclaims members of his team. “Where did you get it from?”, asks Sanjana.

“From my electronics hut”, replied Surya.

“Which hut?”

“My electronics hut, yaar.”

“Don’t tell me, you made it.”

“Ya. I did. What’s so great about it?”

“Then, make me one as well. It would be a cool show-off in the fest.”

“Hey! We also want it”, exclaimed the other team members.

“C’mon guys! Why don’t you make it yourself?”, replied back Surya.

“Okay! Then tell us how to make it. What do you guys say?”, asserted Sanjana.

“Ya sure! Then tell us how to make it”, supported the other team members.

“But yes, you’d have to give us the material to make it”, boasted Sanjana.

“Okay, but only the electronics stuff”, replied Surya.

“What other things do we need?”, asked Sanjana.

“Mainly the piece of cloth, a needle and thread to sew it.”

“That’s fine. In fact, we guys can get cloth of our own colour & design.”

“Ya! Ya!” was the chorus.

“Then, go get the stuff, and I’ll get the electronics stuff. We’ll meet here itself in half an hour.”

Surya does the counting, which comes to 8, and goes to his hut.

Half an hour later, they all meet at the same place, with the material.

“Hi Surya, can we also join you?”, asked two more of his team members.

“Perfect – 10 now. I have got some extra stuff, and you may take some cloth from others.”

Show-off by Surya:

With that, everyone was showing-off their own wearable LED wrist band.

“Wow! That would stand out as a cool identity for our team”, commented Sanjana.

Next Article >>

   Send article as PDF   

Concurrency Management in Linux Kernel

<< Previous Article

In the previous article, we discussed about the kernel threads, wherein we discussed various aspects of threads such as creation, stopping, signalling and so on. Threads provide one of the ways to achieve multitasking in the kernel. While multitasking brings the definite improvement in the system performance, but it comes with its own side effects. So, what are the side effects of multitasking? How can we overcome these? Read on to get the answer to all these questions.

Concurrency Management

In order to achieve the optimized system performance, kernel provides the multitasking, where multiple threads can execute in parallel and thereby utilizing the CPU in optimum way. Though useful, but multitasking, if not implemented cautiously can lead to concurrency issues, which can be very difficult to handle. So, let’s take an example to understand the concurrency issues. Let’s say there are two threads – T1 and T2. Among them is the shared resource called A. Both the threads execute the code as below:

int function()
{
    A++;
    printf("Value of i is %d\n", i);
}

Just imagine, when the thread T1 was in the middle of modifying the variable, it was pre-empted and thread T2 started to execute and it tries to modify the variable A. So, what will be result? Inconsistent value of variable A. These kind of scenarios where multiple threads are contending for the same resources is called race condition. These bugs are easy to create, but difficult to debug.

So, what’s the best way to avoid the concurrency issues? One thing is to avoid the global variables. But, its not always possible to do so. As you know, hardware resources are in nature globally shared. So, in order to deal with such scenarios, kernel provides us the various synchronization mechanisms such as mutex, semaphores and so on.

Mutex

Mutex stands for MUTual EXclusion. Its a compartment with a single key. Whoever, enters inside the compartment, locks it and takes the key with him. By the time, if someone else tries to acquire the compartment, he will have to wait. Its only when he comes outside, gives the key, would the other person be able to enter inside. Similar is the thing with the mutex. If one thread of execution acquires the mutex lock, other threads trying to acquire the same lock would be blocked. Its only when the first thread releases the mutex lock, would the other thread be able to acquire it. Below are the data structures for mutex:

#include <linux/mutex.h>

struct mutex /* Mutex data structure */

// Mutex Initialization
// Statically
DEFINE_MUTEX(my_mutex);
// Dynamically
struct mutex my_mutex;
mutex_init(&my_mutex);

// Operations
void mutex_lock(&my_mutex);
void mutex_unlock(&my_mutex);
int mutex_lock_interruptible(&my_mutex);
int mutex_trylock(&my_mutex);

Here, there are two versions for lock – interruptible and uninterruptible. mutex_lock_interruptible()  puts the current process in TASK_INTERRUPTIBLE state. So, the current process sleeps until the state is changed to TASK_RUNNING. For the process in TASK_INTERRUPTIBLE, there are two possible events which may change the process state to TASK_RUNNING. First event is obviously, when the mutex is available and another thing is, if any signal is delivered to process. But, if the process is put into the TASK_UNINTERRUPTIBLE state, which is the case when we invoke mutex_lock(), the only event which can wake up the process is the availability of resource. In almost all the scenarios we use mutex_lock_interruptible().

Below is the simple example to demonstrate the usage of mutex.

static int thread_fn(void *unused)
{
    while (!kthread_should_stop())
    {
        counter++;
        printk(KERN_INFO "Job %d started\n", counter);
        get_random_bytes(&i, sizeof(i));
        ssleep(i % 5);
        printk(KERN_INFO "Job %d finished\n", counter);
    }
    printk(KERN_INFO "Thread Stopping\n");
    do_exit(0);
}

Here, we have global variable counter, which is being shared between two threads. Each thread increments the counter, prints the value and then sleeps for random number of seconds. This is obvious entity for race condition and can result into the corruption of variable counter. So, in order to protect the variable, we use the mutex as below:

#include <linux/mutex.h>

DEFINE_MUTEX(my_mutex);
static int counter = 0;

static int thread_fn(void *unused)
{
    while (!kthread_should_stop())
    {
        mutex_lock(&my_mutex);
        counter++;
        printk(KERN_INFO "Job %d started\n", counter);
        get_random_bytes(&i, sizeof(i));
        ssleep(i % 5);
        printk(KERN_INFO "Job %d finished\n", counter);
        mutex_unlock(&my_mutex);
    }
    printk(KERN_INFO "Thread Stopping\n");
    do_exit(0);
}

As seen in the above code, we declare a variable my_mutex of type struct mutex which protects the global variable counter. Thread will be able to access the variable only if it is not in use by another thread. In this way, mutex synchronizes the access to the global variable counter.

Semaphore

Semaphore is a counter. It is mostly used, when we need to maintain the count of the resources. Let’s say we want to implement the memory manager, where we need to maintain the count of available memory pages. To start with, say we have 10 pages, so the initial value of the semaphore will be 10.  So, if the thread 1 comes and asks for the 5 pages, we will decrement the value of semaphore to 5 (10 – 5). Likewise, say thread 2 asks for 5 pages, this will further decrement the semaphore value to 0 (5 – 5). At this point, if there is an another thread say thread 3 and asks for 3 pages, it will have to wait, since we don’t any pages left. Meanwhile, if the thread 1 is done with the pages, it will release 5 pages, which in turn will increment the semaphore value to 5 (0 + 5). This, in turn will unblock the thread-3, which will decrement the semaphore value to 2 (5 – 3). So, as you understand, there are two possible operations with the semaphore – increment and decrement. Accordingly, we have two APIs – up and down. Below are the data structures and APIs for semaphore.

#include <linux/semaphore.h>

struct semaphore /* Semaphore data structure */

// Initialization
// Statically
DEFINE_SEMAPHORE(my_sem);
// Dynamically
struct semaphore my_sem;
sema_init(&my_sem, val);

// Operations
void down((&sem);
int down_interruptible(&sem);
int down_trylock(&sem);
void up(&sem);

As with the mutex, we have two versions of down – interruptible and uninterruptible. Initialization function sema_init() takes two arguments – pointer to the struct semaphore and initial value of semaphore. If semaphore value is greater than 1, we call it as counting semaphore and if the value of semaphore is restricted to 1, it operates in way similar to mutex. The semaphore for which the maximum count value is 1, is called as binary semaphore. Below is example, where the mutex is replaced with a semaphore:

#include <linux/semaphore.h>

static struct my_sem;
static int counter = 0;

static int thread_fn(void *unused)
{
    while (!kthread_should_stop())
    {
        if (down_interruptible(&my_sem))
            break;
        counter++;
        printk(KERN_INFO "Job %d started\n", counter);
        get_random_bytes(&i, sizeof(i));
        ssleep(i % 5);
        printk(KERN_INFO "Job %d finished\n", counter);
        up(&my_sem);
    }
    printk(KERN_INFO "Thread Stopping\n");
    do_exit(0);
}

static int init_module(void)
{
    // Binary semaphore
    sema_init(&my_sem, 1);
}

The code is same as with mutex. It provides the synchronized access to the global variable counter.

Conclusion

In this article, we discussed two most commonly used synchronization mechanisms. As seen from the above examples, the synchronization achieved  with mutex, can be achieved with the binary semaphore as well. Apart from this, semaphore can also operate in counting mode. So, why do we need mutex at all? Also, can we use the semaphore in interrupt handler? To find the answers to these questions, stay tuned to my next article on concurrency management. Till then, good bye.

Next Article >>

   Send article as PDF   

Integrated Circuits

This 5th article in the series of “Do It Yourself: Electronics”, kick starts you with an overview of some commonly used integrated circuits aka ICs.

<< Previous Article

Out of the computer programming lab, Pugs headed towards the recently launched Innovation Garage. As he entered there, he saw many crazy geeks playing around with various stuff – not only software but electronics and mechanical stuff, as well. Pugs was super excited seeing all these around him – as if a dream come true – a multi disciplinary lab. He felt as if why not spend my whole time here – but sigh those classes, assignments, lab records, … won’t let him do that. “Why can’t there be only labs for just doing stuff, and that also without being to write lab records?”, Pugs murmured to himself.

“O! You are already here”, exclaimed Surya, as he entered the garage.

“Yes. It is so exciting”, replied Pugs.

“So, what are you planning to innovate on?”

“No idea. Just wondering. Don’t know where to start from.”

“That is simple. Just start from something you have been working on.”

“You mean to say the electronics experiment you taught me.”

“Yes – why not?”

“But that is too simple hobby stuff, for innovation.”

“So what? That’s where you start simple, and then gradually build complex stuff using them, and then more complex stuff using those complex stuff.”

“Something like writing our own functions, and then writing more complex functions using those functions, and so on.”

“You’d always need a software analogy”, sighed Surya. “Yes, you can say something like that.”

“Okay then, is there something like standard library functions, with some pre-built functionality, which can be directly used without bothering about what’s being done inside it?”

“Exactly! You stole my words. ICs are exactly those.”

“Now what is this IC? I know one – inferiority complex.”

“No. It stands for Integrated Circuits. Yes, they may give you IC (inferiority complex), by showing their capabilities”, responded Surya with a laugh.

“O! that would be cool.”

“What would be cool?”, asked Surya with a surprise look.

“Tomorrow is my first day to the Integrated Circuits Lab, and you just told me what an IC is – a standard library function. So, I can go and play around with them, tomorrow.”

“Yes, you can really have lot of fun – create electronic circuits faster and in better ways.”

“But, I have a doubt.”

“What?”

“Do you have ‘man’ pages for the ICs, like we have for the standard library functions?”

“Yes, that’s where the datasheets come into action. Those are like the man pages, giving you the various usage details of the corresponding IC.”

“And those I need to get from the net, right?”

“Yes.”

“But, how do I know, which IC should I be using where?”

“For that I can give you a kickstarter overview. And, then you would keep on finding more as the need arises.”

“O! sure.”

Kickstarter by Surya:

“Aha! So, we have been already using some of these ICs, and now you tell me that they are called ICs”, was Pugs’ response to the overview.

“That is called enlightenment”, laughed out Surya. “By the way, let me know your first IC lab experience.”

Next Article >>

   Send article as PDF   

Kernel Threads Continued

<< Previous Article

In the previous article, we learned the basics of kernel threads such as creating the thread, running the thread and so on. In this article, we will dive a bit more into the kernel threads, where we will see the things such as stopping the thread, signalling the thread and so. So, let’s begin…

Continuing with the previous article, we were observing a crash while removing the kernel module with rmmod, So, are you able to find the reason for the crash? If yes, that’s very well done. The reason for the crash wasss … Let us first cover this article and hopefully, as a part of that, you by yourself would be able to discover the reason.

Stopping the Kernel Thread

If you are familiar with the pthreads in user space, you might have come across the call pthread_cancel(). With this call, one thread can send the cancellation request to the other. Pretty similar to this, there exists a call called kthread_stop() in kernel space. Below is the prototype for the same:

#include <linux/kthread.h>
int kthread_stop(struct task_struct *k);

Parameters:
k – pointer to the task structure of the thread to be stopped

Returns:  The result of the function executed by the thread, -EINTR, if wake_up_process() was never called.

Below is the code snippet which uses kthread_stop():

#include <linux/module.h>
#include <linux/kernel.h>
#include <linux/kthread.h>
#include <linux/delay.h>

static struct task_struct *thread_st;
// Function executed by kernel thread
static int thread_fn(void *unused)
{
    while (1)
    {
        printk(KERN_INFO "Thread Running\n");
        ssleep(5);
    }
    printk(KERN_INFO "Thread Stopping\n");
    do_exit(0);
    return 0;
}
// Module Initialization
static int __init init_thread(void)
{
    printk(KERN_INFO "Creating Thread\n");
    //Create the kernel thread with name 'mythread'
    thread_st = kthread_run(thread_fn, NULL, "mythread");
    if (thread_st)
        printk(KERN_INFO "Thread Created successfully\n");
    else
        printk(KERN_ERR "Thread creation failed\n");
    return 0;
}
// Module Exit
static void __exit cleanup_thread(void)
{
   printk(KERN_INFO "Cleaning Up\n");
   if (thread_st)
   {
       kthread_stop(thread_st);
       printk(KERN_INFO "Thread stopped");
   }
}
MODULE_LICENSE("GPL");
module_init(init_thread);
module_exit(cleanup_thread);

Compile the code and insert the module with insmod. Now, try removing the module with rmmod. What do you see? Dude … where is my command prompt? rmmod seems to have got stuck..”. Relax guys!  I forgot to mention that kthread_stop(), is indeed a blocking call. It waits for the thread to exit and since our thread is in while(1), so hopefully, it will never exit and unfortunately, our rmmod will never come out. So, what does this mean? What we can infer from this, is that the kthread_stop() is just the signal, not the command. Calling kthread_stop() doesn’t gives you a license to kill/stop the thread, instead it just sets the flag in the task_struct() of the thread and waits for the thread to exit. It’s totally upto the thread to decide, when it would like to exit.  So, why is such a thing? Well, just think of the scenario where kernel thread has allocated a memory and would free it up once it exits. Had it been allowed to be killed in middle, thread would never be able to free up the memory. This, in turn would result in memory leak. This was the one of the simplest scenarios, which I could think of. Coming back to our problem, how do we get back the command prompt? Let’s try one more thing. In the user space, you might have used the kill  command to send the signal to the process. And one of the most powerful signal which process can’t mask is SIGKILL. So, lets use the same on the kernel thread as well. Find the id of the running kernel thread with ps command and then, use the following command:

kill -9 <thread_id>

So, what’s the result? Dude … this thread is invincible!. True, by default, kernel thread ignores all the signals. The reason behind this is same as explained above. Kernel thread has a full control over when can it be killed. So, the only way to get out of this problem is to kill the problem, that means, reboot the system. This program has a bug, so read on to fix this bug.

So, now the question is, how to let the kernel thread know that, somebody is willing to stop it. For this, there is a call called kthread_should_stop(). This function returns non-zero value, if there is any outstanding ‘stop’ request. Thread should invoke this call periodically and if it returns true, it should do the required clean up and exit. Below is the code snippet using this mechanism:

static struct task_struct *thread_st;
// Function executed by kernel thread
static int thread_fn(void *unused)
{
    while (!kthread_should_stop())
    {
        printk(KERN_INFO "Thread Running\n");
        ssleep(5);
    }
    printk(KERN_INFO "Thread Stopping\n");
    do_exit(0);
    return 0;
}

Here, the thread periodically invokes kthread_should_stop() and exits, if this function returns a non-zero value. In exit_module() function, we call kthread_stop() function to notify the thread, as earlier.

Signalling the Kernel Thread

As we have already seen, by default, kernel thread ignores all the signals. So, how do we send the signal to the kernel thread, if at all it’s required in some scenarios? Again, we have some set of calls to support this. First call is allow_signal(). Below is the prototype for the same:

void allow_signal(int sig_num)

Parameters:
sig_num – signal number

Unlike user space, there are no asynchronous signal handlers in kernel threads. So, thread should periodically invoke signal_pending() call to check if there is any pending signal and should act accordingly. Below is the prototype for the same:

int signal_pending(task_struct *p)

Parameters:
p – pointer to the task structure of the current thread

Returns:  Non-zero value, if signal is pending

Below is the code snippet for handling the signals:

static struct task_struct *thread_st;
// Function executed by kernel thread
static int thread_fn(void *unused)
{
    // Allow the SIGKILL signal
    allow_signal(SIGKILL);
    while (!kthread_should_stop())
    {
        printk(KERN_INFO "Thread Running\n");
        ssleep(5);
        // Check if the signal is pending
        if (signal_pending(thread_st))
            break;
    }
    printk(KERN_INFO "Thread Stopping\n");
    do_exit(0);
    return 0;
}

Compile the code and insert the module with insmod. Now, find the thread id using ps and execute the below command:

kill -9 <thread_id>

With this, you will see that thread exits, once it detects the SIGKILL signal. Now, just try removing the module with rmmod. What do you get? rmmod comes out gracefully without blocking.

Conclusion

So, with this, I am done with kernel threads. Aah! I missed out one thing from the last article. Why was that crash in the code from the last article? As you might have observed, when I call kthread_stop() in the exit module, the thread terminates after kthread_should_stop() returns true, and we don’t see a crash. So, does it mean that kthread_stop() prevents crash? In a way yes, but we need to understand the fundamental reason behind the crash. As you know, like any other process, thread also requires a memory to execute. So, where does this memory come from? No points for guessing the right answer, its from the module memory. So, when you unload the module, that memory is freed up and its no longer valid.  So, our poor chap tries to access that and its destined to crash.

So, that’s about the kernel threads. In the next article, we will touch upon the concurrency management in the kernel. So, stay tuned …

Next Article >>

   Send article as PDF