Detection of I2C Devices

While exploring new I2C devices or bringing up I2C devices on Linux, and especially when things are not working, one of the common doubts which linger around is, is there a problem in hardware or software. In fact, this is a common doubt for any type of device, why only I2C. And the easiest way ahead for all such standard protocols is to have a user space tool / application, which can scan the devices without depending on any device specific driver. Assumption here is that the corresponding bus driver is in place. Depending on the protocol, the tools may be different. So, here our focus is on I2C.

i2cdetect is a powerful and simple tool for figuring out I2C devices. If an I2C device is detectable with i2cdetect, it means hardware is fine and if not detectable means some issue with the hardware. And the debugging could proceed accordingly. Executing i2cdetect may need root privileges and can be used as follows:

List the I2C buses available:

# i2cdetect -l

Say, 0 & 1 are available. Then, each bus could be scanned to see what all device addresses exist on each bus. It is assumed that we know the device addresses of our devices. Here’s how to scan say bus 0:

# i2cdetect -y 0

If this doesn’t work, issuing an error, you may add a “-r” option to use the SMBus commands, which should work.

# i2cdetect -y -r 0

Output of the working command will be an array of all device address locations on that bus, with “- -” or “UU” or a device address, as its value.

“- -” indicates address was probed but no device responded. So, if you are expecting a device at some address and got “- -“, it means either it is not on this bus, or the device is not getting detected because of some hardware issue, which could be hardware lines not connected properly, or voltage supply issue, or something else.

“UU” indicates that probing of this address was skipped because the address is currently in use by a driver. This is strong indication that the device is present, and highly likely that the driver is also in place.

Device Address in hexadecimal indicates that the device has been detected.

In both the above cases, hardware side of the device & its connections are all fine. And if it is still not working as expected in case it is showing “UU”, it is high chances that the driver may need tuning / modification. Just to be doubly sure about that, you may verify it by changing the device with an another one, if possible.

And for the case showing the device address in hexadecimal, either a software driver is needed for it or it may be accessed using some user space accessing mechanism.

Note: i2cdetect is part of the i2c-tools package. So, if it is not available on the corresponding Linux system, the i2c-tools package may need to be installed.

   Send article as PDF   

Running Commands on VirtualBox from Outside

In today’s world of multi operating systems (OSes), some things get done better / easier in one OS, whereas some in other. Now, if all types of tasks are to be done on the corresponding OSes, there are various possibilities. Two from those are:

  • Have multiple systems with the various OSes
  • Have a system with one of the OSes (referred to as host OS) and VirtualBoxes on it for the other OSes (referred to as guest OSes)

From ease of use perspective, the second one is preferable. In either case, if automation of all the tasks is required the following are the most common steps:

  • Write a script on one of the OSes, preferably bash script on Linux to automate its local tasks
  • Invoke / Do the tasks on the other OSes in the same script, using ssh with the command to the corresponding OS

For the above steps to work, a minimal network connection is expected between the different OSes. In case of multiple systems, physical network connection is required. However, with VirtualBoxes, even the network could be virtual between the VirtualBoxes.

In case of VirtualBoxes, a networkless solution is also possible. One can actually run the commands on a VirtualBox based guest OS using commands on the host OS. The key to that is the command VBoxManage which gets installed alongwith the VirtualBox on the host OS. To be specific, it is the option guestcontrol of the VBoxManage. Invoke it as follows for further list of options:

$ VBoxManage help guestcontrol

Assuming a VirtualBox running with the name “Ubuntu”, username “test”, password “testpwd”, the following are a few examples of what can be done:

$ VBoxManage guestcontrol Ubuntu --username test --password testpwd mkdir /home/test/xyz
$ VBoxManage guestcontrol Ubuntu --username test --password testpwd mv /home/test/xyz /home/test/abc
$ VBoxManage guestcontrol Ubuntu --username test --password testpwd rmdir /home/test/abc

There are few more commands, apart from the above, which can be directly used. But what about the whole plethora of commands on the guest OS? For an access to all the commands on the guest OS, they may be invoked using their complete path as follows:

$ VBoxManage guestcontrol Ubuntu --username test --password testpwd run --exe /bin/ls

The above is an example of invoking “ls”, but this shows the content of the root (/) directory on the guest OS. What if parameters are to be passed to the command? Then, do as follows:

$ VBoxManage guestcontrol Ubuntu --username test --password testpwd run --exe /bin/ls -- ls /home/test

This would list the contents of /home/test on the guest OS. Note that after – – , argv[0], argv[1], … has to be passed. Hence, the first one is “ls” itself.

Want to shorten giving the long command again and again, on a Linux host. Then, define a variable, say

$ export UBUNTU="VBoxManage guestcontrol Ubuntu --username test --password testpwd run --exe"
$ ${UBUNTU} /bin/ls -- ls /home/test

In case of doing it through a script, the variable may be defined without the export.

Now, if the output from the command is not desired, one may use “start” instead of “run”, e.g.

$ VBoxManage guestcontrol Ubuntu --username test --password testpwd start --exe /bin/ls -- ls /home/test

In all the above examples, it has been assumed that the VirtualBox Ubuntu was already running. In fact, if it was not, it also may be started / booted, paused, resumed, stopped / shutdown from the command line as well. This, giving a full control on automation. Here are the corresponding commands:

$ VBoxManage startvm Ubuntu --type gui # The usual graphical Start
$ VBoxManage startvm Ubuntu --type headless # The hidden background Start
$ VBoxManage controlvm Ubuntu pause # Pause the VM
$ VBoxManage controlvm Ubuntu resume # Resume the VM
$ VBoxManage controlvm Ubuntu poweroff # Poweroff the VM
$ VBoxManage controlvm Ubuntu reset # Reset / Hard Restart the VM in case of hang or so
   Send article as PDF   

Playing with ALSA loopback devices

Looping back is always an interesting thing to play with. It comes with its own set of applications, ranging from testing & debugging to replicating & integration. It has been used in various fields including hardware and software. At hardware level, we often short the Rx (receive) & Tx (transmit) lines to do the loopback in devices like serial, network, etc. In software, we do it using pipes, files, etc. However, an even more interesting crop is the concept of virtual devices doing loopback. We had talked about virtual video loopback devices in the previous article “Simultaneous Access to Single Camera“. Similarly, we can have virtual audio loopback devices.

snd-aloop is the kernel module for setting up virtual audio loopback devices.

$ sudo modprobe snd-aloop

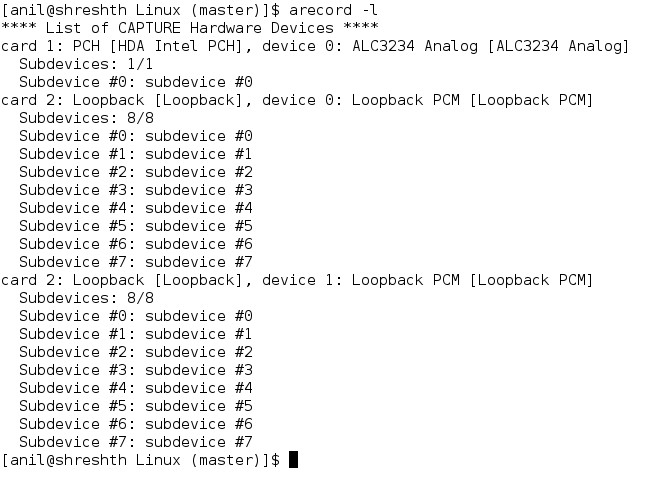
creates two devices 0 & 1 under a new “Loopback” card for both playback & capturing, as shown below, respectively:

Playback Devices

Capture Devices

In the above images, the card 2 is the loopback card. It may vary depending on which is the next free available card number. Moreover, each of the two devices under it, has 8 subdevices, which would be accessed using the format hw:c,d,s, where c stands for card number, d for device number, and s for subdevice number, e.g. hw:2,0,0

Now in this, whatever audio is played back into hw:2,0,s could be captured from hw:2,1,s and viceversa, s ranging from 0 to 7. For example, audio played back into hw:2,0,4 could be captured from hw:2,1,4; audio played back into hw:2,1,7 could be captured from hw:2,0,7 – these are what are the loopbacks. A simple experiment could demonstrate the same.

Start recording audio from hw:2,1,4:

$ arecord -D hw:2,1,4 -f S16_LE -c 2 -r 48000 recorded.wav

Note that providing the sample format, channel count, frame rate in recording ensures that playback picks up the same settings – this is because there is no real hardware underneath it is just a virtual loopback connection.

And in parallel (from another shell) play an audio from audio.wav into hw:2,0,4:

$ aplay -D hw:2,0,4 audio.wav

And you’d find that recorded audio contains the played one – a loopback in action. You may play the recorded audio as follows:

$ aplay recorded.wav

This would play on your system’s default speaker.

Also, note that there may be problem in just playing any audio.wav file because of the mismatched audio format etc support. For that, just record a new wave file with your speech using the following command:

$ arecord -f S16_LE -c 2 -r 48000 audio.wav

This would record from your system’s default mic.

Interestingly, audio loopback could also be achieved in user space using alsaloop from alsa-utils package. Here is a demo of the same. From the output of aplay -l, hw:1,0 is the analog out (speaker). Note that hw:1,0 is same as hw:1,0,0. Find the equivalent on your system. And, now let’s loopback the virtual audio capture device hw:2,1,4 to this:

alsaloop -C hw:2,1,4 -P hw:1,0

On another shell, do the earlier playing:

$ aplay -D hw:2,0,4 audio.wav

This time you should be able to hear the audio.wav directly through system’s default speaker – again a loopback in action – rather two loopbacks in action: audio.wav -> hw:2,0,4 -> (loopback through snd-aloop driver) -> hw:2,1,4 -> (loopback through alsaloop app) -> hw:1,0 -> heard on speaker.

   Send article as PDF   

Simultaneous Access to Single Camera

There are many devices, accessing which is meaningful, only when accessed by one user at a time. Examples include a serial port, a camera, … To illustrate it further, think through as what would happen if two applications (aka users) read from the same serial port simultaneously. Some data would go to one user and some to the other, making both data meaningless. That is why, in such cases it is recommended to use only one application at a time for that particular device. A similar scenario would happen even with camera capturing. To avoid such undesired results, many a times the corresponding device framework marks the device busy if it is being used – thus ensuring that only one application is using it at a time.

In general, this mutually exclusive device usage is fine. But, what if two applications want to access the same data simultaneously. That is a problem. But even if the device is allowed to be accessed simultaneously, it does not solve the problem, as the data would get split, unlike in the storage devices like EEPROM, hard disk. One way to solve such a problem is by mirroring the data, and the mutually exclusiveness also would not be hampered. For that, we would need an intermediate application which would actually read from the device and then mirror the read data into as many virtual devices as needed. With such an arrangement, many applications can actually get the same camera feed, say for different processings.

Here is the outline of how to achieve this for a v4l2 (video for linux 2) compatible camera:

+ Download the v4l2loopback driver from https://github.com/umlaeute/v4l2loopback
+ Compile it using the corresponding kernel version, where the camera is attached. On an x86 system, typically typing make should do.
+ Load the v4l2loopback driver (v4l2loopback.ko file) w/ appropriate options. A typical way:

$ sudo insmod v4l2loopback.ko devices=2

Assuming an existing /dev/video0 for the camera, this would create two loopback video device file entries video1 & vide2. Refer to https://github.com/umlaeute/v4l2loopback/README.md for more options. Whatever is fed into these device files, comes out as their output.

+ Feeding a video test source (Ancient Doordarshan Screen) into the loopback video device files, using gst-launch application (just for testing):

$ gst-launch-1.0 videotestsrc ! tee name=t ! queue ! v4l2sink device=/dev/video1 t. ! queue ! v4l2sink device=/dev/video2

+ Open cheese or any such application to view video test screen from the video1 & video2 device files

+ Time to mirror the video0 stream to video1 & video2. Use the gst-launch application, as follows:

$ gst-launch-1.0 v4l2src device=/dev/video0 ! tee name=t ! queue ! v4l2sink device=/dev/video1 t. ! queue ! v4l2sink device=/dev/video2

+ Now, video1 & video2 are mirrors of video0. Go ahead and enjoy using video1 & video2. An example:

$ gst-launch-1.0 v4l2src device=/dev/video1 ! xvimagesink
   Send article as PDF   

Working with multiple Python environments

With the ample use of Python in applications all over, it is a common requirement that different applications need different combinations & conflicting versions of Python modules. Rather than having separate (real or virtual) machines with different installations for the different applications, it can be simply achieved using the Python’s virtualenv module. Here’s a quick summary of how to do it in Linux.

Install the python-virtualenv package, either using the package installer, or using pip of the desired python version:

$ sudo pip3 install virtualenv

Create a directory with the desired virtual environment, with or without the system wide installed packages, and the desired python version, as follows:

$ virtualenv --system-site-packages -p python3 ./venv

Or,

$ virtualenv --no-site-packages -p python3 ./venv

Here, venv (in the current directory) is the directory created with the desired virtual environment. Now, time to activate the virtual environment:

$ . ./venv/bin/activate

Now onwards, this shell’s prompt would be prefixed by (venv) indicating the virtual environment it is using. Whatever local done on this shell is specific only to this virtual environment, it being stored in this virtual environment’s directory. So, whatever pip installs (w/o sudo) are required for an application to run, can be done here independent of any external environment – even independent of the system wide installed packages, in case the virtual environment was created without them. All such installs would be local only to this environment without affecting the external environment.

Now the desired application, needing this environment, may be run in this environment.

Once done with the virtual environment, it can be deactivated as follows:

(venv) $ deactivate

It can be activated & deactivated as & when desired. Why just one? One may have any number of different virtual environments created and activated in parallel, just using separate directories and on separate shells – no need of separate machines.

   Send article as PDF   

Working with multiple Java versions

With ever growing use of Java in multi-platform applications, it is a common problem that different applications need different versions of Java. That means, we need to have multiple versions of Java installed on a system, and keep on switching between them.

But how? By adjusting the JAVA_HOME variable!!! This overall cumbersome looking task has been made quite trivial by using the Java environment manager (jenv) from Gildas Cuisinier. Overall installation & usage instructions on various platforms are given on its home page, as well as on its github repo. However, here’s a quick summary for Linux bash environment:

  • Download jenv in your desired location, say in the hidden .jenv directory under your home:
$ git clone https://github.com/jenv/jenv ~/.jenv
  • Add the jenv script in the execution path, basically add the following line in ~/.bash_profie or ~/.profile:
export PATH=${PATH}:~/.jenv/bin
  • Then, add jenv’s initialization, i.e. add the following line in ~/.bashrc:
eval "$(jenv init -)"
  • Now, logout and login back for all the settings to take effect. And after logging in, if the system has a pre-installed Java version,
$ jenv versions

should show one line with “* system (set by …”. For other Java version(s), we need to download and add.

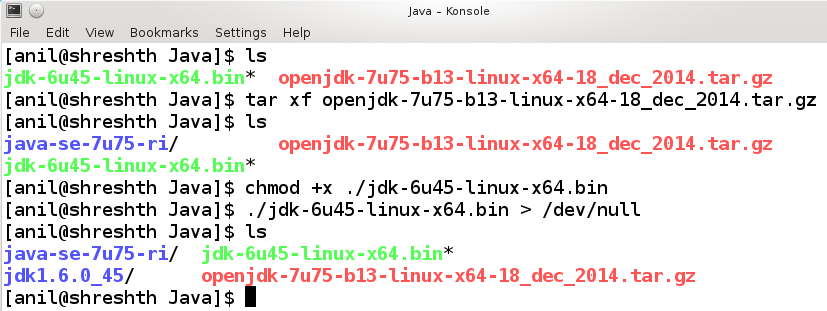
  • In case, corresponding Java version is already downloaded & extracted, go to the next bullet. Otherwise, download the sources (.tar.gz or .bin) of various Java versions you need. Untar the .tar.gz or execute the .bin (after adding execute permissions to it). It would extract them in their corresponding folders. Shown below is one example of each.

Java Downloads

NB There are two variants of Java. One maintained by Oracle (called JDK, Java SE, …) and the other by open source community (called OpenJDK). Here are the corresponding links:

  1. JDK (Java SE, RE etc) is from Sun / Oracle (w/ Oracle Binary Code License)
  2. OpenJDK is the open source version of the above (w/ GNU General Public License version 2)
  • Now, time to add the downloaded & extracted Java version(s) using jenv add <extracted_java_folder>, e.g.
$ jenv add jdk1.6.0_45/
$ jenv add java-se-7u75-ri/

NB One may give the complete or relative path of the extracted folders. After this, the

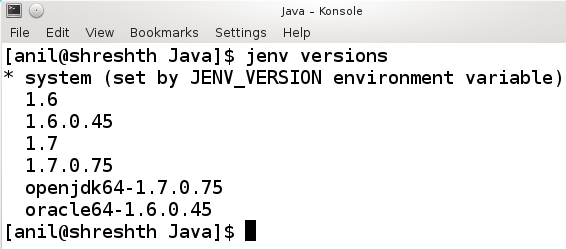
$ jenv versions

should show something like this:

Java Versions

  • Now, switch to the desired Java version from the list using any of the following:
$ jenv local <version>

for only this current directory.

$ jenv shell <version>

for only this particular shell.

$ jenv global <version>

for globally.

$ jenv versions

should show the “*” (current setting) shifted appropriately.

   Send article as PDF   

Creating a micro SD Image

In today’s embedded world, it is very common to be creating bootable micro SDs. And then very often replicating them using raw dump of the micro SD (uSD) into an image file, say using dd command. And then creating another bootable uSD by flashing the image file into the uSD, again using dd command.

But what if one wants to create the image file by hand, rather than raw dumping from an existing uSD? Can it be done? Very well yes. And here follows the outline of the steps to follow:

First, create the image file for the appropriate size, say 1GiB:

$ dd if=/dev/zero of=file.img bs=32k count=32k

NB 1GiB has been achieved using 32 Kibi blocks of 32 KiB each, because nowadays 32KiB is quite an optimal block size in Linux.

Now, partition the image, with say 3 partitions (50MiB, 300MiB, remaining), using the GPT partition table type:

$ parted file.img mklabel gpt # Create a GPT partition table
$ parted file.img mkpart primary fat32 1MiB 51MiB # Create a partition for FAT32 fs
$ parted file.img mkpart primary 51MiB 351MiB
$ parted file.img mkpart primary 351MiB 2097151s

NB 2097151 is the last sector number in our image, but the third partition may not be able to extend till there, and the last command above may prompt for an alternative last sector. Accept it with “y”.

NB One may use any other partitioning utility like fdisk, as well.

Use the following commands to see partition details (in MiB & Byte units):

$ parted file.img unit MiB print
$ parted file.img unit B print

Here’s the expected output:

Partition Details using parted

Now, time to create filesystems on our partitions. But they are not visible as block device files. Then, how does one do it? That’s where loop device comes for rescue. Type the following commands to get the corresponding block device files:

$ sudo losetup -o 1MiB --sizelimit 50MiB -f file.img
$ sudo losetup -o 51MiB --sizelimit 300MiB -f file.img
$ sudo losetup -o 351MiB -f --sizelimit 705674752 file.img

NB 705674752 (refer to the print output above) is provided in bytes to be exact for the last partition

The three partitions would typically get available as /dev/loop0, /dev/loop1, /dev/loop2. You may verify using the following command:

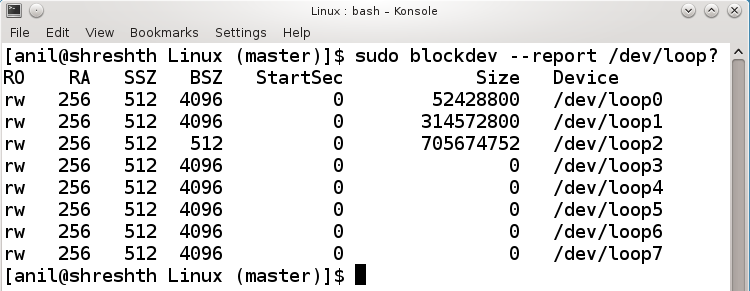
$ sudo blockdev --report /dev/loop?

Here’s the expected output:

Loop (Block) Device File Details using blockdev

NB If the partition sizes are not multiple of 4096, their block size (BSZ) would reduce to 512.

Now, do all the usual partition operations. For example:

$ sudo mkfs.vfat /dev/loop0
$ sudo mkfs.ext4 /dev/loop1
$ sudo mkfs.ext4 /dev/loop2

Mount the required filesystems & copy the appropriate contents & unmount them. For example, for the first vfat filesystem:

$ sudo mount /dev/loop0 /mnt
$ sudo touch /mnt/om_arham.txt
$ sudo umount /mnt

Once done with content creation for all the filesystems, detach the loop devices:

$ sudo losetup -d /dev/loop2
$ sudo losetup -d /dev/loop1
$ sudo losetup -d /dev/loop0

All done – file.img is the desired uSD image. In fact, one may use the above learnings, to access the contents of an already existing uSD image, without raw dumping or flashing it in a uSD. Go ahead & try it out. And finally, why only an image of a uSD, you may create &/or decode any damn storage image, using just what has been learnt.

   Send article as PDF   

Philosophy Quiz

<< Previous Class

Today we come to a closure of our philosophical journey together. I hope you enjoyed it.

“Noooooo”, came a chorus.

“Don’t say closure. It was so much fun, and we hope we continue with it”, echoed Ātmā.

“Yes sirrrrrrr”, again came a chorus.

I too hope, you continue with it in your life, as I guess it had opened a lot of doors of possibilities for you. So, to make it a memorable closure with me, I thought, we would run a quiz today, by asking each one of twenty five of you, some questions. You may add extra info in your answers, though.

“Wow! a quiz”, exclaimed Gati.

Ok. Let’s start with you. How many types of sense organs?

Gati: Five.

What are the further divisions of each of the sense organs? (pointing to Jāti)

Jāti: Dravyendriya (Observable Organ made of pudgal) and Bhāvendriya (Non-observable Organ made of soul)

What are the divisions of dravyendriya?

Kāy: Dravyendriya is divided into the matter and energy components. The materialistic form & structure (nirvritti), and the organ energy (upkaraṅ) needed to drive a sense organ. The form & structure could be further divided into internal & external sense organs.

How do we understand the bhāvendriya?

Indriya: Bhāvendriya is the aspect of a sense organ because of its being driven by life / soul. It also has two aspects: labdhi (organ’s soul power) and upyog (organ in live action).

As, even a sense organ is fundamentally driven by two types – observable dravyendriya and non-observable bhāvendriya, wouldn’t the whole of a living being be so driven?

Paryāpti: Yes. We living beings are also driven by the observable paryāpti, and the non-observable prāṅ.

What are the varieties of paryāpti (matter & energy) needed to live a life?

Paryāpti: There are six varieties. Food, body, sense organ(s), breath, speech, mind, and they are acquired in that order, for taking birth.

What are the corresponding prāṅ (life support due to soul)?

Prāṅ: They are actually ten. 5 indriya (prāṅ) for organs, manobal for mind, vachanbal for speech, kāybal for body, shwāsochchhwās for breath, āyuṡ for food, and they go away in that order, while dying.

Excellent. And if you know, as both dravyendriya and bhāvendriya are required for the proper functioning of any sense organ, similarly both paryāpti and prāṅ are required for the proper functioning of the corresponding aspect of any living being. Next, minimum how many bodies does a worldy being possess?

Sharīr: Two (tejas & kārmaṅ) during transition from one life form to another.

What are the different types of (soul initiated) activities aka yog?

Yog: They are three – activities of body (physical), speech (verbal), mind (mental).

What is the philosophy of multi-perspective called?

Upyog: Anekāntvād

What are the two types of karm particles at broad level?

Karm: Ghāti (Hindering) & Aghāti (Non-hindering).

In which all guṅasthān do you not die, or are you immortal?

Guṅasthān: Third, Twelfth, Thirteenth. Third because it is a doubtful state. Twelfth and Thirteenth as from these you are destined to go the the next state.

What are the subjects of the sense organs?

Viṡay: 3 (types of) sounds, 5 colours, 2 smells, 5 tastes, 8 touches.

Which karm particles get accumulated on using sense organs?

Mitthyātva: Good ones if used without any bias of anger, ego, deceit, greed. Otherwise, bad karm particles.

What are the ways of stopping the karm particles?

Tatva: 5 sanvar (opposite of āshrav), viz right faith, right conduct, alertness of right conduct, no-kaṡāy, non-activity.

What are the types of ātmā?

Ātmā: As such all are same – the substance ātmā. But based on its worldly state, it could be infinite, but could be broadly classified into 7 more apart from dravya (substance): kaṡāy (anger, ego, deceit, greed), yog (activity), upyog (business), knowledge, faith, conduct, power.

Our hormones trigger our thoughts. Our thoughts trigger our behaviour. But what trigger our hormones?

Danḋak: Leshyā, types of which are typically represented by six enhancing colours of black, blue, gray, red, yellow, white.

And what triggers the leshyā?

Leshyā: Vibrations of the karmic body or karm particles.

What are the types of faith?

Driṡṫi: Right, Wrong & Mixed.

What are the types of meditation?

Dhyān: Four: ārtt (continuous focus on unfavourables & desirables), roudra (concentration in ruthless thoughts), dharm (philosophical concentration), shukla (thought to thoughtlessness). Obviously the first two are not the good forms of meditation.

What is the relation between the three faiths with guṅasthān?

Dravya: First guṅasthān is the stage of wrong faith, third one of mixed, and the rest are of right faith.

Which all forms of living beings can go to mokṡ?

Rāsi: As such any. But directly only from human being form. So, others also will have to come into human form to go to mokṡ.

So, ultimately can all living beings attain mokṡ?

Vrat: No. There are two varieties of all living beings: bhavi and abhavi. Only bhavi are capable of going to mokṡ.

Would all bhavi go to mokṡ?

Mahāvrat: Not really. They are just capable – doesn’t mean they will go. And moreover they are infinite.

In what different ways can the activities (yog) be executed?

Bhāngā: Each of the three activities (body, speech, mind) can be executed in three ways: by oneself, or can be gotten executed by someone else, or can be executed by supporting someone else. (In terms of karm accumulation, all three of them are equivalent.) Hence in detail, there becomes 3 x 3 = 9 varieties of activity execution.

And finally, in how many ways can the level of an ascetic be classified?

Chāritra: Five, viz sāmāyik, chhedopsthāpya, parihār vishuddhi, sūkṡm sanprāy, yathākhyāt.

On a closing note:

As a scientist does lot of experiments trying to unravel the mysteries of observables. In the same way, a philosopher need to do a lot of experiments to unravel the mystery of everything.

In fact, philosophy had been studied, experimented with, and being explored since ages.

Moreover, in the past there have been humans, who have decoded the mysteries of everything. And based on their knowledge, they had conveyed the secrets as the various philosophies. Hence, we do not have to reinvent the wheel, from the scratch. Rather, study these philosophies, and get to know, where to start from. Though finally, everyone has to know on its own.

In fact, even students of science, should use these for inputs to their studies and experiments, providing them a deeper insight to discoveries.

However, as philosophy also deals with the unobservables, the experiments go beyond the usual physical types. To be specific, they need to start with diving into the closest non-observable – the self – the soul.

   Send article as PDF   

The Foursome Kasaay

<< Previous Class

Today’s topic is something we have touched upon many times. So many times that I thought necessary to dedicate a day for it – the topic of the foursome kaṡāy – anger (क्रोध), ego (मान), deceit (माया), greed (लोभ). Interestingly, almost every philosophy says that these are the cause of the bondage, sufferings, etc. And if you reverse question as why are these four there. It would come back as because of the karm bondage we have.

“That looks like a vicious cycle. Kaṡāy because of bondage, and bondage because of kaṡāy”, interrupted Ātmā.

Yes, it is.

If it is a cycle, can we ever come out of it and be a free soul aka go to mokṡ.

Yes, sure. But for that, one needs to understand as how to break the cycle. The key is puruṡārth – one’s own effort.

Yes. We had talked about it under the drivers of our activities.

Correct. That is the only one which could break the cycle. Bondage would lead to kaṡāy, but with our conscious efforts, we can prevent them to further cause bondage – thus breaking the cycle.

How do we do that?

Simply by being equanimous in the situations of provocation of kaṡāy.

“That’s hell lot of effort”, exclaimed Yog.

Ya but that’s what is needed to break the cycle. In fact, it looks complex only at its face. There are ways to make it simple.

Tell us that.

The kaṡāy could be broken up into four stages, and then we may master its control to equanimity through these stages, one by one.

Are these four stages for all the four kaṡāy?

Yes. Thus, there becomes four x four = sixteen kaṡāy, but for the time being we’d consider it just as four stages, each with the four kaṡāy. The various insights into the four stages of kaṡāy is tabulated as follows (alongwith the various stages of soul purification):

Kaṡāy stage Guṅasthān Max period of the stage Next birth Avoid falling back to previous stage by effort of Forgiving
anantānubandhī (severest) 1, 3 Life long Hell Already at the lowest
apratyākhyān (severe) 2, 4 1 year Tiriyanch Forgive within 1 year
pratyākhyān (light) 5 1 month Human Forgive within 4 months
sanjwalan (lightest) 6-10 15 days Heaven Forgive within 15 days
Zero kaṡāy stage 11 < 48 minutes Heaven Not controllable by puruṡārth – would eventually fall back to previous stages
Zero kaṡāy stage 12-14 Permanent Mokṡ Not controllable by puruṡārth – would be maintained forever

“What I understand from the chart is that once we reach 12-14th stages of soul, we don’t need to put any efforts to be equanimous”, clarified Ātmā.

Yes – there you are already equanimous and it is self-sustaining – basically you have broken the cycle and are heading to permanent mokṡ.

That’s great. I think the last column in the chart is really something that gives us the direction to conquer our kaṡāy.

Yes. And other columns shall give you motivation.

Before we close for today, can you please provide some analogies for us to understand the four stages for each of the four kaṡāy? That way we could be more alert of our kaṡāy, so as to take some actions to conquer it.

Ya sure. In fact, I’ll quote the analogies from the philosophical text, itself:

Anger Ego Deceit Greed
(Strong as) (Stubborn as) (Twisted as) (Sticky as)
anantānubandhī Etching on a stone Stone pillar Bamboo roots Colour of silk
apratyākhyān Etching on hard land Bone pillar Sheep horns Colour of mud
pratyākhyān Etching on sand Wood pillar Pee-line of a walking ox Grease
sanjwalan Etching on water Vine pillar Stripping bamboo bark Colour of turmeric

Thanks. That looks cool.

Next Class >>

   Send article as PDF   

Stages of Soul Purification

<< Previous Class

Stages of soul purification will be our focus of discussion today.

“But, I have a question related to the previous session“, interrupted Ātmā.

Go ahead.

Once on the pathway to mokṡ, can we track ourself as to where are we on the pathway? Are we on the right direction, or the opposite direction?

Right question at the right time. Yes, we can track. And the various stages of soul purification could be the guide for the same. As such, there would be infinite stages of soul purification because of infinite gradations in soul purity. However, broadly they can be classified into fourteen guṅasthān.

What is guṅasthān?

Stage of purification. Under each, there could be infinite varieties. But they are classified into one because of some common characteristics.

What is the basis of classification?

As such there are 5 doorways of karm accumulation (āshrav), which obstructs the pathway to mokṡ. Depending on the level and number of doors being closed, the progress / purification stage of the soul is determined on the pathway to mokṡ.

What are the five āshrav?

They are wrong faith (मिथ्यात्व), wrong conduct (अव्रत), neglect of right conduct (प्रमाद), kaṡāy (कषाय) (foursome of anger, ego, deceit, greed), activity (योग) (threesome by mind, speech, body).

O! So even activity accumulates karm?

Yes. In fact, that is the key one, which leads to karm accumulation. It is just the addition of kaṡāy or no kaṡāy alongwith, which decides the badness or goodness of the accumulated karm. So, when all the 5 doors are open, it is the stage one – mithyādriṡṫi guṅasthān. When the faith is shaky in an undecided state of right and wrong, the soul is in the stage three – mishra guṅasthān.

“What about the second stage?”, asked Guṅasthān.

Don’t worry. We’ll come to that. When the faith is completely right, the soul is at the fourth stage – avirati samyak driṡṫi guṅasthān. So, in all stages four and above, the first door of wrong faith is closed. If partial right conduct is added, the soul gets into the fifth stage – desh virati guṅasthān, and with complete right conduct, it is in the sixth stage – pramatt sanyat guṅasthān. From sixth and onwards, the second door of wrong conduct is closed, but the neglect may still happen. The stage where even that third door is closed, takes the soul to stage seven – apramatt sanyat guṅasthān. And from there onwards it is the diminishing foursome kaṡāy which keeps the soul moving upwards to stages eight (nivritti bādar guṅasthān) and nine (anivritti bādar guṅasthān).

What is the difference between the eight and ninth stage?

Eighth is with diminished kaṡāy. Ninth is with so further diminished kaṡāy, that towards the end of it, only the last one greed (of the foursome) is left, and then the soul enters the stage ten (sūkṡm sanprāy guṅasthān) with a very minute greed. The next stage would be with zero kaṡāy, where even the fourth door is closed. But here comes an interesting twist in the tale. The diminishing kaṡāy could be diminishing in two ways: 1) By elimination, 2) By suppression. If it was due to suppression, the soul enters stage eleven (upshānt moh guṅasthān) with zero kaṡāy due to complete suppression. Otherwise it enters stage twelve (kshīṅ moh guṅasthān) with zero kaṡāy due to complete elimination of its causing karm – the perception hindering aka deluding (mohaniya) karm – one of the eight karm types.

But isn’t the stage eleven a danger zone? How long would the kaṡāy remain suppressed?

Yes, very rightly pointed out. It is a danger zone, because the soul can’t stay longer here, as the suppressed kaṡāy would erupt again within 48 minutes, meaning the soul would fall back to the lower stages.

Which lower stage would it go to?

It may go to starting from tenth till back to the first stage.

That’s really bad.

And it is for this falling soul which is heading towards the stage one, there comes a pre-stage two (sāswādan samyak driṡṫi guṅasthān), where only the taste of right faith remains.

O! This is the missing stage two.

Yes. It is better than one but worse than three, as from it the soul would definitely go to stage one. From stage three, the soul would have gone to either four or one.

So, it is always better to skip stage eleven and jump to stage twelve from the stage ten.

Yes indeed.

But how do we know, whether we are heading towards eleventh or twelfth?

May not be perfectly with the current level of knowledge. But you may get a feel of it. Say you are being bothered by someone to trigger one of your kaṡāy, say anger. Now, whatever that someone does, you don’t get angry. That’s really great, your soul is getting into the better stages. But did you not get angry by letting it go forever, or by ignoring for the time being. That decides the pathway to twelfth vs eleventh stage, respectively.

Okay. Isn’t then getting to the twelfth stage near impossible? I guess all of us would go to eleventh and fall back.

Even if you keep falling back in this birth, you should keep trying – so that you would have enough practice to get to the twelfth stage at least in your later births. And once the soul is in the stage twelve, there is no returning back – mokṡ is for sure, in that life (birth) itself. From stage twelve, it would get rid of three more hindering karm types (knowledge hindering (jyānāvaraṅiya), vision hindering (darshanāvarṅiya), power hindering (antarāy)), leading it to attain the stage thirteen (sayogī kewalī guṅasthān) – the state with the infinite kewal knowledge.

“What I understand from our discussions is that mohaniya karm has to be the first karm type to be completely gotten rid of”, clarified Karm.

Yes. Absolutely correct. And if it is gotten rid of, others would any way go away. And that’s why it is called the king of karm among the eight karm types.

And then, while attaining the kewal knowledge, three more karm types are removed.

Yes.

So, does that mean even in stage thirteen, there are still four more karm types associated with the soul?

Absolutely. And in fact, it is because of these only, the soul is able to continue its physical aka worldly existence till before its mokṡ.

What are these four more karm types?

Pain / Pleasure causing (vedaniya), Age deciding (āyuṡ), Body deciding (nām), Status deciding (gotra). And as you see, they are non-hindering to any of the soul attributes of knowledge, vision, perception, power. Moreover, they are the basic ones needed to live in this world.

So, mokṡ can’t be attained unless these are also gotten rid of, right?

Yes. And that is where the soul has to stop all its activities, closing the fifth door, to enter the stage fourteen (ayogī kewalī guṅasthān). With all doors closed for karm particle entry, no new karm particle gets attracted towards the soul. And the above four karm types also get disassociated from the soul, leading it to mokṡ, beyond all stages of purification – the ultimate purification.

Next Class >>

   Send article as PDF